
August 15, 2014 07:43 by
 Onit
Onit
In this article we will showed you how to configure Dynamic Website Activation.
One of the best feature in the latest IIS 8.5 is the “Dynamic Website Activation”. What so cool about this feature? When the IIS servicing large number of configured sites (100 or greater, by default) this feature let the IIS Service not activate any of the sites when the service started.

What is The Function?
When IIS servicing a large number of configure sites (default: 100 or greater), IIS will not activate any of the sites (all of them at once).
Why Using This Feature?
This Feature only available in the latest IIS 8.5 before this version IIS will automatically activates all configures websites at once. This will bring some trouble in the resources, and memory if it’s service the large number of sites.
How This Feature works?
If IIS 8.5 service in a large number of configured sites (default: 100 or greater), This service will not activate all of the sites at once, instead of activate them all at once IIS will activate each sites one by one (only when it receives the first request of the sites) and by using this technique could reduce the amount of system resources require by IIS.
How to Configure This Feature?
As I mention before, if there are less than 100 sites configured then IIS will activate all sites at starts up, but if there are 100 or more. Then it will activate each site as it is accessed the first time.
Step by Step
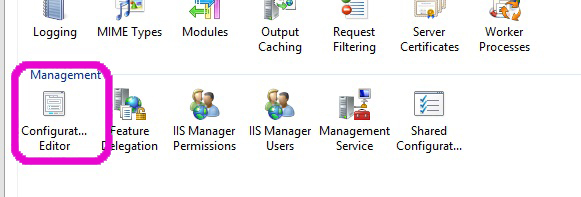
- Open IIS Manager
- Double Click Configuration Editor
- Select System.applicationHost/webLimits
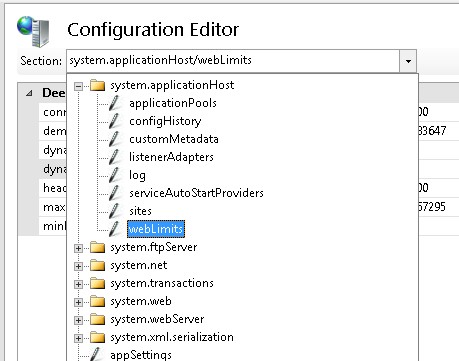
- Set the value of dynamicRegistration Threshold to the new Treshold Value ( the default is : 100)

- Restart IIS
August 6, 2014 08:25 by
Onit
Prerequisite
If you are using SSL on your IIS 8.5 (from 7.5 or greater) server for some time now; to get here you had to do a few things:
- You scrubbed your site content to ensure all URLs are using their relative form, e.g. “src=’//images\image.png” or explicitly reference the use of HTTPS.
- You have tested for certificate and SSL related problems like mixed content, appropriately tagging cookies as secure.
- You have ensured that you follow the best practices guidance for SSL server configuration and verified you get an A on SSLLabs.
there are a few things left for you to do, the most obvious being redirecting all traffic to the SSL version of your site! You should probably monitor your CPU usage during your peak so to ensure you have some headroom. This isn’t likely to be a problem as most web-servers are not CPU bound but it’s always good to check.

Once you know you are OK then it’s just a matter of deciding which approach to use, you have two choices:
- Dynamically rewriting via code in your ASPX pages
- Using the IIS URL Rewrite module
If you are familiar with the IIS configuration you’re probably asking yourself what about the “Require secure channel (SSL)” option in the IIS MMC? Unfortunately this doesn’t do redirecting it only requires the use of SSL on a given site/folder/file.
So how do you decide which approach to use? The answer to that question is dependent on both your environment and personal preference, but this time we will show how to do using the method two
IIS URL Rewrite Module
since in this article we will showed you to use the second choice, using the IIS URL Rewrite module, you can check the steps below
This approach has a number of benefits, for one having this module allows you to leverage remapping for other purposes also for example maintaining old links that have SEO value. From a security standpoint it’s also a good approach as it keeps this decision one of policy that is enforced in a central place.
To use the URL rewrite approach you will need to do the following:
- Install the URL Rewrite module (x86, x64).
- Add a rule to rewrite all HTTP URLs to HTTPS.
- Open your “web.config” with your favorite editor.
- Find the “configuration\system.webserver\rewrite\rules” section.
- Add the following text block:
<rule name=”Redirect to HTTPS” stopProcessing=”true”>
<match url=”(.*)” />
<conditions>
<add input=”{HTTPS}” pattern=”^OFF$” />
</conditions>
<action type=”Redirect” url=”https://{HTTP_HOST}/{R:1}” redirectType=”Permanent” />
</rule>
- Restart IIS
Now you can go to your website over HTTP and you will see you are redirected to the HTTPS instance of the site.