IIS 7.5 and IIS 8.0 European Hosting

BLOG about IIS 7.5 Hosting, IIS 8.0 Hosting and Its Technology - Dedicated to European Windows Hosting Customer

IIS 8.0 with Free ASP.NET Hosting - HostForLIFE.eu :: How to Install and Use URL Rewrite in IIS

clock June 3, 2015 06:57 by author Rebecca

In this post, I'm going to show you how to install and use IIS URL Rewrite. The IIS URL Rewrite module may be a better solution than HTTP Redirect in IIS. You can effectively “redirect” from http://domain.com to http://www.domain.com. Of course the URL rewrite has many more uses and features, but I will use it for redirection purposes in this tutorial.

IIS URL Rewrite Installation

To get the below URL Rewrite code to work in IIS, you must first install the URL Rewrite module. The URL Rewrite module is not installed by default. To install the IIS URL Rewrite module: Go Here and click install… Or just click Here. Once installed you may need to reboot.

IIS URL Rewrite after Installation

You can double click and make your URL rewrite rule using the interface, or edit the web.config. See below:

IIS URL Rewrite code in the web.config

IIS URL Rewrite http:// to http://www :

<!--web.config url rewrite-->
  <system.webServer>
      <rewrite>
          <rules>
              <rule name="RedirectToWWW" stopProcessing="true">
                  <match url=".*" ignoreCase="true" />
                  <conditions>
                      <add input="{HTTP_HOST}" pattern="^domain.com$" />
                  </conditions>
                  <action type="Redirect" url="http://www.domain.com/{R:0}" redirectType="Permanent" />
              </rule>
          </rules>
      </rewrite>
  </system.webServer>

Previous to IIS7 this was handled in:

<system.web>
</system.web>

The above code can be viewed in the URL rewrite module interface. It’s illustrated below. You may add or modify in either the web.config, or this interface. The main thing is to get it installed, and most likely reboot.

URL Rewrite Rules Interface in IIS

IIS redirect using URL Rewrite

Notice under the “Action” section in the above image there is a selection for “Action type”. Among other choices you can choose “Redirect.” Once selected there are then places for you to select “Redirect URL,” and “Redirect type,” such as “Permanent (301).”

IS 8.0 with Free ASP.NET Hosting
Try our IIS 8.0 with Free ASP.NET Hosting today and your account will be setup soon! You can also take advantage of our Windows & ASP.NET Hosting support with Unlimited Domain, Unlimited Bandwidth, Unlimited Disk Space, etc.


IIS 8.0 with Free ASP.NET Hosting - HostForLIFE.eu :: How to Install FTP Server in IIS 8 (Windows Server 2012)

clock May 27, 2015 06:32 by author Rebecca

The File Transfer Protocol (FTP) is a standard network protocol used to transfer computer files from one host to another host over a TCP-based network, such as the Internet. FTP is built on a client-server architecture and uses separate control and data connections between the client and the server. Internet Information Services (IIS, formerly Internet Information Server) is an extensible web server created by Microsoft for use with Windows NT family. IIS supports HTTP, HTTPS, FTP, FTPS, SMTP and NNTP. In this tutorial, I will show you how to install FTP Server in IIS 8 (Windows Server 2012).

Please follow these steps below:

Step 1

Open the Server Manager and click on Manage and select Add Roles and Features. Skip the Before you begin page by clicking on Next button. Then Select Role-based or feature based installation.


Select the server you wanted to install the FTP Server and click on Next.


Step 2

We must first install the Web Server (IIS) to enable the FTP Server feature and allow to add the pre-requisite to proceed to FTP Server installation.

Click on "Next" Button twice.

Step 3

When you are asked to select the role services to install for Web Server (IIS): Scroll down and make sure you have checked the FTP Server role, FTP Service and FTP Extensibility checkbox. Confirm the installation selections and click on Install. Then Click on close when the installation is done.


Step 4

It is now time to configure the newly installed FTP Server: Open your Server Manager and click on Tools then select Internet Information Services (IIS) Manager. You can click on Yes and disable the IE ESC to enable this feature or just click on No.

Step 5

In your Internet Information Services (IIS) Manager: Right click on you Sites and select Add FTP Site. Name your FTP Server and Select the content directory. In this screenshot, I made a folder name FTP-Files and click on OK.

Review the name and path then click on Next.

Check the Start FTP site automatically and the No SSL option and click on Next.


Step 6

This option depends on where you gonna use this FTP Server. In this example, I selected the basic authentication and specify the user who could access the FTP Server with Read and Write permission. Once you have decided on authentication and authorization information, Click on Finish.


Step 7

We are now done with the Installation and Setup of our FTP Server. Now its time to test it using your Internet Explorer. Open your Internet Explorer and type in: ftp://ipaddressofyourftpserver. Then Login and test if the authentication is working.


Hey, Its working!

Step 8

Now try to test using File Zilla or your favorite FTP application. Connect to your FTP Server and upload a test file (Remember to check if you have transferred the file successfully).

Step 9

Once everything is working. You might want to tweak some settings according to your FTP needs. Setup SSL, edit authentication and customize your FTP server. Just open the Internet Information Services (IIS) Manager to play around with the settings.

Hope this was able to help you setup your FTP Server in your Windows 20012 Server.

IIS 8.0 with Free ASP.NET Hosting
Try our IIS 8.0 with Free ASP.NET Hosting today and your account will be setup soon! You can also take advantage of our Windows & ASP.NET Hosting support with Unlimited Domain, Unlimited Bandwidth, Unlimited Disk Space, etc.


IIS 8.0 with Free ASP.NET Hosting - HostForLIFE.eu :: How to Set Up Redirector for SharePoint Sites in IIS 8

clock May 20, 2015 07:25 by author Rebecca

Today, I will explain to you how to set up redirector for SharePoint Sites in IIS 8. First, you need to install IIS 8 on your computer. You can check how to install IIS in this link. I used SharePoint Server 2013, IIS 8, and Windows Server 2012 to apply this tutorial.

Step 1

Most importantthing that you have to is to install HTTP Redirection component when installing IIS 8 to set-up redirector. You can click on Next to finish Installation. Let all the necessary components installed on.
If it requires a restart then do it.

Step 2

Click on Run and type Inetmgr to open the IIS manager console, you can see HTTP Redirect.

Step 3

Double click on this. You can see the HTTP Redirect console. In my example I am redirecting it to google.com and click Apply on the right hand side of the console.

Step 4

Now open you IE and type: http://localhost and hit enter and you will be redirected to google.com.

This is just an example, you can choose any URl based on your needs.

IIS 8.0 with Free ASP.NET Hosting
Try our IIS 8.0 with Free ASP.NET Hosting today and your account will be setup soon! You can also take advantage of our Windows & ASP.NET Hosting support with Unlimited Domain, Unlimited Bandwidth, Unlimited Disk Space, etc.


IIS 8.0 with Free ASP.NET Hosting - HostForLIFE.eu :: How to Load A File In The Browser Through The File Server

clock May 13, 2015 06:52 by author Rebecca

Today, i'm gonna explain to you the simple steps to load a file in the browser through the file server.

Just follow these steps:

Step 1

Using any web editor you like, create a file called index.html that resembles the page below using your name. Save it on the desktop.

Step 2

Using the mouse, double-click on the file that you have save in your desktop. Then page index.html is loaded into the browser via the file server.

Step 3

And the files that are rendered through the file server will have file:// in the Navigation window. Just remember, PHP files may not be rendered through the file server.

IIS 8.0 with Free ASP.NET Hosting
Try our IIS 8.0 with Free ASP.NET Hosting today and your account will be setup soon! You can also take advantage of our Windows & ASP.NET Hosting support with Unlimited Domain, Unlimited Bandwidth, Unlimited Disk Space, etc.


IIS 8.0 with Free ASP.NET Hosting - HostForLIFE.eu :: How to Add PHP to Default Document

clock May 6, 2015 06:13 by author Rebecca

Today, I will show you how to add your PHP to default document on IIS (Internet Information Manager).

You can follow this simple steps to add PHP to default document:

Step 1

Double-click on Default Document like below:

Step 2

Select the Change Permissions button. By default, there are 6 default document types. In the event that the directory contained a document called Default.htm and a document called default.aspx, all browsers will load page Default.htm because it is higher in the priority list, see below:

Step 3

Now, you can configure PHP. you would like index.php to have the highest default priority. Using the mouse, select the Add button which has seen above.

Step 4

Type index.php and then select/push the OK button.

Note that index.php has the highest priority.

That's all! Easy, right?

IIS 8.0 with Free ASP.NET Hosting
Try our IIS 8.0 with Free ASP.NET Hosting today and your account will be setup soon! You can also take advantage of our Windows & ASP.NET Hosting support with Unlimited Domain, Unlimited Bandwidth, Unlimited Disk Space, etc.


IIS 8.0 Hosting Belgium - HostForLIFE.eu :: Running HTML Documents Through The File Server

clock April 29, 2015 07:15 by author Rebecca

When you navigate a browser to a folder that contains one of the defined default documents, the default document will automatically load. However, how can you run HTML documents through the file server? Here are the steps to run your HTML documents through the file server on your computer.

Step 1

Using the mouse, double-click on iisstart.htm below:

Step 2

When a web page is run through the file server, file:// can be seen in a navigation bar (if visible).

Step 3

Files that are run through the file server, might be located anywhere on the drive.

That's all!

For your information, web files that contain a middleware language, such as PHP, ASP, JSP, etc. will not run correctly through the File Server and they must be run through the Web Server.

HostForLIFE.eu IIS 8.0 Hosting
HostForLIFE.eu is European Windows Hosting Provider which focuses on Windows Platform only. We deliver on-demand hosting solutions including Shared hosting, Reseller Hosting, Cloud Hosting, Dedicated Servers, and IT as a Service for companies of all sizes. We have customers from around the globe, spread across every continent. We serve the hosting needs of the business and professional, government and nonprofit, entertainment and personal use market segments.


IIS 8.0 with Free ASP.NET Hosting - HostForLIFE.eu :: Configuring Server Name Indication (SNI)

clock April 22, 2015 07:21 by author Rebecca

This article shows you how to install multiple SSL certificates for Server Name Indication using the Management Console on Windows 2012 Server. If you wish to install a single certificate on IIS 8, please refer to the IIS 8 SSL Installation Instructions. Or if you didn't generate a certificate request (CSR) yet, and didn't order a certificate, please see IIS 8 SSL Certificate Request Instructions.

Here are the steps how to install multiple SSL certificate on Microsoft IIS 8:

Step 1

Save the certificate you received to the desktop of your Windows 2012 Server.

Step 2

Open the IIS console by clicking Start, then opening Administrative Tools, then Internet Information Services (IIS) Manager.

Step 3

Click on your server's name in the left pane.

Step 4

In the center pane, double-click Server Certificates in the IIS section.
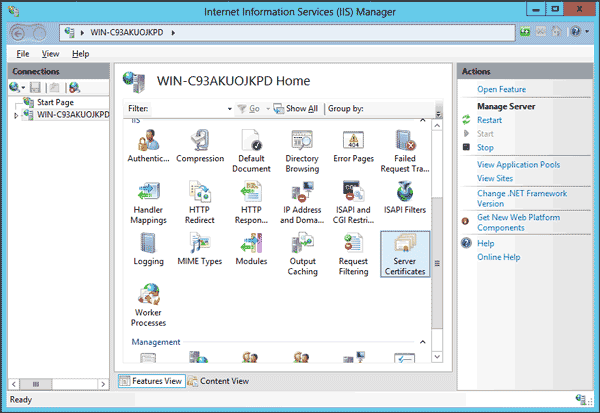
Step 5

In the Actions menu in the right pane, click on "Complete Certificate Request" to open the Complete Certificate Request Wizard.
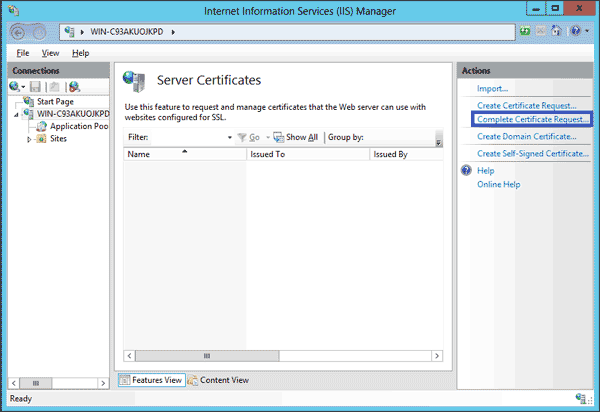
Step 6

Browse for the certificate file you just saved to your desktop. Enter a friendly name to identify the certificate with. This name will not be part of the certificate, but serves to identify the certificate for the server administrator. Use the same domain name you used when requesting your certificate. Select the Web Hosting certificate store. Click OK to store the certificate on the server.
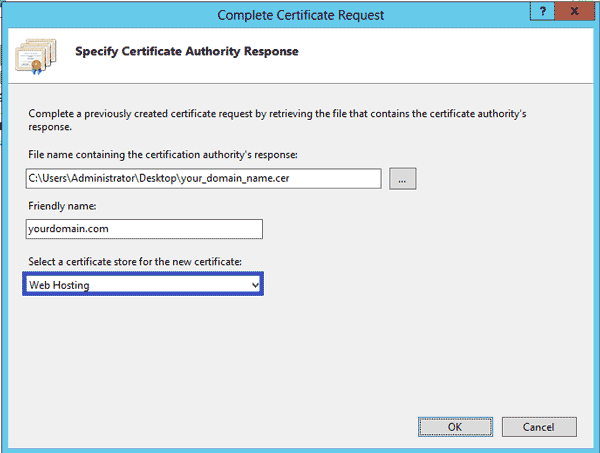
You may encounter a known issue on IIS 8 if you receive the message "Failed to remove the certificate". In that case, click Cancel to exit the dialog, and refresh the server certificates list by pressing F5. If your certificate appears in the list, it installed correctly. However, you may want to check that it was saved to the correct Web Hosting store. If your certificate doesn't appear, you will need to re-issue your certificate with a new CSR.

Step 7

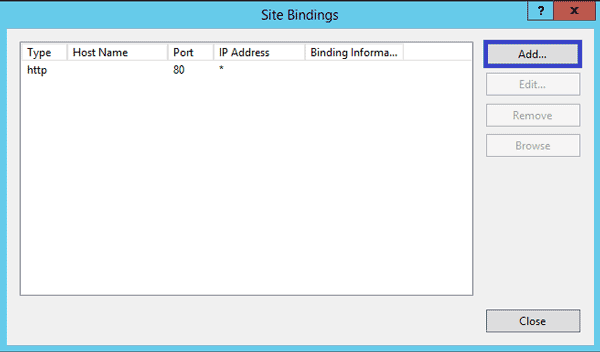
The certificate is now installed on the server, but must be assigned to a web site in IIS. Click on your server name in the left pane to browse the sites, and select the site you wish to assign the certificate to. In the Actions menu in the right pane, click "Bindings" to add a binding.
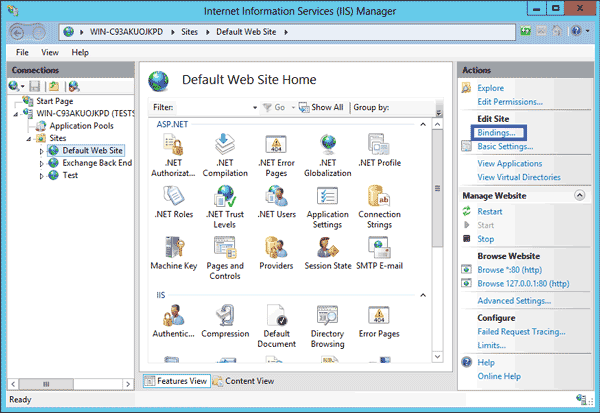
Step 8

In the Site Bindings window, click "Add" to open the Add Site Binding window.
Step 9

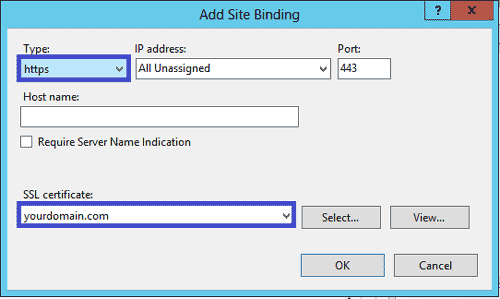
Select https as type. The IP address should be the one your website is listening on. Alternatively, you can leave the dropdown to All Unassigned. Leave the TCP port to 443, and select the correct certificate from the dropdown.
Step 10

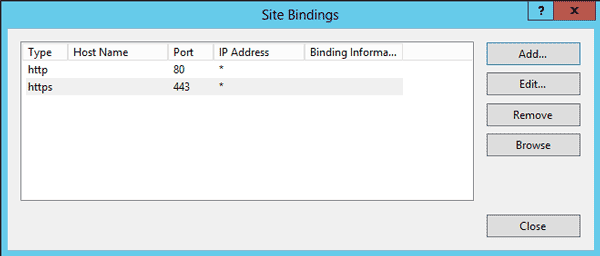
Your first SSL certificate is now installed, and the main website is ready to accept SSL connections.
Step 11

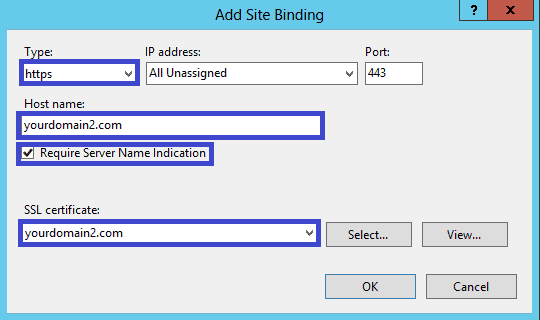
Repeat all previous steps for installing your second certificate, up to step 9. In the Add Site Binding window, you should now check the box Require Server Name Indication. This is not required for the first certificate, which is the server's main certificate, but it is for the second and any additional certificates installed.
Step 12

Repeat the steps above for your third and any additional certificates you wish to install.

IIS 8.0 with Free ASP.NET Hosting
Try our IIS 8.0 with Free ASP.NET Hosting today and your account will be setup soon! You can also take advantage of our Windows & ASP.NET Hosting support with Unlimited Domain, Unlimited Bandwidth, Unlimited Disk Space, etc. You will not be charged a cent for trying our service for the next 3 days. Once your trial period is complete, you decide whether you'd like to continue.


IIS 8.0 Hosting UK - HostForLIFE.eu :: Installing SSL Certificate

clock April 11, 2015 06:24 by author Rebecca

This article shows you how to install an SSL certificate, using the Management Console on Windows 2012 Server.

Here are the steps to install a single SSL certificate on Microsoft IIS 8:

1. Save the certificate you received to the desktop of your Windows 2012 Server.

2. Open the IIS console by clicking Start, then opening Administrative Tools, then Internet Information Services (IIS) Manager.

3. Click on your server's name in the left pane.

4. In the center pane, double-click Server Certificates in the IIS section.

5. In the Actions menu in the right pane, click on Complete Certificate Request... to open the Complete Certificate Request Wizard.

6. Browse for the certificate file you just saved to your desktop. Enter a friendly name to identify the certificate with. This name will not be part of the certificate, but serves to identify the certificate for the server administrator. Use the same domain name you used when requesting your certificate. Select the Personal certificate store. Click OK to store the certificate on the server.

7. The certificate is now installed on the server, but must be assigned to a web site in IIS. Click on your server name in the left pane to browse the sites, and select the site you wish to assign the certificate to. In the Actions menu in the right pane, click Bindings to add a binding.

8. In the Site Bindings window, click Add to open the Add Site Binding window.

9. Select https as type. The IP address should be the one your website is listening on. Alternatively, you can leave the dropdown to All Unassigned. Leave the TCP port to 443, and select the correct certificate from the dropdown.

10. The Site Bindings window should now correctly reflect the addition of the certificate, which is now ready to be used by your website. Congratulations!

HostForLIFE.eu IIS 8.0 Hosting
HostForLIFE.eu is European Windows Hosting Provider which focuses on Windows Platform only. We deliver on-demand hosting solutions including Shared hosting, Reseller Hosting, Cloud Hosting, Dedicated Servers, and IT as a Service for companies of all sizes. We have customers from around the globe, spread across every continent. We serve the hosting needs of the business and professional, government and nonprofit, entertainment and personal use market segments.


IIS 8.0 Hosting France - HostForLIFE.eu :: How to Configure IIS to PHP Server

clock April 6, 2015 09:59 by author Rebecca

In this tutorial, I will show you how to install PHP and configure IIS to PHP Webpages Server. PHP is a widely used general-purpose scripting language that is especially suited for Web development and can be embedded into HTML. This guide is recommended for IIS 8.0.


Follow this step to configure IIS to PHP Server:

1. You must download PHP for Windows 

Click here to download

2.  Extract the downloaded zip ( C:php )

3.  Download PHP manager for IIS ( it's an extension  for managing PHP from IIS control panel)

Click here to download

These are the some features of PHP Manager:

  1.     Register PHP with IIS
  2.     Validate and properly configure existing PHP installations
  3.     Run multiple PHP versions side by side on the same server and even within the same web site
  4.     Check PHP runtime configuration and environment (output of phpinfo() function)
  5.     Configure various PHP settings
  6.     Enable or disable PHP extensions
  7.     Remotely manage PHP configuration in php.ini file.
  8.     Easily install, configure, and manage troubleshoot in one or many PHP versions on the same IIS server.

4. Open PHP manager and click on "register new php installation"

5. Choose "php-cgi.exe" then click OK

6. Now, check phpinfo and choose "error reporting"

7. Testing Time: open your favorite code editor and type

For example:

<?php echo "Hello World !" ; ?>

Save this as hello.php ( or anything ) on c:inetpubwwwroot and open http://localhost/hello.php

Then you'll get an output like the picture below:

HostForLIFE.eu IIS 8.0 Hosting
HostForLIFE.eu is European Windows Hosting Provider which focuses on Windows Platform only. We deliver on-demand hosting solutions including Shared hosting, Reseller Hosting, Cloud Hosting, Dedicated Servers, and IT as a Service for companies of all sizes. We have customers from around the globe, spread across every continent. We serve the hosting needs of the business and professional, government and nonprofit, entertainment and personal use market segments.


About HostForLIFE.eu

HostForLIFE.eu is European Windows Hosting Provider which focuses on Windows Platform only. We deliver on-demand hosting solutions including Shared hosting, Reseller Hosting, Cloud Hosting, Dedicated Servers, and IT as a Service for companies of all sizes.

We have offered the latest Windows 2016 Hosting, ASP.NET Core 2.2.1 Hosting, ASP.NET MVC 6 Hosting and SQL 2017 Hosting.


Tag cloud

Sign in