IIS 7.5 and IIS 8.0 European Hosting

BLOG about IIS 7.5 Hosting, IIS 8.0 Hosting and Its Technology - Dedicated to European Windows Hosting Customer

IIS 7.5 Hosting UK - HostForLIFE.eu :: How to Enable HTTPS on IIS ?

clock January 27, 2015 07:35 by author Peter

First, you may have to be compelled to purchase a 2048-bit SSL certificate(s) and configure IIS. you'll got to purchase a multi-domain or wildcard certificate based mostly upon your wants. There are free certificates obtainable for bloggers and non-commercial organizations.

Create certificate request file
First we want to create a certificate request file. Once making the certificate request, we'll copy/paste the contents of the certificate request file into the SSL provider web site. Once their verification we'll be ready to download the resulting SSL certificate files.

Create Certificate Request
On the primary screen of the wizard you may have to be compelled to give the details for your organization. The important part is to specify the Common name as your fully qualified domain name (FQDN) — together with appropriate subdomain. Here i'm simply using “www.example.com”.

Next, make certain to specify the bit length of your certificate to 2048. supported todays standards, this is often the length to decide on. Any shorter isn't secure enough, and any further isn't necessary and can produce unnecessary cpu cycles on your server.

The next step is to specify the file name for the certificate request file. I store all of my SSL certificates and associated files in folder on the C drive: C:\ssl. Then, merely click the finish button.

We will currently open up the resulting .txt file and copy and paste the contents into the SSL provider’s web site. however and wherever you do this can rely on the SSL provider you selected.

Install certificate in IIS
Once you have got completed the certificate signing request, your SSL supplier can notify you once the SSL certificate is prepared and accessible for you to transfer. After downloading the SSL certificate file (csr), complete the certificate request in IIS.

To complete the certificate request, choose the SSL certificate file (crt) and enter the Friendly name. The friendly name is for you to understand that SSL certificate is that in IIS. For best practices, I continuously name these to match the absolutely qualified domain name.

Add HTTPS Binding
The last step is to bind our web site in IIS to the HTTPS port (443). Note that the common name (FQDN) for the certificate should match the host name for the location that you just are configuring.  To get started right click on the site in IIS and choose Edit Bindings.

Then click the Add… button to add a replacement binding. we'll choose https because the kind, the suitable IP address on the server to bind the web site to, then choose the SSL certificate file and click on OK. you're now serving the web site using HTTPS. move and open your browser and enter the full domain with the https:// protocol specification to look at the location a new HTTPS.

HostForLIFE.eu IIS 7.5 Hosting
HostForLIFE.eu is European Windows Hosting Provider which focuses on Windows Platform only. We deliver on-demand hosting solutions including Shared hosting, Reseller Hosting, Cloud Hosting, Dedicated Servers, and IT as a Service for companies of all sizes. We have customers from around the globe, spread across every continent. We serve the hosting needs of the business and professional, government and nonprofit, entertainment and personal use market segments.


IIS 7.5 Hosting UK - HostForLIFE.eu :: How to Fix NetworkService Account Not GZIPing IIS Responses ?

clock January 14, 2015 06:43 by author Peter

After following several posts and tutorials on properly fixing IIS dynamic compression for JSON responses, i used to be still reaching a dead finish. For no matter reason, my responses were still uncompressed. Apparently, using the NetworkService account doesn’t perpetually play nicely with static or dynamic content compression.

The NetworkService account doesn’t have permission to the IIS Temporary Compressed Files folder, preventing it from writing and reading out compressed streams. The best thanks to get around this can be by adding the NetworkService account to the IIS_IUSRS group (which already has permissions to the IIS temporary folder).

1. First step, Open the local Users and groups management console.

2. Next, Select Groups from the sidebar.

3. Now, open the IIS_IUSRS property window.

4. Click Add, then enter Network Service as the user. Make sure to have your nearby workstation as the area, then Check Names to make certain you entered everything effectively. Click OK.

5. Next, Click OK on the IIS_IUSRS property window.

6. Close the Local Users and Groups management console
7. Restart IIS

Dynamic compression should be working now!


IIS 7.5 Hosting UK - HostForLIFE.eu :: How to Upload Large File on IIS ?

clock December 16, 2014 08:32 by author Peter

By default, IIS can not upload large file size to the web server. For IIS 6 and IIS 7, the default maximum file size for upload is 4 MB and 28.6 MB respectively. IIS 7 will throw a 404 error (HTTP Error 404.13 - CONTENT_LENGTH_TOO_LARGE) if user upload file larger than 30MB. In order to allow for larger file size uploads, a few server changes are required.  You have three steps to increase the file upload limit:

1. Modify the maxAllowedContentLength setting in the web.config
You could increase the max file size by modify the maxAllowedContentLength setting in the web.config file:
<system.webServer>
  <security>
    <requestFiltering>
      <requestLimits maxAllowedContentLength="2147483648" />
    </requestFiltering>
  </security>
</system.webServer>


With that maxAllowedContentLength, users can upload files that are 2 GB in size. This setting will work right away without restart IIS services.

2. Edit the request filtering feature settings and therefore the request limits using IIS manager

  • Open IIS Manager.
  • Choose the web site that you simply wish to configure.
  • Check that you're in features view per the button at the lowest of the manager.
  • Choose Requests Filtering and open it by double-clicking the icon. The Request Filtering pane displays.
  • From the Actions pane on the right hand side of the screen click Edit Feature Settings... link. The Edit Request Filtering Settings window displays.
  • In the Request Limits section, enter the appropriate maximum allowed content length (Bytes) then click the OK button.
  • Next, Restart IIS.

3. Manually edit the ApplicationHost.config file

  • Click start. In the start Search box, type notepad. Right-click notepad, and so click Run as administrator.
  • On the File menu, click Open. within the File name box, type %windir%\system32\inetsrv\config\applicationhost.config, and so open.
  • Within the ApplicationHost.config file, find the  node.
  • Take away the maxAllowedContentLength property. Or, add a value that matches the scale of the Content-Length header that the client sends as a part of the request. By default, the worth of the maxAllowedContentLength property is 30000000.
    For instance, modify the subsequent configuration information within the  section.

    <requestLimits maxAllowedContentLength ="<length>" />

  • Finally, Save the ApplicationHost.config file.


IIS 7.5 Hosting with Paris (France) Server - HostForLIFE.eu :: How to work with IIS Metabase and DirectoryServices ?

clock November 12, 2014 10:31 by author Peter

While operating with the IIS we all prefer to understand the settings done on the Virtual Directory are correct or not. therefore we are planning to see a way to do this programmatically. To check some properties of the IIS (Virtual Directory) of web based application after  install, one will create custom application for that. There are list of IIS Properties that we will get once post installation. The list of properties exposed by the IIS API or net Settings Property is mentioned below:


  • AuthFlags
  • Path
  • AppFriendlyName
  • EnableDirBrowsing
  • AccessRead
  • AccessExecute
  • AccessWrite
  • AccessScript
  • AuthNTLM
  • EnableDefaultDoc
  • DefaultDoc
  • AspEnableParentPaths

The top of settings are designed within the Metabase of the IIS.

IIS Metabase:
IIS Metabase may be a structure wherever IIS configuration settings are stored. You'll be able to navigate through the IIS Metabase using MetaEdit or Metabase explorer. The Metabase is predicated on a hierarchical  style with inheritance. Every object within the metabase has a KeyType. The KeyType property specifies the type of metabase key.
.NET provides the namespace that is used to induce the properties of the IIS Virtual Directory. .Net have the "System.DirectoryServices" namespace that exposes the DirectoryEntry class.

Code:
WebSettings.cs

public class WebSettings
{
     //Authentication Bitmask Values
     //Constant Value Description
     public const int MD_AUTH_ANONYMOUS = 0x00000001;
     //Anonymous authentication available.
     public const int MD_AUTH_BASIC = 0x00000002;
     //Basic authentication available.
     public const int MD_AUTH_NT = 0x00000004;

     //Windows authentication schemes available.
     string Auth_Type;
     public string calc(int AuthValue)
     {
         if (AuthValue == MD_AUTH_ANONYMOUS)
          {
               Auth_Type = "ANONYMOUS ACCESS ENABLED";
          }
          if (AuthValue == MD_AUTH_BASIC)
          {
               Auth_Type = "BASIC ACCESS ENABLED";
          }
          if (AuthValue == MD_AUTH_NT)
          {
               Auth_Type = "INTEGRATED WINDOWS ACCESS ENABLED";
         }
          if (AuthValue == (MD_AUTH_ANONYMOUS + MD_AUTH_NT))
          {
               Auth_Type = "INTEGRATED WINDOWS + ANONYMOUS ACCESS ENABLED";
          }
          if (AuthValue == (MD_AUTH_ANONYMOUS + MD_AUTH_BASIC))
         {
              Auth_Type="BASIC + ANONYMOUS";
         }
         if (AuthValue == (MD_AUTH_ANONYMOUS + MD_AUTH_NT))
         {
              Auth_Type = "INTEGRATED + ANONYMOUS";
         }
         if (AuthValue == (MD_AUTH_BASIC + MD_AUTH_NT))
         {
             Auth_Type = "BASIC + INTEGRATED";
        }
         if (AuthValue == (MD_AUTH_ANONYMOUS + MD_AUTH_BASIC + MD_AUTH_NT))
         {
             Auth_Type = "ANONYMOUS + BASIC + INTEGRATED";
         }
          return Auth_Type;
     }

Main.cs

string serverName;
string vDir;

serverName = System.Environment.MachineName;
vDir = "DirectoryName";
vdir = new DirectoryEntry("IIS://" + serverName + "/W3SVC/1/ROOT/" + vDir);
wbs = new WebSettings();
string[] sComp = new string[12];
sComp[0] = "AuthFlags";
sComp[1] = "Path";
sComp[2] = "AppFriendlyName";
sComp[3] ="EnableDirBrowsing";
sComp[4] ="AccessRead";
sComp[5] ="AccessExecute";
sComp[6] ="AccessWrite";
sComp[7] ="AccessScript";
sComp[8] ="AuthNTLM";
sComp[9] ="EnableDefaultDoc";
sComp[10] ="DefaultDoc";
sComp[11] ="AspEnableParentPaths";
ListViewItem[] listViewItem = new ListViewItem[12];
lstIISProperty.Items.Clear();
for (int i = 0; i < sComp.Length; i++)
{
    //lstComponents.MultiColumn = 2;
    lstIISProperty.Sorting = SortOrder.Ascending;
    if (sComp[i] != null)
    {
    listViewItem[i] = new ListViewItem(new string[]{ sComp[i], IISPropertyValue(sCompi]), fnExpected_Value(sComp[i])}, -1);
    lstIISProperty.Items.Add(listViewItem[i]);
    }
}


European IIS 7 Hosting - HostForLIFE.eu :: How to Easily Create Multiple 301 Redirects with a URL Rewrite Map

clock November 6, 2014 08:33 by author Frank

Redesigning a website or creating a new version of an existing web page is a common task for web developers and webmasters. If you have an established web site with good search engine traffic it’s critical to be able to redirect that search traffic from the old pages to the new pages even if the name of the page or the page location changes. Even if that content is great and plenty of people have linked to your page/s, all your hard work won’t matter if search engines like Google are unaware of the new location or people are trying to link to the old, non-existent, page location.

The way to properly communicate these changes to search engines is to use a 301 Redirect which tells search engines the new permanent location of the content.

Using 301 redirects used to be a manual process where you had to place code in the old page using Javascript in the page body or add a special metatag like this:

<meta http-equiv=”refresh” content=”0;url=http://www.domain.com/newpage.html”>

As you can imagine, this can be a tedious and time consuming task if you have several of pages to update. One additional downside to the old manual redirects option is performance. The old page still has to be accessed in order for the redirection to take effect.

URL Rewrite Module with IIS7

Now there’s an easier solution, and one that offers better performance.  Starting with IIS 7 one can implement different kinds of url rewriting and redirecting with ease by using the URL Rewrite Module. The various rules can be configured using the IIS 7 Manager GUI or by directly editing the web.config. To open the URL Rewrite Module simply double click the URL Rewrite icon on your site properties as shown below.


From there you will be able to maintain your existing rules or add new ones as seen in this picture.


This is a pretty easy way to create server-side rules for rewriting and redirecting, but what happens when you have 30 or 40 legacy URLs that need to be redirected to new pages? Do you have to enter each one manually? Of course not. The solution to that is to use a URL Rewrite Map.

URL Rewrite MAP

By using a URL Rewrite Map it has never been easier to create and maintain multiple 301 redirects for different pages on your web site.  The rewrite rules are stored in the <system.webServer> section of your web.config so you can quickly make changes as needed.

Here is all the code you need to accomplish this:

<system.webServer>
  <rewrite>
<rewriteMaps>
  <rewriteMap name=”Redirects”>
<add key=”/test.aspx” value=”/test2.aspx” />
<add key=”/aboutus.aspx” value=”/about” />
  </rewriteMap>
</rewriteMaps>
  <rules>
<rule name=”Redirect rule1 for Redirects”>
  <match url=”.*” />
  <conditions>
<add input=”{Redirects:{REQUEST_URI}}” pattern=”(.+)” />
  </conditions>
  <action type=”Redirect” url=”{C:1}” appendQueryString=”false” />
</rule>
  </rules>
</rewrite>
</system.webServer>

In the example above I’m performing a 301 redirect on the test.aspx file to test2.aspx file. There’s also a 301 redirect for the aboutus.aspx file to folder called /about, however, in this case it’s important to note that the /about folder will also need a default page or else a 404 error will result.

As you add more URLs to your Rewrite Map you’ll notice that your web.config can become a bit cluttered. The solution to this will be to store the redirect rules in an external file. Let’s call this file myrewritemaps.config. This file will now contain this code block:

<rewriteMaps>
  <rewriteMap name=”Redirects”>
<add key=”/test.aspx” value=”/test2.aspx” />
<add key=”/aboutus.aspx” value=”/about” />
  </rewriteMap>
 </rewriteMaps>

In your web.config you add the following line of code under the <rewrite> section referencing the external config file:

<rewriteMaps configSource=”myrewritemaps.config” />

Your web.config will now look nice and clean like this:

<system.webServer>
  <rewrite>
<rewriteMaps configSource=”myrewritemaps.config” />  
<rules>
  <rule name=”Redirect rule1 for Redirects”>
<match url=”.*” />
<conditions>
  <add input=”{Redirects:{REQUEST_URI}}” pattern=”(.+)” />
</conditions>
<action type=”Redirect” url=”{C:1}” appendQueryString=”false” />
  </rule>
</rules>  

  </rewrite>
</system.webServer>

Here is a 3rd party site which offers a free test to ensure your 301 redirect rules are working:

http://www.ragepank.com/redirect-check/

There is no real limit on how many URLs can be configured for redirecting with the URL Rewrite Map.  You should perform regular search engine analysis to see when the new URLs have been picked up. Once the old URL is no longer indexed and traffic has dropped off you could remove it from your map.


IIS 7.5 Hosting - HostForLIFE.eu :: Application Pool Idle Time-out Settings on IIS

clock October 23, 2014 09:48 by author Peter

Whether you host in-house or with a managed Windows hosting provider, if you self-administer a web server it's sensible to understand that by default IIS 7.5 sets application pools to “time-out” when twenty minutes of inactivity. therefore if you don’t have a visitor to your website within twenty minutes the application pool can shut down those system resources. Then the next time a request comes into the site IIS7 can automatically restart the application pool and serve the requested pages.

This is an excellent way to preserve resources since each running application pool will place a certain quantity of overhead on the system. But, it conjointly implies that the primary request – the one that causes the application pool to restart – is incredibly slow. it's slow as a result of the method literally must begin, then load the desired assemblies (like .NET) then load the requested pages. betting on the size and complexity of your application, this would possibly simply be a couple of seconds or it'd take 30+ seconds (during which time a user would possible quit and move on to a different site).

If you wish to increase the length of the time-out setting, simply change it from the default of twenty to however several minutes you wish. you can also modify the setting to zero (zero) which effectively disables the timeout so the application pool can never shut down due to being idle.

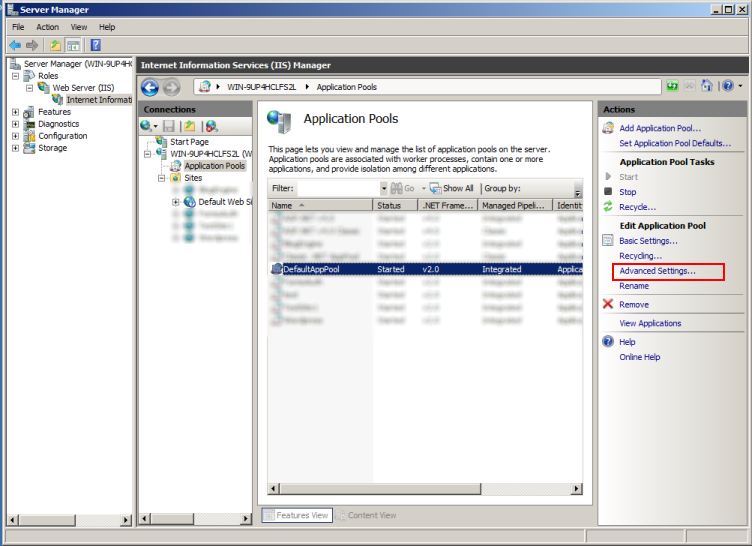
To make this change, open Server Manager; Expand the Roles node; Expand the web Server (IIS) node. Then click on the web Server (IIS) node; Expand the node along with your local server name; and click on the application Pools icon. You’ll then see a list of the application pools that are defined on your server. within the right-hand pane you’ll see an option for Advanced Settings -> click that.

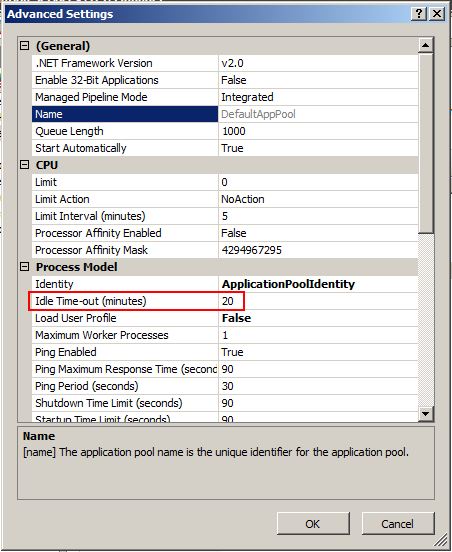
Once you see the Advanced Settings dialog box simply look for the Idle Time-out (minutes) property; click wherever the default “20″ is, and change it to no matter value you prefer.

This is only 1 of the many settings that may impact the performance, uptime, and functioning of your web site. If you don’t have the time or interest in learning and maintaining the various settings for a secure high-performing web server, you would possibly need to consider a totally managed windows hosting solution and let a trained and experienced administrator take care of the work for you.


About HostForLIFE.eu

HostForLIFE.eu is European Windows Hosting Provider which focuses on Windows Platform only. We deliver on-demand hosting solutions including Shared hosting, Reseller Hosting, Cloud Hosting, Dedicated Servers, and IT as a Service for companies of all sizes.

We have offered the latest Windows 2016 Hosting, ASP.NET Core 2.2.1 Hosting, ASP.NET MVC 6 Hosting and SQL 2017 Hosting.


Tag cloud

Sign in