IIS provides a new command-line tool, AppCmd.exe, to configure and query objects on your Web server, and to return output in text or XML. In this article, I will explain how to perform common IIS administrative tasks such as creating new sites, stopping/starting services, and viewing status of the site.

AppCmd.exe allows you to perform just about all the typical management functions you would want to perform using the CLI instead of the GUI. For example, here are some of the things that AppCmd.exe can do:
- Start and stop IIS web sites
- Create IIS websites, applications, application pools, and virtual directories
- Show running IIS processes and list currently executing requests
- Import, export, and search IIS ASP.NET configurations
Five ways that you can use AppCmd.exe to make your IIS website administration easier:
Sure, you can do just about everything in the IIS management MMC (GUI) that you can do with AppCmd.exe at the command line but GUI interfaces also have their disadvantages. To name a few, with a GUI you cannot do repetitive tasks quickly (like with a Windows Desktop Shortcut) nor can you use output from one AppCmd.exe output and send it to an AppCmd Action. Here are 5 ways that using AppCmd.exe can make your IIS website administration easier:
1. Start and Stop IIS websites from the command line
This is actually very simple. If you don’t know the name of your sites, just do:
Appcmd list sites

Now that you know what sites you have, you can start and stop your IIS web sites like this:
Appcmd start sites “Default Web Site” (or whatever site you want to start)

2. Add a new website
Adding a new website is easy. Just use:
Appcmd add sites /name:”Dave’s Site” /id:12 /bindings:http://mysite.com:80
Like this:

While this may add a new website, that website may not be as complete as a site added in the GUI unless all command options are added then an application is added for it. To get a more fully functioning IIS site, use the following two commands:
AppCmd add site /name:ddsite /id:99 /bindings:http/*:81: /physicalPath:C:\ddsite
AppCmd add app /site.name:DDSite /path:/ddapp /physicalPath:C:\sites\ddsite
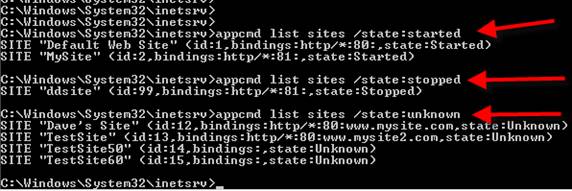
3. Listing objects that meet certain information
Using the list command is easy. I showed you how to list our websites running on the server in #1, above. Notice in the output how you can see that the sites are running or not (the sites state). You can also list all objects (like sites) that meet certain criteria. For example, this command lists all sites that are stopped. Here is an example:
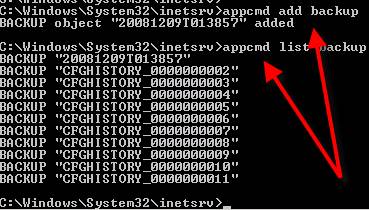
4. Backing up you IIS configuration
AppCmd.exe can backup your IIS configuration using the add backup command. You can also list your commands with the list backup command the and the restore backup can put your backup data back where it needs to go with the restore backup command.
Below, you see me backing up my IIS configuration then listing out what backups were available after that.
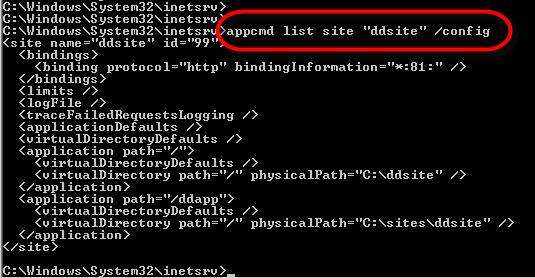
5. Report on IIS configurations
AppCmd has the power to report on your IIS configurations and export that configuration to a text file. To do this, just run:
Appcmd list site “sitename” /config
Here is what the output looks like:
IIS 8.0 with Free ASP.NET Hosting
Try our IIS 8.0 with Free ASP.NET Hosting today and your account will be setup soon! You can also take advantage of our Windows & ASP.NET Hosting support with Unlimited Domain, Unlimited Bandwidth, Unlimited Disk Space, etc.
