
May 24, 2019 11:48 by
 Peter
PeterWhile publishing Web API using Visual Studio, you may run into some errors. This article helps to provide the solution to the possible errors that will occur. When you publish the Web API from Visual Studio, the following error may possibly come up.
Output class library not set error while hosting web API
OutputPath property is not set for project 'Company.Directory.Web.csproj'. Please check to make sure that you have specified a valid combination of Configuration and Platform for this project. Configuration=Release Platform='AnyCPU'. You may be seeing this message because you are trying to build a project without a solution file, and have specified a non-default Configuration or Platform that doesn't exist for this project.
Solution
When you try to publish for the first time, one of the reasons for the above error to pop up is due to the incorrect settings in .csproj.user file of the solution.
Open the .csproj.user file in the solution and change the settings in the file.
Add the following code in the file.
<PropertyGroup Condition=" '$(Configuration)|$(Platform)' == 'Debug|AnyCPU' ">
<DebugSymbols>true</DebugSymbols>
<DebugType>full</DebugType>
<Optimize>false</Optimize>
<OutputPath>bin\</OutputPath>
<DefineConstants>DEBUG;TRACE</DefineConstants>
<ErrorReport>prompt</ErrorReport>
<WarningLevel>4</WarningLevel>
</PropertyGroup>
<PropertyGroup Condition=" '$(Configuration)|$(Platform)' == 'Release|AnyCPU' ">
<DebugType>pdbonly</DebugType>
<Optimize>true</Optimize>
<OutputPath>bin\</OutputPath>
<DefineConstants>TRACE</DefineConstants>
<ErrorReport>prompt</ErrorReport>
<WarningLevel>4</WarningLevel>
</PropertyGroup>
<PropertyGroup Condition="'$(Configuration)|$(Platform)' == 'Dev|AnyCPU'">
<DebugSymbols>true</DebugSymbols>
<OutputPath>bin\</OutputPath>
<DefineConstants>DEBUG;TRACE</DefineConstants>
<DebugType>full</DebugType>
<PlatformTarget>AnyCPU</PlatformTarget>
<ErrorReport>prompt</ErrorReport>
<CodeAnalysisIgnoreBuiltInRuleSets>false</CodeAnalysisIgnoreBuiltInRuleSets>
<CodeAnalysisIgnoreBuiltInRules>false</CodeAnalysisIgnoreBuiltInRules>
<DeployIisAppPath>Port 80/directory/dev</DeployIisAppPath>
</PropertyGroup>
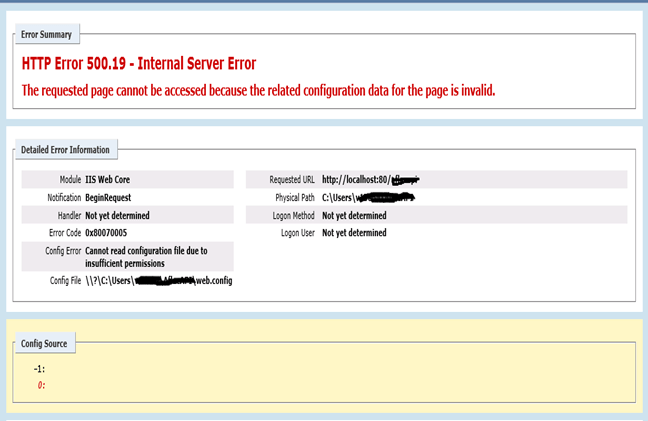
Solution to 500.19 internal server error while hosting Web API
Solution
The above error will pop up when you do not have the permission to access the folder/web.config file.
- In Windows Explorer, locate the web.config file that is associated with the Web site.
- Right-click the web.config file
- Click Properties.
- Click the Security tab, and then click Edit.
- Click Add.
- In the Enter the object names to select box, IUSR, click Check Names, and then click OK.
- Click to select the Read check box, and then click OK.
- In the Web.config Properties dialog box, click OK.
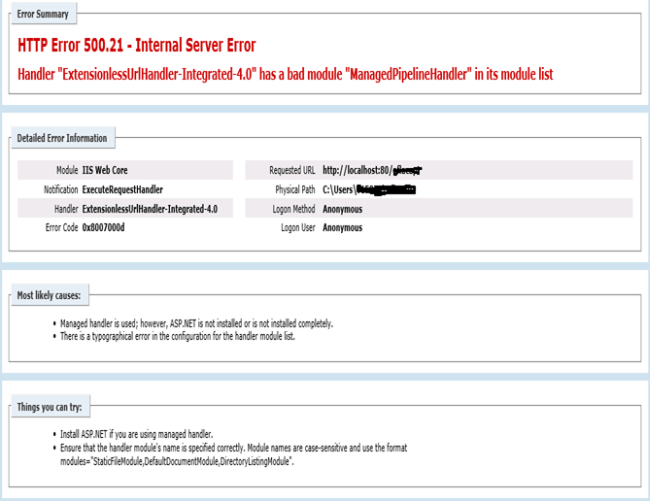
Solution to 500.21 internal server error while hosting Web API
Solution
One of the reasons for the error 500.21 Internal Server Error to pop up, is when ASP.NET is not installed completely in your system.
Run the command prompt as administrator.
Type the line in the command prompt below any one.
%windir%\Microsoft.NET\Framework\v4.0.30319\aspnet_regiis.exe -i
or
%windir%\Microsoft.NET\Framework64\v4.0.30319\aspnet_regiis.exe -I
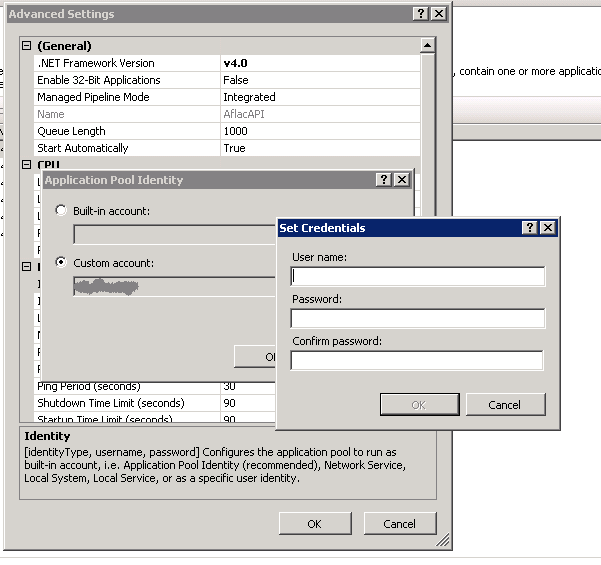
Solution to login for application pool access error is denied while hosting Web API
Solution
Create the application pool in IIS by selecting the .NET version which your project supports. When creating the site in the default application in IIS for Web API, select the application pool which you have created. The above error will pop up if the application pool which you have created has a built in account selected.
For reference - go to: "Advanced Setting->Process->Identity” of the application pool which you have created. Change the application pool identity to custom account and click on set button to provide the account credentials. Once you have set the setting, refresh/reset IIS to resolve the above error.
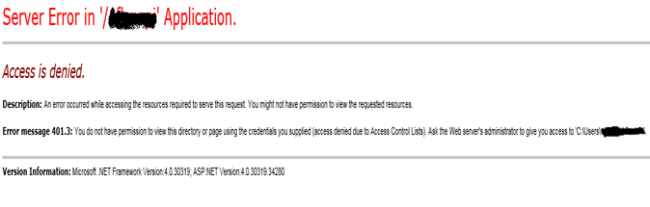
Access Denied Error while hosting Web API
Solution
The above error will pop up if the solution directory (folder) doesn’t have required permissions.
To resolve the issue follow the steps given in “500.19 : internal server error”.

January 18, 2019 10:07 by
PeterIn a few Web sites, if we type the Web site name, (like www.someurl.com) it will automatically load the page www.someurl.com/index.aspx. This is because of the setting of the “Default Document” feature of IIS. In this post we are going to discuss this feature of IIS.
- Open IIS, type the command “inetmgr” in Run window.
- Select “Default Document” and click.
- In the feature view, we can see some type of Document orderly kept.
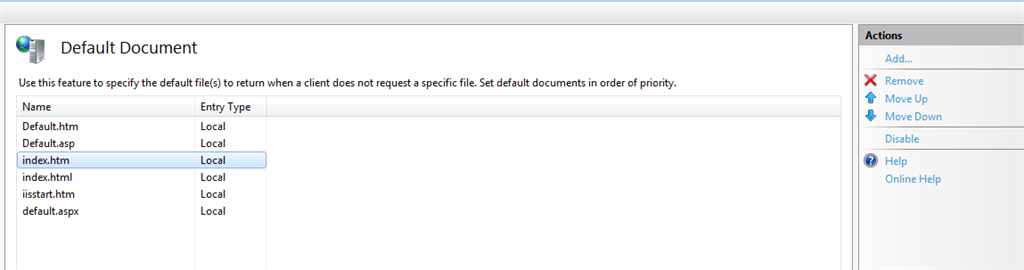
- The top most had the highest priority and the last one had the least priority.
As per the above figure, the document “Default.htm” had the highest priority and the file “Default.aspx” had the lowest priority. This means whenever the user types a url (like www.someurl.com), then IIS looks for any one of the files that exist in the above order on that Virtual Directory. If it finds any one of the files, it will load that page.
IIS also allows, adds/removes the custom default document per Web site. For example, if we specify a page (say home.htm) as the default document which does not exist in the website, then IIS will look into that website and alert the user as shown below, which explicitly states that each time we type the url, IIS will look in that order.
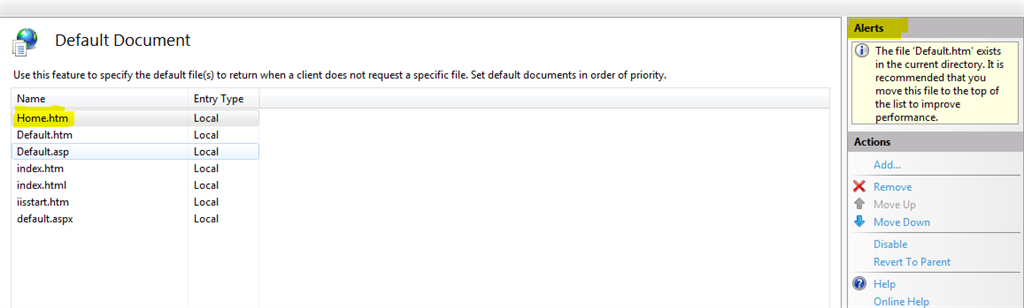
As per the alert, it is advisable to move the default document at the top level, which will increase the performance in the sense IIS can avoid going further down in the list.
December 20, 2018 10:44 by
Peter
We have many clients ask about how to redirect non-www to www URLs. We believe this is important factor in SEO as search engines consider http://www.domain.com and http://domain.com are different websites. As a result, if your website has been linked to from other websites using a mix of the two URLs you are effectively splitting the potential benefit of valuable link popularity.

Workaround
Using a 301 redirect on the “non-www” version of the URL, which is essentially a “permanent” redirect in server talk, you can effectively consolidate all of your link popularity to a single URL. This consolidation will serve to increase your website’s chances of obtaining and maintaining top rankings.
How To Enable The 301 Redirect
You need to instruct the server you are hosting your website on to redirect the traffic seamlessly. To do this you need to first establish what type of server your website is hosted on. There are two main types of servers that are in use: Microsoft and Apache (Linux/Unix), but as on our hosting environment, we use IIS, so we will discuss how to enable it on IIS.
Enable non-www 301 Redirect in IIS Server
Microsoft servers do not have a .htaccess file to alter so we suggest that you contact your hosting provider and request they make this change for you. If they are baffled or need further instructions on how to make the changes you can refer them to the tutorials referenced below:
1. Using Internet Services Manager create a new IP-based website using the http://yourdomain.com URL or alternatively you can avoid using a unique IP by using the host header (virtual website) of www.yourdomain.com.
2. Now verify the server headers for each website using the Server Header Checker. The server response should be 200 OK for both addresses.
3. Now add your domain-revised version of the following ASP code to the default home page for http://yourdomain.com:
< %@ Language=VBScript %>
< %
Response.Status=”301 Moved Permanently”
Response.AddHeader “Location”, http://www.yourdomain.com
%>
Note: do not change the spacing or line placement within the above code; place it as is.
4. Once the default page is online first visit your website via http://yourdomain.com to ensure the redirect is working. Next check the server headers for http://yourdomain.com and make sure you see the following code within #1: “HTTP Status Code: HTTP/1.1 301 Moved Permanently”. That code will confirm the 301 redirect is being properly communicated
October 12, 2018 11:22 by
Peter
In this post, we will see how we can get rid of the error “Briefly unavailable for scheduled maintenance. Check back in a minute,” in WordPress. If you are working with WordPress, or your blog or website is made in WordPress, you may face this kind of issue whenever you are updating any plugins or updating the WordPress core. But sometimes, what happens is that even after the update process is finished, your site remains in maintenance mode. Here, I am going to share with you a quick fix, so that you can fix this issue. I hope you will like this.
Background
I always prefer to update my WordPress core and the plugins whenever there is an update. So, I faced the following issue so many times. “Briefly unavailable for scheduled maintenance. Check back in a minute.”
So, I thought of sharing a quick fix with you for the same.

Here are the steps to remove the error," Briefly unavailable for scheduled maintenance. Check back in a minute".
Step 1: Go to your File Explorer
 Step 2: Go to your ftp folder
You can either go to your ftp folder via file explorer or by using an ftp client, like FileZilla.
 Step 3: Find the .maintenance file and delete
Check for the .maintenance file in the root folder and delete it.
Now, if you refresh your WordPress site, it will be running fine. Hope it helps.
Conclusion
Did I miss anything that you may think is needed? Did you find this post useful? I hope you liked this article. Please share your valuable suggestions and feedback with me.
Your turn. What do you think?
A blog isn’t a blog without comments. So, comment on it but try to stay on topic. If you have a question unrelated to this post, you’re better off posting it on C# Corner, Code Project, Stack Overflow, Asp.Net Forum instead of commenting here. Tweet or email me a link to your question there and I’ll definitely try to help if I can.
October 4, 2018 12:11 by
PeterThis Script will help in checking the below basic functionalities of the Bulk Servers. It will do so during Migration, Patch and Monthly Restart activities
This Script is added with the below functionalities,
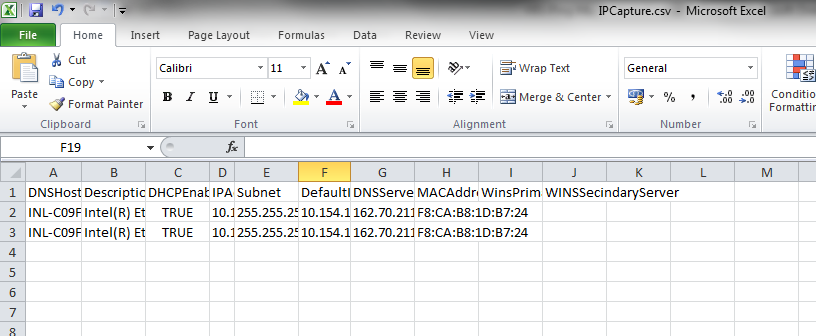
- IP Capture -- >Collects the DNSHostName,Description,DHCPEnabled,IPAddress,IpSubnet,DefaultIPGateway,MACAddress,DNSServerSearchOrder for all Enabled and IP Discovered NICs
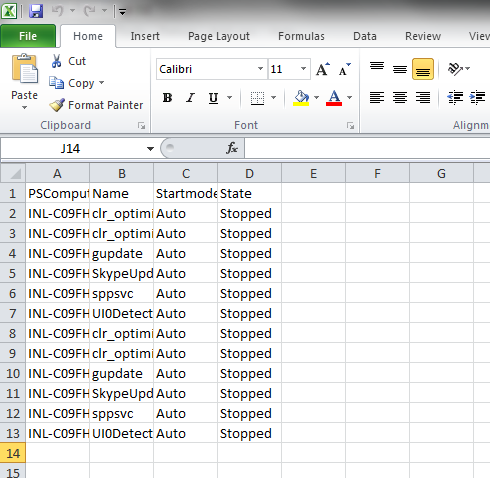
- Services Status -- >It checks all the Services Automatic set and not Stopped services and provides the output.
- Server Status –- >Checks the Servers reachability and provides the output on screen
- Server Shutdown/Reboot -- >Checks the server status and perform Bulk Shutdown / Restart at once with Event Description Keyed.

Output Samples
European IIS 10 Hosting
September 26, 2018 11:52 by
Peter
What is Load Balancing ?
Distributing network traffic across multiple servers effectively is called Load Balancing.To meet high volumes, it generally requires adding more servers. Load Balancer routes the client requests to the servers in an optimized way and takes care that no server is overworked. If a new server is added to the group, It will start sending requests to this new server.
Load-Balancing Algorithms
Why did algorithms come into the picture ? Actually Load Balancer selects the server based on two factors,
- periodically pinging server to check its availability.
- defined algorithms - based on which load-balancer selects the server.
Algo 1 Least Connection (Default algorithm)
The least connection is the default algorithm to select server. Server which has the least number of active transactions is picked by Load Balancer to handle request. Load Balancer maintains records of transactions for each server. Now discuss this in detail: Let's say all the servers have the same capacity and still some of the servers are overloaded as there may be the situation that the client stayed in those servers for longer duration and connected to other severs for shorter duration. Active connections on the server where client stayed longer will pile up and hence based on the least connection algorithm Load Balancer will route the request in the server with least active connections,
Weighted Least Connections
Now let's consider the above Least Connection algorithm with different server capacities (CPU/RAM etc.). You would definitely want to allocate more requests to the higher capacity server than the lower capacity servers. Weighted Least Connection is the solution.
Let's say there are 2 servers, server 1 and server 2 and server 2 has high configuration.With this algorithm Load balancer will allocate more requests to server 2 to utilize it better. Like Least Connection this also allocates request to the server withthe least number of active connections but the higher configuration server will handle more requests based on the right proportion defined during the Load Balancer setup. Weight proportion is calculated by the server capacity. Server 1 : Capacity X, Server 2 : Capacity : 10X the weight for each server would be 1:10 .
Round Robin
Round Robin is a vastly used and simple algorithm. Load Balancer distributes requests in the cyclic order irrespective of server inefficiencies. There might be the scenario if you don't want to overload any of the servers for some reason, you may use this algorithm to give extra weight to other servers.
Both the Servers are ready to take request, suppose request comes and load-balancer routes to Server 1 then if a second request comes it will be routed to Server 2. The third and fourth will be routed to Server 1 and 2 respectively in a cyclic order. Even if one of the server has stronger configuration i.e. RAM, CPU etc. As per Round Robin algorithm Load-Balancer will follow the cyclic order.
Algo 4 Weighted Round Robin
Like Round Robin this is also cyclic but the higher configuration server will handle more requests.Rest it is same as Weighted Least connection algorithm i.e. weight would be defined during Load Balancer setup and high weight server will handle more requests.
i.e. if weight proportion to server 1 and server to is 1:10. first 10 requests will go to server and 11th request will go to server 1 and next 10 request will go to server 2 and so on.
Algo 5 IP Hash
This algorithm generates a hash key using client and server IP addresses which means this key would be assigned to client for subsequent requests which assure that the client is routed to the same server that it was using earlier.This algorithm can be used to achieve Session Persistence or Sticky Session.
Session Persistence
In the multiple server environment a user might experience losing cart items during navigation. Persistence session or sticky session is the culprit. As you know Http is a stateless protocol which means in subsequent requests it doesn't maintain any information about the user so to identify server uses client's ip or cookie to track users session. Sticky session is to make sure all the requests goes to the same server which has its user's session tracking information.
Layer 4 & Layer 7 Load Balancing
In Layer 4 Load Balancing , Load balancer decides the server on which it will redirect the requests on the basis of the IP addresses of the origin and destination servers (Network Layer : Layer 3) and the TCP port number of the applications (Transport Layer : Layer 4).
On the other hand Layer 7 Load Balancing decides routing on the basis of OSI Layers 5, 6, and 7 which together makes Http.
September 12, 2018 08:50 by
PeterWe may get the following error after publishing a website on IIS.
Parser Error Message
"Unrecognized attribute 'targetFramework'. Note that attribute names are case-sensitive."
To fix it, we need to follow the below troubleshooting steps.
- Check on which .NET version the application is developed. Let's assume, it's .NET 4.0.
- Open IIS Manager and find the Application Pool, on which your website is hosted.
- Go to that Application Pool and check the .NET version and change it to 4.0 accordingly by clicking on Basic\Advanced Settings.
If .NET 4.0 is not listed, go ahead and install it.
- If it still won't show up, go to command prompt and fire the below command to find a list of ASP.NET versions installed:
C:\Windows\Microsoft.NET\Framework\v4.0.30319>aspnet_regiis.exe -lv
In the output, if .NET 4.0 is not listed, register it by firing the below command:
C:\Windows\Microsoft.NET\Framework\v4.0.30319>aspnet_regiis.exe -I.
- It should show up as .NET 4.0 in the .NET Framework Version dropdown for the application pool.
July 25, 2018 11:18 by
PeterHere, we are going to connect with the Docker engine remotely using PowerShell. For this, we can either use our local machine or a VM. Before we proceed further, make sure that your Nano Server is up and running.
Step 1 Downloading the Docker Daemon and extracting them
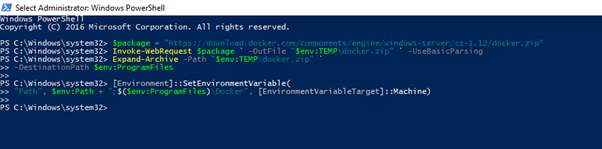
Create a variable that references the zip file which is in the official docker website. This zip file will have the Docker engine data that is required to create the client and server. Open the PowerShell with administrator privileges and run the below given command.
This will assign the link to that variable named,
$package = "https://download.docker.com/components/engine/windows-server/cs-1.12/docker.zip"
The next step is to invoke a web request to get the link that has been referenced in the variable called. Then, the file will be stored in a temporary storage by getting downloaded from the Docker site. For this, we have to run the following command.
Invoke-WebRequest $package ` -OutFile "$env:TEMP\docker.zip" ` -UseBasicParsing
Now, we shall expand the downloaded zip file to the programming files of our machine. For this, run -
Expand-Archive -Path "$env:TEMP\docker.zip" `
-DestinationPath $env:ProgramFiles
The final step is to create an environment variable that will add the Docker directory to the path daemon. Run the command
[Environment]::SetEnvironmentVariable("Path", $env:Path + ";$($env:ProgramFiles)\Docker", [EnvironmentVariableTarget]::Machine)

Nano Server
Now, we have finished installing the Docker (client) and Dcokerd (engine) in "Program Files" folder. Check for these inside the Docker folder.

Step 2 Creating Environment variable to connect Docker easily
Here, Docker is client and Dockerd is engine. Now, we are going to configure an environment variable that will store the DNS name of our Nano Server and connect with it. For this, run the below command.
[Environment]::SetEnvironmentVariable("DOCKER_HOST","nanoserver007.southindia.cloudapp.azure.com",[EnvironmentVariableTarget]::Machine)
Note - Replace the DNS name with your Nano Server DNS or IP.
Now, open the new PowerShell console and run the command "docker version" . This will show you the client (Docker) and engine (Dockerd). This means we have created a connection in between these two services which we have actually downloaded from the Docker website.
July 18, 2018 11:36 by
PeterIn this article, we will learn the most useful and powerful command line tool, AppCmd, for publishing or hosting a website on IIS. Using the AppCmd tool, we can host static as well as a dynamic website (ASP.NET Webform, MVC, Dot Net Core etc) easily.
Description
I assume you are aware of (or have knowledge of) how to Host or Publish Website in IIS using inetmgr. This will help you understand AppCmd.exe.
AppCmd.exe is the command line tool for managing IIS 7 and above. It provides an easy way to manage a website without Graphical User Interface.
Some of the things you can do with AppCmd,
- Create and configure sites, apps, application pools, and virtual directories
- Start and stop sites, and recycle application pools
- Search, manipulate, export, and import IIS and ASP.NET configuration
How to Use AppCmd.exe
The AppCmd.exe command line is built on top of a set of top-level server management objects, such as Site and Application. These objects expose methods that can be used to perform various actions on those objects, and object instances expose properties that can be inspected and manipulated.
AppCmd.exe is located in the %systemroot%\system32\inetsrv\ directory. Because it is not a path of the PATH automatically, you need to use the full path to the executable when executing commands like in %systemroot%\system32\inetsrv\AppCmd.exe list sites. Alternatively, you can manually add the inetsrv directory to the path on your machine so that you can access AppCmd.exe directly from any location.
Note
Run Command Prompt as Administrator to using AppCmd.
In this article, we learn basic command to host websites.
List all available commands and actions in AppCmd
AppCmd
AppCmd /?
From the above screenshot, it is clear that Command Prompt is run as administrator and run AppCmd which return list of supported Command.
List all hosted or published websites in IIS.
AppCmd List Site
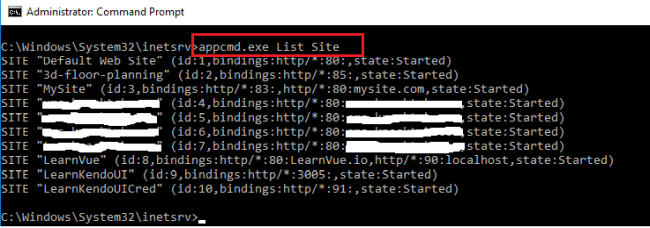
In the above screenshot, I have run List Site command which returns all published site with bindings and state of site e.g. Started or Stop.
Create the website using AppCMD
APPCMD add site /name:WebByAppCMD /bindings:"http/*:94:" /physicalPath:"C:\Users\Mepani\Desktop\2018 Article\Kendo Grid" -virtualDirectoryDefaults.userName:USERNAME -virtualDirectoryDefaults.password:PASSWORD
For any website hosting we require information as above like Site Name, Bindings (Protocal, hostname), Physical Path, Credential for access or permission to folder path.
Sometimes, if you don't provide access/permission to a physical path then you might be getting Access denied error.
View Newly Hosted or published website
appcmd.exe list site "WEbByAppCMD"
Start and stop hosted or publish a website
appcmd.exe start site "WEbByAppCMD"
appcmd.exe stop site "WEbByAppCMD"
Delete or remove published or hosted website from IIS
appcmd.exe delete site "WEbByAppCMD"
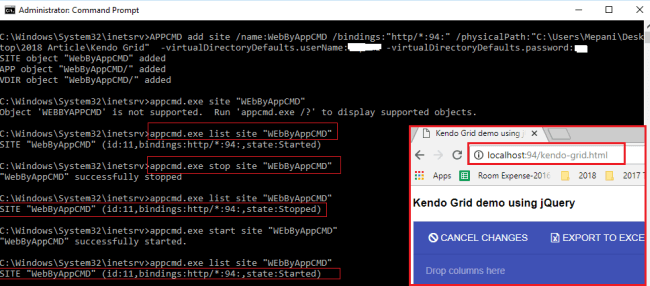
App CMD Create website
In the above screenshot, we have covered all the above site commands except delete. Possible issue or challenges might be faced during command line website hosting niclude,
- Site name already created
- Port is already in use
- Bad Request -Invalid hostname
Hope you enjoyed this and learned a new way to host or publish a website using AppCmd.
December 6, 2016 10:45 by
Scott
One of our clients receive this error message when deploying his ASP.NET application.
“System.Net.WebException: The underlying connection was closed: Could not establish trust relationship for the SSL/TLS secure channel.”. Here is how we solved that issue.
There are 3 related and important issues:
1. the remote site uses a Server Name Indication (SNI) certificate, installed on a different domain name
2. the web application was published to a IIS 6.0 (Windows Server 2003) web server
3. a System.Security.Authentication.AuthenticationException: The remote certificate is invalid according to the validation procedure. This error message is caused because the process is not able to validate the certificate supplied by the server during an HTTPS (SSL) request
IIS 6.0 + Server Name Indication (SNI) certificates = System.Net.WebException #
A Server Name Indication (SNI) certificate basically means that you can install oneSSL/TLS certificate on a web server, to use on multiple domain names. The TLS part takes the negotiation, and that enables the server to select the correct virtual domain early and present the browser with the certificate containing the correct name. Therefore with clients and servers that support SNI, a single IP address can be used to serve a group of domain names for which it is impractical to get a common certificate.
Windows Server 2003 (IIS 6.0), Windows Server 2008 (IIS 7.0) and Windows Server 2008 R2 (IIS 7.5) do not support SNI-certificates.
How to Solve this Error Message
You might wonder what the solution to this error message was. Well, simple: Move the website to an IIS 8.0+ (Windows Server 2012) web server. This version supports Server Name Indication certificates. Microsoft calls this SSL Scalability in IIS 8.0. Because of SNI, or SSL-scalability, support in Windows Server 2012, the ASP.NET System.Net.WebException went away.
It’s simple, right? :)
