IIS 7.5 and IIS 8.0 European Hosting

BLOG about IIS 7.5 Hosting, IIS 8.0 Hosting and Its Technology - Dedicated to European Windows Hosting Customer

European IIS Hosting - HostForLIFE.eu :: How to Enable Reverse DNS Lookup in IIS

clock February 21, 2017 10:37 by author Scott

This article explains how to enable reverse Domain Name System (DNS) lookup for all versions of Internet Information Services (IIS).

When reverse DNS lookups are enabled on the web server, the IP address of each web client that connects to the IIS server is resolved to a DNS name, and the DNS name instead of the web client IP address is placed in the IIS log files.  Enabling reverse DNS also affects what CGI and ISAPI extensions see as a value of the Remote_Host variable.

Microsoft KB article 297795 gives a step-by-step demonstration how to enable RDNS for IIS4, IIS5 and IIS6, but all you need to do is run the following in a command prompt from the ADScripts folder:

For IIS4 run:

adsutil set w3svc/EnableReverseDNS TRUE

For IIS5 and IIS6 run:

cscript adsutil.vbs set /wesvc/EnableReverseDNS "TRUE"

In IIS7, you must install the IP and Domain Restrictions role service for the Web Server (IIS) role.  You can do this in Server Manager or from the command line using the following command:

ServerManagerCMD -install Web-IP-Security

In Windows Server 2008 R2, the ServerManagerCMD.exe program is deprecated and has been replaced with the ServerManager Powershell cmdlets.  The following two cmdlets are used to install the IP and Domain Restrictions role service:

Import-Module ServerManager
Add-WindowsFeature Web-IP-Security

Now that the role service is installed, you can configure reverse DNS lookups, as follows:

  • Open Internet Information Services (IIS) Manager.
  • Navigate to the Server Name in the Connections pane.  If you only want to enable reverse lookups on a particular website, navigate to that website.
  • Double-click IP Address and Domain Restrictions in the center pane and click Edit Feature Settings in the Actions pane.
  • Put a checkmark in Enable domain name restrictions and click OK.

You will see the following warning:

Restricting access by domain name requires a DNS reverse lookup on each connection. This is a very expensive operation and will dramatically affect server performance. Are you sure you want to enable restrictions based on domains?

Clicking Yes will enable reverse lookups for all clients connecting to the web server.  I have not noticed any more than a 1-2% increase in CPU performance and the websites are just as performant as before.

Each of these changes go into effect immediately.  There is no need to restart IIS.


European IIS Hosting - HostForLIFE.eu :: How to Create Multiple 301 Redirects

clock December 15, 2016 08:33 by author Scott

Some of our clients sometimes ask about how to create URL Rewrite on their site. Previously, we have written about how to redirect HTTP to HTTPS in IIS. In this tutorial, we will advise how to create multiple redirection with a URL Rewrite Map.

URL Rewrite Module with IIS 7/IIS 8

Now there’s an easier solution, and one that offers better performance.  Starting with IIS 7 one can implement different kinds of url rewriting and redirecting with ease by using the URL Rewrite Module. The various rules can be configured using the IIS 7 Manager GUI or by directly editing the web.config. To open the URL Rewrite Module simply double click the URL Rewrite icon on your site properties as shown below.

From there you will be able to maintain your existing rules or add new ones as seen in this picture.

This is a pretty easy way to create server-side rules for rewriting and redirecting, but what happens when you have 30 or 40 legacy URLs that need to be redirected to new pages? Do you have to enter each one manually? Of course not. The solution to that is to use a URL Rewrite Map.

URL Rewrite Map

By using a URL Rewrite Map it has never been easier to create and maintain multiple 301 redirects for different pages on your web site.  The rewrite rules are stored in the <system.webServer> section of your web.config so you can quickly make changes as needed.

Here is all the code you need to accomplish this:

<system.webServer>
<rewrite>
<rewriteMaps>
<rewriteMap name=”Redirects”>
<add key=”/test.aspx” value=”/test2.aspx” />
<add key=”/aboutus.aspx” value=”/about” />
</rewriteMap>
</rewriteMaps>
<rules>
<rule name=”Redirect rule1 for Redirects”>
<match url=”.*” />
<conditions>
<add input=”{Redirects:{REQUEST_URI}}” pattern=”(.+)” />
</conditions>
<action type=”Redirect” url=”{C:1}” appendQueryString=”false” />
</rule>
</rules>
</rewrite>
</system.webServer>

In the example above I’m performing a 301 redirect on the test.aspx file to test2.aspx file. There’s also a 301 redirect for the aboutus.aspx file to folder called /about, however, in this case it’s important to note that the /about folder will also need a default page or else a 404 error will result.

As you add more URLs to your Rewrite Map you’ll notice that your web.config can become a bit cluttered. The solution to this will be to store the redirect rules in an external file. Let’s call this file myrewritemaps.config. This file will now contain this code block:

<rewriteMaps>
<rewriteMap name=”Redirects”>
<add key=”/test.aspx” value=”/test2.aspx” />
<add key=”/aboutus.aspx” value=”/about” />
</rewriteMap>
</rewriteMaps>

In your web.config you add the following line of code under the <rewrite> section referencing the external config file:

<rewriteMaps configSource=”myrewritemaps.config” />

Your web.config will now look nice and clean like this:

<system.webServer>
<rewrite>
<rewriteMaps configSource=”myrewritemaps.config” />
<rules>
<rule name=”Redirect rule1 for Redirects”>
<match url=”.*” />
<conditions>
<add input=”{Redirects:{REQUEST_URI}}” pattern=”(.+)” />
</conditions>
<action type=”Redirect” url=”{C:1}” appendQueryString=”false” />
</rule>
</rules>
</rewrite>
</system.webServer>

There is no real limit on how many URLs can be configured for redirecting with the URL Rewrite Map.  You should perform regular search engine analysis to see when the new URLs have been picked up. Once the old URL is no longer indexed and traffic has dropped off you could remove it from your map.


European IIS Hosting - HostForLIFE.eu :: How to Check Trace is Enabled on IIS Server

clock December 9, 2016 07:33 by author Scott

Trace \ Track is a vulnerability that is usually identified on an IIS server when we run PCI compliance and find this vulnerability. A hacker can run a Trace attack on IIS Website and get information about the Backend server and other important information.

In latest versions on IIS (IIS 6.0, 7.5) Trace is disabled by default but still it is good idea to make sure that Trace is disabled on IIS.

Testing if Trace \ Track is Enabled on a IIS website or not

Follow these steps :

1. Go to command Prompt of your Machine.
2. Type telnet <URL of the website> 80 (this will open a telnet session of that website on port 80)
3. Type following commands on the telnet session screen in exact same order: 

    TRACE / HTTP/1.0
    Host: <hostname_you_are_testing>
    TestA: Hello
    TestB: World


4. Press enter twice. 

If Trace is enabled on your server, you should see following results:

    HTTP/1.1 200 OK
    Server: Microsoft-IIS/7.5
    Date: Tue, 05 Dec 2016 08:17:15 GMT
    Content-Type: message/http
    Content-Length: 76 


And If you receive following results on the telnet screen, then Trace is enabled :

     HTTP/1.1 501 Not Implemented
    Content-Type: text/html
    Server: Microsoft-IIS/7.5
    X-Powered-By: ASP.NET
    Date: Tue, 06 Dec 2016 09:32:58 GMT
    Content-Length: 1508


    Connection: close

Disabling Trace or Track on IIS

The easiest way to mitigate the risk of Trace \ Track on iis is  : installing URLScan from Microsoft, 
The urlscan.ini file is included as part of URLScan . This sets by default a configuration setting "UseAllowVerbs=1".  In this [AllowVerbs] section of the ini file, only http methods that are allowed are GET, HEAD, and POST so simply by installing URLScan on an IIS server , we can assume that it  protected from TRACE or TRACK.  


European IIS Hosting - HostForLIFE.eu :: How to Fix "Could not establish trust relationship for the SSL/TLS secure channel" Error

clock December 6, 2016 10:45 by author Scott

One of our clients receive this error message when deploying his ASP.NET application.

“System.Net.WebException: The underlying connection was closed: Could not establish trust relationship for the SSL/TLS secure channel.”. Here is how we solved that issue.

There are 3 related and important issues:

1. the remote site uses a Server Name Indication (SNI) certificate, installed on a different domain name
2. the web application was published to a IIS 6.0 (Windows Server 2003) web server
3. a System.Security.Authentication.AuthenticationException: The remote certificate is invalid according to the validation procedure. This error message is caused because the process is not able to validate the certificate supplied by the server during an HTTPS (SSL) request

IIS 6.0 + Server Name Indication (SNI) certificates = System.Net.WebException #

A Server Name Indication (SNI) certificate basically means that you can install oneSSL/TLS certificate on a web server, to use on multiple domain names. The TLS part takes the negotiation, and that enables the server to select the correct virtual domain early and present the browser with the certificate containing the correct name. Therefore with clients and servers that support SNI, a single IP address can be used to serve a group of domain names for which it is impractical to get a common certificate.

Windows Server 2003 (IIS 6.0), Windows Server 2008 (IIS 7.0) and Windows Server 2008 R2 (IIS 7.5) do not support SNI-certificates.

How to Solve this Error Message

You might wonder what the solution to this error message was. Well, simple: Move the website to an IIS 8.0+ (Windows Server 2012) web server. This version supports Server Name Indication certificates. Microsoft calls this SSL Scalability in IIS 8.0. Because of SNI, or SSL-scalability, support in Windows Server 2012, the ASP.NET System.Net.WebException went away.

It’s simple, right? :)


European IIS 8.5 Hosting - HostForLIFE.eu :: How to Host Different SSL with 1 IP in IIS

clock October 7, 2016 18:56 by author Scott

That has been a question we have come across frequently. Before IIS 8, you could host multiple sites needing SSL on a single IP address if the sites utilized the same SSL certificate or used a wildcard SSL certificate.  A wildcard certificate was only beneficial if you needed SSL on the subdomain level of a current site/domain. But what if you had sites with different names? Well, you could get a Subject Alternative Names (SAN) SSL certificate.  This SSL certificate would allow you to protect multiple sites with a single SSL certificate. The last available option prior to IIS 8 required setting each additional SSL site on the same IP address but with a different SSL port number. This would allow you to utilize each site’s/domain’s SSL on the same IP address as another site.  By default, SSL certificates utilize port 443 for secure communication. This port doesn’t need to be specified in the URL since this is the standard port. When you use a different port number for SSL you will be required to add the non-standard SSL port number in the URL in order for it to work.  As you can imagine, this is not the way you want to run a public site. How would a user know to enter the port number and it’s not a common step that users are familiar with doing when browsing a site.

Adding an additional IP address to host another site needing SSL is the common method used but sometimes this isn’t an option for some people. With the inception of IIS 8 on Windows Server 2012, a new feature called Server Name Identification (SNI) was added. This feature offers an easier solution to hosting multiple sites that have a different or individual SSL on a single IP address. This feature is included in IIS 8 by default and doesn’t require the installation of any additional features to begin using it. Below, we will walk through the steps involved with configuring SNI. One thing to note with implementing SNI for your SSL solution, it will not work for those users running Internet Explorer on Windows XP. If your server has multiple IP addresses, you can implement SNI for some sites in addition to assigning individual sites to a single IP address for SSL. Both methods will work along side each other on different IP addresses without issue.

Steps:

1)  One of the first things you will need to do is import the SSL certificates for each site on the server if this hasn’t been done already
2)  Next, open IIS 8 Manager and add your first site that will need SSL
  a.  If the first site is already in place, proceed to step the next step
3)  After the site is added select the site and click Bindings… under the Actions menu pane on the right

4)  Click Add
  a.  Select https for the Type
  b.  You can leave the IP address to “All Unassigned” or choose the IP address you want to use
(If you have multiple IP’s on the server you will want to specify the one you want to use for SNI)
  c.  Enter your site/domain name for Host name
  d.  Check the box for “Require Server Name Indication”
  e.  Select the SSL certificate for the site from the drop down box
  f.  Click OK

5)  Create the second site and add the SSL binding following the steps below
6)  Select Bindings and click Add
  a.  Select https for the Type
  b.  You can leave the IP address to “All Unassigned” or choose the IP address you want to use
   (If you have multiple IP’s on the server you will want to specify the one you want to use for SNI)
  c.  Enter your site/domain name for Host name
  d.  Check the box for “Require Server Name Indication”
  e.  Select the SSL certificate for the site from the drop down box

7)  Click OK to complete the setup

That’s all that needs to be done.  Test SSL for the site to make sure each site is working properly.  If you have additional sites that need SSL added, you can continue following the steps above for adding the SSL binding for each new site.


European IIS 8 Hosting - UK :: Using IIS Auto - Start Feature to Speed Up Your ASP.NET Site

clock November 27, 2015 20:50 by author Scott

One of ASP.NET feature that we can use to speed up our application is using IIS Auto-Start Feature. Auto-Start, introduced with IIS 7.5, allows an ASP.NET application deployed to IIS to be available immediately after deployment.  In the simplest sense, enabling this feature causes IIS to prime an application as soon as it is deployed removing the warm-up time often required of “cold hits” to a website.  In this article we’ll see how we can enable this feature either through IIS Manager or configuration files and even how we can perform more advanced application warm-up routines, such as priming a cache.

Configuring Auto-Start with IIS Manager

Enabling Auto-Start via IIS is actually quite simple, though the settings can be tricky to find the first time.

  • Open Internet Information Services (IIS) Manager.
  • In the Connections pane, select the Application Pools node, revealing the Application Pools pane in the main view.
  • Select the application pool for which you wish to enable Auto-Start.

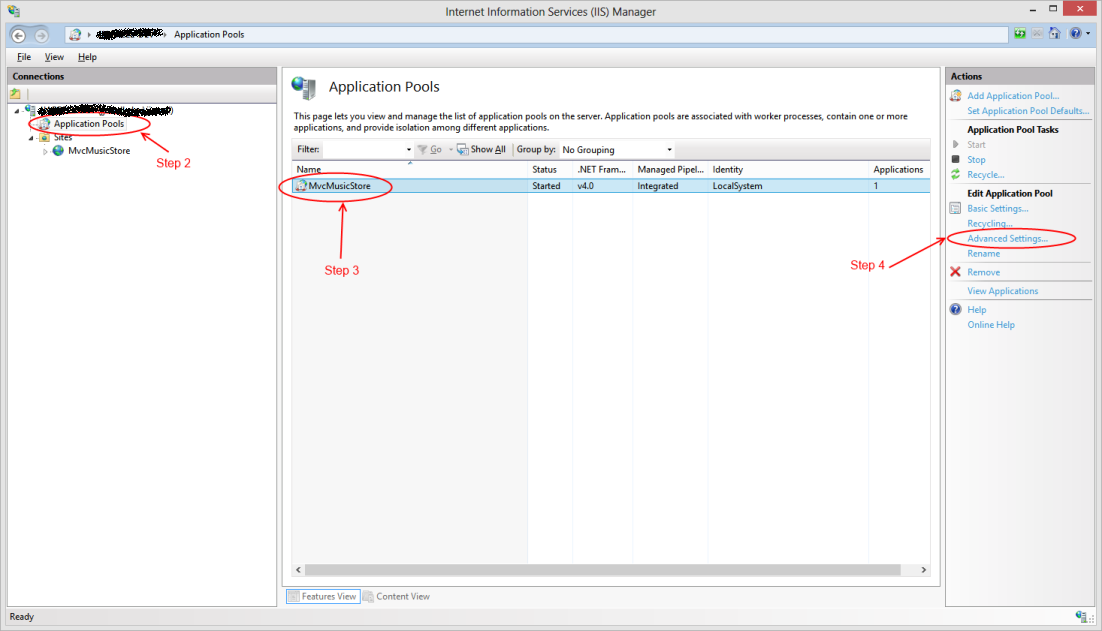
  • Click Advanced Settings…
  • Locate the Start Mode option under the General group and set it to AlwaysRunning.

Configuration Auto-Start with applicationHost.config

Enabling Auto-Start using the IIS Manager UI is quick and simple, but tweaking the settings for all of your application pools via the user interface may not be scalable.  For example, imagine that you were rolling out your website to a large web server farm and need to automate the configuration of all your application pools.

In this case, we can also enable Auto-Start by tweaking the applicationHost.config file which controls the application domains for all instances running on that server. applicationHost.config can be found at <Windows>\System32\inetsrv\config\applicationHost.config.

Inside of the applicationHost.config file, locate the <applicationPools> node located under<configuration>/<system.applicationHost>. Inside of the <applicationPools> node, locate the entry whose name attribute corresponds to your application pool, and add a startMode attribute with the value of “AlwaysRunning”.

<applicationPools>
        <add name="MvcMusicStore" startMode="AlwaysRunning" />
    ...
</applicationPools>

The addition of the startMode attribute will override the default start mode of “OnDemand“.

Advanced Application Warm Up with Auto-Start

We’ve seen how to work around the “cold-hit” problem that often affects websites running on IIS.  However, imagine that early requests to your site can still cause delays, perhaps due to expensive data that has to be retrieved.  In these cases you can certainly cache the data after it’s retrieved to make subsequent requests faster, but the unlucky visitor who first makes the request still has to bear the brunt of the work for others.

While in the past it wasn’t unheard of for developers to prime their caches with these expensive data requests in the Application_Start() function of Global.asax.cs, IIS now provides a cleaner way through the use of Auto-Start Providers.

For example, let’s imagine that the home page of your application contains a rather expensive call.  In the fact, the call is so expensive that we’ve elected to cache the results improve the performance of subsequent requests.  However, this still lays the bulk of the work at the feet of the site’s first visitor.

        public ActionResult Index()
        {
           var albums = HttpRuntime.Cache["TopSellingAlbums"];
           if (albums == null)
           {
                var service = new TopSellingAlbumsService();
                albums = service.GetTopFiveSellingAlbums();
                HttpRuntime.Cache["TopSellingAlbums"] = albums;
            }
            return View(albums);
         }

While this technique does improve the performance for subsequent visitors, it still lays the bulk of the work at the feet of the site’s first.  However, IIS now provides a better place to perform these types of warm-up tasks.

Preload clients, which implement the IProcessHostPreloadClient interface, contain a single method Preload(…) which can be used to cleanly perform these warm-up tasks.

    public class MvcMusicStoreApplicationPreloadClient : IProcessHostPreloadClient
    {
        public void Preload(string[] parameters)
        {
            var service = new TopSellingAlbumsService();
            HttpRuntime.Cache["TopSellingAlbums"] = service.GetTopFiveSellingAlbums();
        }
   }

However, this class will not be loaded automatically.  We need to tell IIS both about the existence of this class as well as which website it applies to.  To do this, we’ll need to return to our applicationHost.config file.

First, we’ll need to add an element called <serviceAutoStartProviders> to the<configuration>/<system.applicationHost> node.

        <serviceAutoStartProviders>
            <add name="MvcMusicStoreAutoStartProvider" type="MvcMusicStore.MvcMusicStoreApplicationPreloadClient, MvcMusicStore" />
        </serviceAutoStartProviders>

This element registers our custom preload client with the name MvcMusicStoreAutoStartProvider.  Be sure to fully qualify the type name in the type attribute so the assembly loader can locate it.

Finally, we’ll locate the entry for our site under the sites node and register our preload client in our site’s application node.

            <site name="MvcMusicStore" id="1" serverAutoStart="true">
                <application path="/" applicationPool="MvcMusicStore" serviceAutoStartEnabled="true" serviceAutoStartProvider="MvcMusicStoreAutoStartProvider">
                </application>
       . . .
            </site>

This is done by adding the serviceAutoStartEnabled attribute, set to true, and by adding theserviceAutoStartProvider attribute, set to the name of the serviceAutoStartProvider entry we added in the previous step.

Wrapping Up

With just a few easy steps we’ve ensured that our application is always ready to go when a user a visits.  In addition, we’ve also discovered an easy way to offload time intensive operations, such as priming a cold cache, from the first user to the initial startup of the application.  With these two tips in hand we’re sure to have a fast and responsive application that our users will rave about.


European IIS 8 Hosting - UK :: Tips to Secure Your IIS Installation

clock November 18, 2015 20:55 by author Scott

You have just finished installing IIS on your Windows OS. You’re probably thinking that you can delve into the web development world and forget all about the underlying web server. After all, IIS is a Microsoft product so it should install with the right default configuration settings, right? That is far from true with IIS.

In this article, I will provide 8 tips that you can use to secure your IIS installation.

Move the Inetpub folder to a different drive

The Inetpub folder is the default location for your web content, IIS logs and so on. By default IIS 7 and upwards install the Inetpub folder in the system drive. It’s good practice to move the Inetpub folder to a different partition so that the web content is separate from the operating system. This folder can be moved after IIS installation is completed.

Install the appropriate IIS modules

IIS includes more than 30 modules  – you should only install the ones which are needed by your web applications. Disable any modules that are not required, to minimize the capacity of potential attacks. Periodically review the modules that are installed and enabled and remove any that are no longer required. You can use IIS Manager to list all the modules that are enabled.

  • Open IIS Manager
  • Select the name of the machine to view the modules for the whole machine, or change to the specific web site to view the modules enabled for the selected site
  • Double click on ‘Modules’
  • To disable a module, click on the module from the list and select ‘Remove’ from the Actions pane
  • Confirm the removal by pressing Yes

Disable the OPTIONS method

The OPTIONS method provides a list of methods that are supported by the web server. Although this might seem beneficial, it also provides useful information to an attacker. This will provide information to an attacker at the reconnaissance stage of this attack. Therefore it’s recommended to disable the OPTIONS method completely. This can be done by denying the OPTIONS verb from the HTTP Verb request filtering rules in IIS.

  • Open IIS Manager
  • Select the name of the machine to configure this globally (or change to the specific web site for which you need to configure this)
  • Double click on ‘Request Filtering’
  • Change to the HTTP Verbs tab
  • From the Actions pane, select ‘Deny Verb’
  • Insert ‘OPTIONS’ in the Verb, and press OK to save changes

Enable Dynamic IP Restrictions

The Dynamic IP Restrictions module helps blocks access to IP addresses that exceed a specified number of requests and thus helps prevent Denial of Service (DoS) attacks. This module will inspect the IP address of each request sent to the web server and will filter these requests in order to temporarily deny IP addresses that follow a particular attack pattern. The Dynamic IP Restrictions module can be configured to block IP addresses after a number of concurrent requests or by blocking IP addresses that perform a number of requests over a period of time. Depending on your IIS version you will need to enable either the ‘IP Security’ feature or the “IP and Domain Restrictions”  as explained in this Microsoft article.

This will include the ‘IP Address and Domain Restrictions module in the IIS Manager, from where dynamic IP restrictions can be set.

  • Open IIS Manager
  • Select the name of the machine to configure this globally (or change to the specific web site for which you need to configure this)
  • Double click on ‘IP Address and Domain Restrictions’
  • From the Actions pane, select ‘Edit Dynamic Restriction Settings’
  • Modify and set the dynamic IP restriction settings as needed and press OK to save changes

Enable and Configure Request Filtering Rules

It is also a good idea to restrict the types of HTTP requests that are processed by IIS. Setting up exclusions and rules can prevent potentially harmful requests from passing through to the server, since IIS can block these requests on the basis of the request filtering rules defined. For example, a rule can be set to filter traffic for SQL Injection attempts. Whilst SQL Injection vulnerabilities should be fixed at source, filtering for SQL Injection attacks is a useful mitigation. This can be set from the Rules tab found in the Request Filtering page in IIS Manager.

  • Open IIS Manager
  • Select the name of the machine to configure this globally (or change to the specific web site for which you need to configure this)
  • Double click on ‘Request Filtering’
  • Change to the Rules tab
  • From the Actions pane, select ‘Add Filtering Rule’Set the required rules, and press OK to save changes

The rule set in the below screenshot would instruct IIS to check for the provided strings in requests for .asp and .aspx pages. IIS will then block the request if any of these strings are found.

You can also filter requests that contain things like high-bit characters or double escape characters. This and other similar filtering options are explained at http://technet.microsoft.com/en-us/library/hh831621.aspx

Enable logging

Configuring IIS logging will cause IIS to log various information from HTTP requests received by the server. This will come in handy and can give a better understanding of issues that might have occurred on your website when things go wrong. It’s the place where you will start the troubleshooting process in such situations.

The server’s logs can also be continuously or periodically monitored in order to review the server’s performance and provide optimizations if needed. This can be automated using various server monitoring tools. Make sure to keep a backup of the logs. Microsoft also provide Log Parser, which is a tool that can be used to query and retrieve specific data from IIS logs. Additionally, log consolidation tools prove useful for consolidating and archiving data from logs in a more meaningful way.

IIS logging can be enabled and configured from IIS Manager > select the machine name or the specific site you want to configure > Logging. Since these log files might grow quite large, it would be a good idea to start a new file periodically.

Use the Security Configuration Wizard (SCW) and the Security Compliance Manager (SCM)

Both of these Microsoft tools can be used to test your IIS security. The Security Configuration Wizard (SCW) runs different checks and provides advice and recommendations on how to boost your server’s security. The Security Compliance Manager (SCM) tool performs security tests on your server and compares server configurations to predefined templates as per industry best practices and security guide recommendations.

Updates

Finally, ensure that you keep up to date with the latest updates and security patches. It is interesting how often this basic security requirement is missed. The majority of hacks affecting the web server occur on unpatched servers. This just demonstrates how important it is to always keep your IIS web server up to date.


European IIS 8 Hosting - UK :: How to Optimize Your IIS 7.5/8 Performance

clock March 3, 2015 06:58 by author Scott

Most of you must be very familiar with IIS, moreover if you use Windows Server and deploy your ASP.NET application. In this tutorial, we will only give short tips about how to improve your IIS 7.5/8 performance. With good performance, IIS will serve better and faster web pages to your users.

Please Disable ASP Debugging

When you run your server in the production environment, you may not need to run ASP debugging mode. Stopping debugging mode will save you a great amount of processing power. To disable debugging, click on your server name in IIS and then right click on it to enable feature view. One the right pane, click on ‘compilation’ and then click on ‘debugging properties’. Next, set the following values as given below:

Server side debugging: false

Client side debugging: false

Limit ASP Threads per Processor

This limits the number of ASP requests handled by IIS simultaneously. Normally, the default value is 25. The maximum allowed number is 100. You can increase it to 50 and monitor the performance level of your IIS. To change this value click on your server and then double click on ASP under IIS in the feature view mode. Next, click on “limit properties” and set the value, as you consider suitable to match your processing needs.

Enable HTTP Compression

This is something that our clients ask to configure and it is really effective to make your site run faster. This feature helps to transfer data faster between IIS and client browsers and saves your bandwidth. You can compress HTTP in both website level and server level. To enable server level http compression, right click on sever name in IIS and then double click on compression under IIS on the right pane. You can enable both static and dynamic http compression.

Setup Logging Option

With default settings, IIS logs almost everything under the hood.  You either can disable logging option or can select a number of essential events to log in your server. To set logging option, click on “Sites” in IIS server, and then select the parameters that you want to keep as a log in your server. Remember to enable the “feature view” by right clicking on the server name in IIS. In the feature view pane, click on ‘log’ and set the logging feature; to disable logging completely click on the disable option on the right pane. Remember that you can set logging option both in server level and website level.

Setup HTTP Response Header

This feature helps to minimize the number of http requests send to IIS by website visitors. HTTP expires header will help the client browser to cache webpages and its elements such as images, CSS etc.  To set http expires you need to click on HTTP response headers in the IIS, and then click on “set common headers”. Next select ‘expire web contents” and select the number of days or hours—this is total time your contents will be cached in the client’s browser.

Enable Output Caching

When you enable output caching, IIS will keep a copy of requested webpages. If a new user requests the very same webpage located in the cache, IIS will send the copy from its cache without reprocessing the contents. Output caching can significantly improve your server response time for dynamic contents.

Modify ASP queue length property

This value represent how often IIS will send “server too busy” message (HTTP error 503) to the users when ASP is receiving high number of requests. If the queue length time is too high, IIS will send “busy message” to users with longer delay, which make the users feel that the server may be out of service.  Too low queue length will cause the server send “server busy message” quite often, consuming resources of the server. If you are unsure about this setting, you can follow Microsoft’s recommendation for one-to-one ratio, which means if you have four processors in your server with ASP thread processor value set to the default 25, you can set the queue length to 25*4=100.

You can change the queue length by going at “limit properties”—the same way you change the ASP thread processor value.

Control the connection limits

This option can give you to control the connection in three ways: controlling connection timeout, controlling maximum bandwidth per website, controlling concurrent connections.

This connection limit option will allow you to set the maximum bandwidth per second and the maximum concurrent connection per second.  The maximum allowed bandwidth make a site use only a certain amount of bandwidth per second—thus improving the performance of other sites in a shared web-hosting environment.

Controlling the number of concurrent connection is another way to improve IIS performance and to improve the security of IIS as well. This option will allow only the specified number of clients to connect to the website at a given moment. So, if any malicious program tries to send numerous connection requests will be rejected by the IIS, and thus prevent your server becoming overloaded with requests during a DDoS attack.

After changing the performance settings, check the performance level of your server by gradually increasing load to a desired level. You can also consider using Google page speed tool to check whether page-loading time has been improved.

Hope above tutorial bring benefits for you. Thanks for reading.


European IIS 8.5 Hosting - UK :: How to Install Wordpress on Windows Server 2012

clock November 4, 2014 08:56 by author Scott

In this tutorial, I will show you how to install Wordpress on Windows Server 2012 with IIS 8. Assume that you have your own dedicated server and you want to install Wordpress. If you use shared hosting provider, all can be done via one click installation via your hosting provider Control panel, or you can ask your hosting provider to install Wordpress for you. Now, how about if you own your dedicated server and you want to install Wordpress on server?

Configuration

The configuration of IIS 8 is quite easy: you just enable the Web Server role through Server Manager. Please see the screenshot below

Then, please make sure you install PHP Manager, I would recommend you to use http://phpmanager.codeplex.com/. This is good tool and help you to enable and disable PHP extensions.

Installation

To make things easy, you can install and configure PHP quite easily using the Microsoft Web Platform Installer. When you run the Web Platform Installer (Web PI), you can do a quick search for “sql php” and it comes up a few results. When you select “Microsoft Drivers 3.0 for PHP v5.4 for SQL Server in IIS”, which is what we need, all other prerequisites will be automatically installed as well as dependencies (PHP and URL Rewrite for IIS).

After Web PI finishes, you will have PHP installed and configured for use in IIS. Time to do a little test to see if everything is running smoothly. Create a new file under C:\inetpub\wwwroot\ (or wherever your Default Web Site is pointing to) named test.php with the following content:

<?php echo phpinfo(); ?>

This will output information about your PHP configuration (ref: http://php.net/manual/en/function.phpinfo.php).

Time to try it out: navigate to the page (likely http://localhost/test.php). If you are greeted with a screen with purple blocks of information about your PHP configuration, you’re all set and you can skip ahead to the WORDPRESS INSTALLATION section. Chances are you’re going to be greeted with an IIS 403.1 error screen, however, which is due to the fact that the user account that IIS is currently using for the anonymous access to your site doesn’t have the proper privileges to access your wwwroot (or equivalent) folder on disk. This is solved quite easily by granting this user (called IUSR by default) access to the wwwroot folder through Windows Explorer or your other favorite method.

Then, please retry

Wordpress Installation

Now we can start downloading the actual WordPress files and start the installation. First off, grab the latest version (or the version of your choice) of WordPress. We will also need the WP Db Abstraction plugin. After downloading, unblock and unZIP both files in a folder under wwwroot (or your Web Site’s location). Installation of the WP Db Abstraction plugin is quite easy, just follow the steps outlined in the readme.txt:

  • Upload wp-db-abstraction.php and the wp-db-abstraction directory to wp-content/mu-plugins. This should be parallel to your regular plugins directory. If the mu-plugins directory does not exist, you must create it.
  • Put the db.php file from inside the wp-db-abstraction.php directory to wp-content/db.php
  • Visit $your_wordpress_url/wp-content/mu-plugins/wp-db-abstraction/setup-config.php to generate your wp-config.php file

Before you perform the last step, though, go to IIS Manager and enter PHP Manager (it’s located on the Features page of your server under IIS). Scroll down and click the “Enable or disable an extension” link. You need to make sure that php_pdo_sqlsrv.dll and php_sqlsrv.dll are both enabled. You can also go ahead and disable the *mysql*.dll extensions. Here’s my list of enabled extensions:

Now we can visit the setup-config.php page as outlined above. The steps here are quite straightforward, so I’m not going to walk you through them. You will need to create a user on your SQL Server 2012 installation with SQL Server authentication that has access to a database that you also need to create to use for your WordPress installation. 

One note about this process: I had some issues when choosing the default selected “SQL Server using MS PHP driver” and went with the “PDO SqlSrv” option the second time to eliminate these issues.

If the wizard has trouble automatically creating the wp-config.php file, you can either choose to give IUSR write permissions on the folder you created to hold all your WordPress files or you can manually create the file under that folder and paste the output you see on screen in there (I chose the latter). After the wp-config.php file is created, you can start the installation of WordPress by clicking the link on the bottom of the page you’re on.

Wordpress Configuration

After the install, which should only take a minute tops, you are now ready to log in to your WordPress admin dashboard and start configuring it how you’d like. As you can see, there’s a sample post and comment already waiting for you. If your experience is anything like mine, you will notice that when you navigate to the Posts -> All Posts option on the top left of your dashboard you won’t actually see these posts in the list. It took some hunting around the web to figure this out, but apparently there’s a line in the translations.php file of the WP Db Abstraction plugin that’s causing this (thanks to tm3ister on http://sourceforge.net/projects/wp-sqlsrv/forums/forum/1124403/topic/5004241 for figuring this out!). The solution is to manually edit the translate_limit function in the mu-plugins/wp-db-abstraction/translations/sqlsrv/translations.php file:

Change

// Check for true offset
if ( (count($limit_matches) == 5  )  && $limit_matches[1] != '0' ) {
    $true_offset = true;
} elseif ( (count($limit_matches) == 5 )  && $limit_matches[1] == '0' ) {
    $limit_matches[1] = $limit_matches[4];
}

To

// Check for true offset
if ( (count($limit_matches) == 5  )  && $limit_matches[1] != '0' ) {
    $true_offset = true;
} elseif ( (count($limit_matches) >= 5 )  && $limit_matches[1] == '0' ) {
    $limit_matches[1] = $limit_matches[4];
}

The last thing we’re going to configure is Permalinks (or pretty URLs) for our posts. When you navigate to Settings -> Permalinks on the admin dashboard, you’ll see some options to rewrite URLs to be more human and search engine friendly. For now, select Custom Structure and enter/%year%/%monthnum%/%postname%/ in the text field and hit Save Changes. The last step is to create a web.config file in our WordPress folder to rewrite the URLs according to this scheme with IIS URL Rewrite. Create a new web.config file (if you don’t have one already) in the folder you installed WordPress to and copy in the following:

<?xml version="1.0" encoding="utf-8"?>
<configuration>
  <system.webServer>
    <rewrite>
      <rules>
        <rule name="wordpress" patternSyntax="Wildcard">
          <match url="*" />
          <conditions>
            <add input="{REQUEST_FILENAME}" matchType="IsFile" negate="true" />
            <add input="{REQUEST_FILENAME}" matchType="IsDirectory" negate="true" />
          </conditions>
          <action type="Rewrite" url="index.php"/>
        </rule>
      </rules>
    </rewrite>
  </system.webServer>
</configuration>

Done!! Your Wordpress is ready on Windows Server 2012.


European Full Trust ASP.NET Hosting - UK :: How to Fix The System.SecurityException error occurs when a SocketTools

clock October 31, 2014 08:27 by author Scott

When you application requires Full Trust permission and your hosting provider provider doesn’t offer Full Trust permission, then your application won’t work. This is an error message that you might find if your hosting provider doesn’t support Full Trust

“The System.SecurityException error occurs when a SocketTools .NET component is used with an ASP.NET application, displaying the error message: The application attempted to perform an operation not allowed by the security policy.”

More Information

This error indicates that the server is not configured for full trust. The SocketTools .NET components require unrestricted access to specific system resources such as the networking subsystem and system registry. To grant full trust to your ASP.NET application, you need to modify the web.config file to include the following:

<location allowOverride="true">
  <system.web>
    <trust level="Full" originUrl=".*"/>
  </system.web>
</location>

Note that setting the code access security level to full trust enables the application to call native code, access system services, open database connections and access the registry and modify files outside of the server’s virtual directory.

If your hosting provider doesn’t provide full trust, then above code won’t work too. So, you need to find hosting provider that support Full Trust.


About HostForLIFE.eu

HostForLIFE.eu is European Windows Hosting Provider which focuses on Windows Platform only. We deliver on-demand hosting solutions including Shared hosting, Reseller Hosting, Cloud Hosting, Dedicated Servers, and IT as a Service for companies of all sizes.

We have offered the latest Windows 2016 Hosting, ASP.NET Core 2.2.1 Hosting, ASP.NET MVC 6 Hosting and SQL 2017 Hosting.


Tag cloud

Sign in