IIS 7.5 and IIS 8.0 European Hosting

BLOG about IIS 7.5 Hosting, IIS 8.0 Hosting and Its Technology - Dedicated to European Windows Hosting Customer

IIS 8 Hosting - HostForLIFE.eu :: How to Install SSL Certificate in IIS 8?

clock April 6, 2016 18:31 by author Anthony

In this tutorial, I will show you how to install SSL certificate in IIS 8.0. To communicate securely over the web requires the use of encryption on the messages passed back and forth.  Encryption on the web is accomplised through the use of Transport Layer Security (TLS). Http traffic layered over SSL/TLS is called Https.  It would be all too easy to venture down the rabbit hole and explain in great detail how TLS establishes a secure connection, but the crypto minutia is likely a bit out of scope for the purposes of this discussion.  However, a basic understanding of the mechanisms used by TLS to secure the communication channel will make understanding the use of SSL certificates much easier.

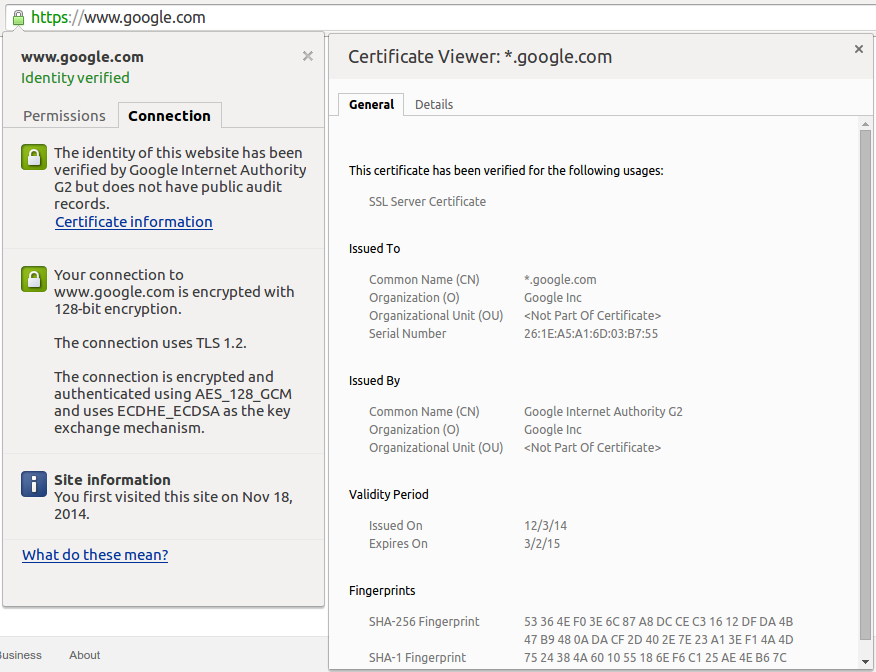
TLS uses public key cryptography, which requires the distribution of a public key.  This public key is transmitted as part of an SSL certificate, along with other identifying information meant to establish trust that a server is who it is supposed to be (and not a malicious eavesdroper).  While it is possible to create self-signed certificates, browsers do not trust these certificates and will give users dire warning when they are encountered (this would be like me printing my own drivers license and saying "See, I am who I say I am... really!").  For a certificate to be trusted, it must be issued by a trusted Certificate Authority (CA).  When a secure connection is made using a trusted certificate, most browsers will display an indicator that the connection is secure.  In Chrome, clicking the green lock icon will reveal information regarding the details of the connection:

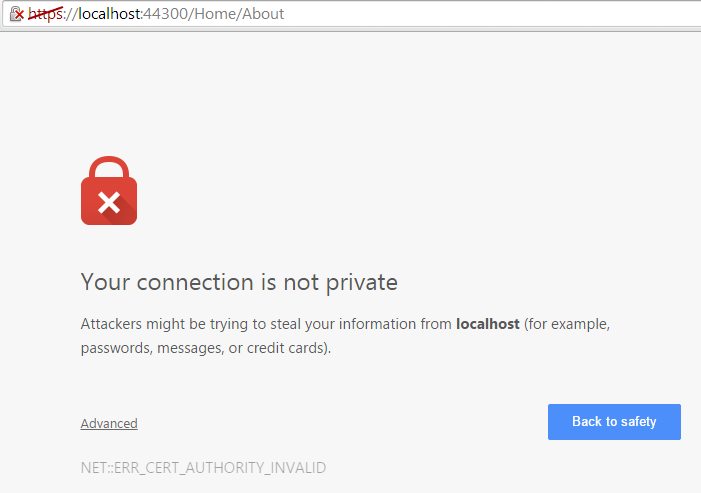
And this is what a self-signed certificate will get you:

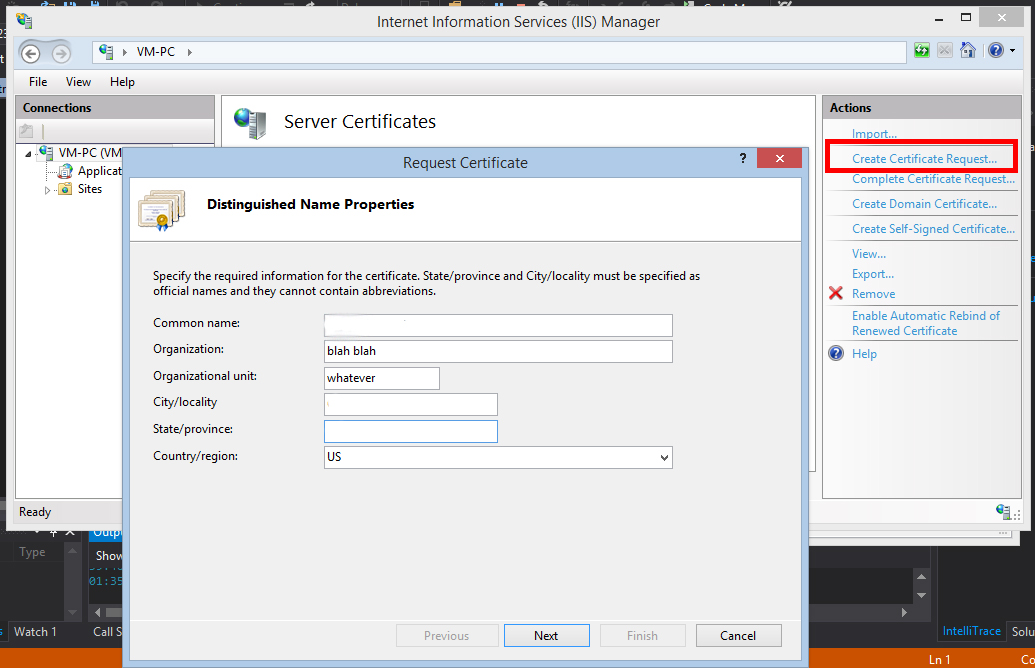
So to fully take advantage of Https you need to have a certificate from a trusted CA (Symantec [GeoTrust, VeriSign], Comodo, GlobalSign, etc).  Getting a certificate involves first creating a Certificate Signing Request (CSR).  IIS has the capability of creating a CSR, and their are other tools available, including the linux command line using OpenSSL.  This is what it looks like in IIS:

You'll transmit the CSR in one form or another to the CA you are getting your certificate from, and after they've performed whatever level of due diligence they'll send you your SSL certificate.  Once you have the certificate, you'll need to install it on the server hosting your site.  For .NET based web applications, that likely means IIS or Azure.

  • Installing SSL Certificate in IIS 8.0

In IIS Manager, under Server Certificates, there is an option for "Complete Certificate Request".  Here you'll browse to the *.cer file that contains your certificate, add a friendly name to make management easier it doesn't change anything in the certificate and add the certificate to the Personal certificate store.  This installs the certificate to the server.  To use it in your site, you have to bind it.  Navigate to the site settings in IIS, go to bindings, and add a binding for https using port 443 and the created certificate.

  • Using Https in the application

Using the URL Rewrite rule described in the Azure SSL instruction involved adding this rule to the web.config file:

<system.webServer>
  <rewrite>
    <rules>
      <rule name="Force HTTPS" enabled="false">
        <match url="(.*)" ignoreCase="false"/>
      <conditions>
        <add input="{HTTPS}" pattern="off"/>
      </conditions>
        <action type="Redirect" url="https://{HTTP_HOST}/{R:1}"
                appendQueryString="true" redirectType="Permanent"/>
      </rule>
    </rules>
  </rewrite>
  </system.webServer>

In MVC, using the [RequireHttps] attribute gives fine grained control over what portions of the site will need to use https:

[RequireHttps]
public ActionResult About()
{
    ViewBag.Message = "Your application description page.";
 
    return View();
}

HostForLIFE.eu IIS 8 Hosting

HostForLIFE.eu revolutionized hosting with Plesk Control Panel, a Web-based interface that provides customers with 24x7 access to their server and site configuration tools. Plesk completes requests in seconds. It is included free with each hosting account. Renowned for its comprehensive functionality - beyond other hosting control panels - and ease of use, Plesk Control Panel is available only to HostForLIFE's customers. They offer a highly redundant, carrier-class architecture, designed around the needs of shared hosting customers.


European IIS 8 Hosting - How to solve Could not load type ‘System.ServiceModel.Activation.HttpModule’

clock December 10, 2013 04:55 by author Patrick

Do you ever encountered an error if you deploying WebSocket server application which targeted .NET 4.5 to Windows Server 2012 plus IIS 8? Yes, it was an exception shown in browser whenever tried to open a web page. The exception said:


This problem is: the default configuration in applicationHost.config (in C:\Windows\System32\inetsrv\config) declared two conflicted modules and two conflicted handlers:


As we know, applicationHost.config contains the root settings for all web sites and web applications on the server. Therefore, any web application would have all the four conflicted modules and handlers loaded by default. “ServiceModel” and “svc-Integrated” were for .NET Activation 3.x while “ServiceModel-4.0” and “svc-Integrated-4.0” were for .NET Activation 4.x. Unfortunately, the 3.x items were declared before the 4.x items. That was why the exception occurred for a .NET 4.x web application!

Then how did such a situation happen? On Windows Server 2008, it could happen when you install .NET 3.x framework or IIS 7.5 with Activation features after .NET framework 4.x is installed. However, on Windows Server 2012, it always happens when you install .NET framework 3.x with Activation features.


Microsoft officially announced the solution (http://support.microsoft.com/kb/2015129) for Windows Server 2008 plus IIS 7.5: manually running “aspnet_regiis.exe /iru” for .NET framework 4.x (in C:\Windows\Microsoft.NET\Framework\v4.0.30319 or C:\Windows\Microsoft.NET\Framework64\v4.0.30319). However, aspnet_regiis.exe is not allowed to run for IIS 8.

The final solution was to delete the 3.x module and handler from IIS manager. You could delete them at the application or site level if you want to keep them in applicationHost.config. But if you wanted to delete them from applicationHost.config. So you should did the following steps:

1.      In IIS manager, click the machine name node.

2.      In “Features View”, double-click “Modules”.

3.      Find “ServiceModel” and remove it.

4.      Go back to the machine name node’s “Features View”, double-click “Handler Mappings”.

5.      Find “svc-Integrated” and remove it.

Now everything works well.


European IIS 8 Hosting - how to setup IIS ISAPI CGI Restriction with powershell

clock October 3, 2013 10:48 by author Ronny

There are several ways to enable IIS ISAPI CGI Restrictions. Enabling this feature can be directly in IIS or using Powershell. This section will explain How can enable IIS ISAPI CGI Restrictions with Powershell. Here below is the script for Powershell.

Import-Module webadministration 

function Is64Bit 
 { 
      [IntPtr]::Size -eq 8 

 }

 function EnableIsapiRestriction($isapiPath){ 

 $isapiConfiguration = get-webconfiguration "/system.webServer/security/isapiCgiRestriction/add[@path='$isapiPath']/@allowed" 

if (!$isapiConfiguration.value){ 

set-webconfiguration "/system.webServer/security/isapiCgiRestriction/add[@path='$isapiPath']/@allowed" -value "True" -PSPath:IIS:\ 

Write-Host "Enabled ISAPI - $isapiPath " -ForegroundColor Green 
 } 
 } 

    function EnableDotNet40Isapi($systemArchitecture){ 

$frameworkPath = "$env:windir\Microsoft.NET\Framework$systemArchitecture\v4.0.30319\aspnet_isapi.dll"

EnableIsapiRestriction $frameworkPath      
 } 

    function Main(){ 

if (Is64Bit){ 

EnableDotNet40Isapi "64" 


EnableDotNet40Isapi 

    Main

Now IIS ISAPI CGI Restrictions have been active. Happy programming!


European IIS Hosting - Amsterdam :: How to Host WCF Service in IIS 8 (Windows Server 2012)

clock April 25, 2013 06:56 by author Scott

This blog cover brief information how to host your WCF service in IIS8 (Windows Server 2012).

Here is the solution.

Server Roles

1. First make sure you have enabled IIS function and .net 3.5 in Features.
For the IIS features, please remember to enable ASP.NET3.5 and ASP.NET 4.5

2. Second, check the IIS Hostable WebCore
3. Finally, I think the most important is this:

Check Application Sever->Web Server (IIS) Support

I have also check the HTTP Activation in Windows Process Activation Service Support, but I do not know if it is required.

For the freatures,

1. Check all items in .NET 3.5
2. Check WCF Service in .NET 4.5

That’s it.

Last but not least, I have register the WCF Service from

C:\Windows\Microsoft.NET\Framework\v3.0\Windows Communication Foundation\ServiceModelReg.exe –i

Run the above in command line.


About HostForLIFE.eu

HostForLIFE.eu is European Windows Hosting Provider which focuses on Windows Platform only. We deliver on-demand hosting solutions including Shared hosting, Reseller Hosting, Cloud Hosting, Dedicated Servers, and IT as a Service for companies of all sizes.

We have offered the latest Windows 2016 Hosting, ASP.NET Core 2.2.1 Hosting, ASP.NET MVC 6 Hosting and SQL 2017 Hosting.


Tag cloud

Sign in