IIS 7.5 and IIS 8.0 European Hosting

BLOG about IIS 7.5 Hosting, IIS 8.0 Hosting and Its Technology - Dedicated to European Windows Hosting Customer

IIS 8.0 Hosting UK - HostForLIFE.eu :: Recognizing and Handling.Net Server-Side (Output) Caching

clock January 29, 2024 07:41 by author Peter

A user's request does not go to the database every time they visit a website in order to answer every detail. As an alternative, some data is extracted directly, which speeds up and improves efficiency. This tactic enables the server to process numerous requests from various users without interfering with the database. Important information is stored in the server's memory so that it can respond to your request promptly.


Given that data is typically saved in databases, you may be asking how the server obtains, stores, and locates this data.

Thus, the Internet Information Services, or IIS, serves as the operation's beating heart.

Output Caching is the name of the operation.


Even the type of file and duration of storage are customizable. by using the easy steps listed below.

  • On your server, open the Internet Information Services (IIS) Manager.
  • Access your web application by navigating through the Connections pane.
  • Give the "Output Caching" feature a double-click.
  • Examine the cached items, their expiration dates, and other pertinent details in the "Output Caching" feature.

But how can the cache be kept there?
Installing System is hence the first step.Net.Caching from the Nuget bundle

Caching in System.Web
You can implement caching within a server-side web application, usually hosted by Internet Information Services (IIS), by using the classes provided by the System.Web.Caching namespace. The caching method uses the server's RAM to cache data when you use the System.Web.Caching namespace in an ASP.NET web application hosted on Internet Information Services (IIS).

Create
HttpRuntime.Cache.Insert("yourkey","your value");To do CRUD activities with such caches, there are a few methods under this namespace.

This is how the cache is set. You might have noticed, though, that the code above doesn't indicate when this caching item expires. This suggests that unless the web application is terminated or restarted, the caching item won't be destroyed. As a result, you must also include an expiration.

Here's another method to get there:

HttpRuntime.Cache.Insert(
     string key,
     object value,
     System.Web.Caching.CacheDependency dependencies,
     DateTime absoluteExpiration,
     TimeSpan slidingExpiration
);

You are aware of the value and key in this case, but what about the other parameters?

Dependencies: When any of a cache item's dependencies are altered or eliminated, the cache item will be automatically cleared.

Nonetheless, if you would like it to stay in the cache until further specified expiration conditions (such absolute or sliding expiration) are satisfied or until it is manually deleted.

Absolute Expiration: The cache can have a precise expiration time that you specify. To set its value, there are three options:

  • Absolute Time of Expiration: AbsoluteTime belongs to the DateTime type. You designate a precise day and time for the cache item to expire. The cache expires when this date and time are reached.
  • Save.NoAbsoluteExpiration: This constant value means that the item will stay in the cache until it is manually removed, and it does not have an absolute expiration period.
  • Blending using Adaptive Expiration:  The slidingExpiration parameter needs to be set to NoSlidingExpiration if you are utilizing absolute expiration.

Declining Expiration
1. Sliding Expiration makes sure that the cache item lifespan will be increased by the interval value if the data is accessed within the designated time frame. For instance, a session with a 10-minute expiration is introduced.
TimeSpan.FromMinutes(5), TimeSpan.FromSeconds(30), NoSlidingExpiration, etc. are few examples.

2. Combining with AbsoluteExpiration: NoAbsoluteExpiration is required as the absolute expiration argument if sliding expiration is being used.


IIS 8 Hosting - HostForLIFE :: How Do I Deploy and Publish a.NET 7 Application in IIS?

clock August 22, 2023 12:50 by author Peter

This article walks you through the process of installing and publishing a.NET 7 application to Internet Information Services (IIS).


Step 1: Configure IIS (Optional)
If IIS is not already configured, we can use the procedures below to enable it.
Navigate to the Control Panel > Programs > Programs and Features > Turn on or off Windows features.
Increase the availability of Internet Information Services, World Wide Web Services, and Application Development Tools.

Step 2: On the IIS server, install the.NET Core Hosting Bundle.
Check that your server has IIS installed and configured correctly. Otherwise, you can proceed with the optional procedures listed above.
Ascertain that the required components for hosting.NET 7 applications are enabled. The hosting package includes the.NET Core Runtime,.NET Core Library, and the ASP.NET Core Module.

After installation, please restart the server.

Step 3: Save to a File Folder
Right-click the project you wish to deploy in Visual Studio and select publish.

Click on Folder > Next > Folder location will populate the default path as “bin\Release\net7.0\publish\”. > Click on Finish > Publish.

OPTIONAL - An alternative method for generating published files,
Navigate to the root directory of your.NET 7 project in a terminal.
To publish your application, use the following command:
dotnet publish -c Release -o PublishOutput

This will compile your application in Release mode and generate the necessary files in the Publish folder.

Step 4. Copy Files to Preferred IIS Location
Now, copy the published files to the location where they should be stored. In our case, let's copy the files to C:\inetpub\wwwroot\EmpoyeeAPI.


Step 5: In IIS, create an application and configure the application pool.
On your server, launch the IIS Manager.
To host your application, either create a new site or use an existing one. Select "Add Website" from the context menu when you right-click on the "Sites" node.
Provide a site name, a physical path (to the previous step's PublishOutput folder), and an optional hostname.

Because.NET 7 uses the.NET Core runtime, make sure the.NET CLR version is set to "No Managed Code."
Select Application Pools > Choose the name of the application pool > Configure the.NET CLR version to "No Managed Code" > Select "Integrated" as the pipeline mode.

Step 6. Test your app after deployment
After configuring the site, try accessing it through a web browser. Make sure everything is working as expected.

Important note: Because we are delivering Web API in our situation, the Swagger UI middleware is often retained within the app.Environment.Check the IsDevelopment() function. I kept this swagger middleware outside of this condition for demonstration purposes so that we could test the page in a browser.


IIS 8 Hosting - HostForLIFE :: How To Change Localhost To Custom Domain Name In IIS?

clock September 9, 2022 08:55 by author Peter

Most developers face a lot of problems while releasing a website in the production/hosting environment because they don't have experience with local IIS and custom domain names. IIS Express (localhost) provides developers with almost all the settings for development and debugging. Since most of the developers work with IIS Express, they have a lot of issues while working on the real server (hosting environment).


Instead of running, developing, and debugging (testing) a website using a localhost URL (like http://localhost:), local IIS (custom domain name) gives a good feel and looks professional. Setting a custom domain name instead of localhost will help you during website development, debugging, and its release.

Often, developers release security patches and updates to their customers. For this, they require the versioning of the domain. The virtual directory and application concept in IIS (Internet Information Services) helps developers to a version that I will also discuss in my article.

In this tutorial, I am going to explain various steps to change localhost to a custom domain name in IIS. This detailed article will cover the following topics as follows,

    Introduction
    Terminologies
    Prerequisites
    IIS Setup Configurations
    Changing localhost to Custom Domain Name Configurations
    Advanced Custom Domain Name Configurations
    Conclusion

Terminologies
As per Wikipedia, "Internet Information Services (IIS, formerly Internet Information Server) is an extensible web server software created by Microsoft for use with the Windows NT family. IIS supports HTTP, HTTP/2, HTTPS, FTP, FTPS, SMTP and NNTP".

Application Pool
An application pool defines a group of one or more worker processes, configured with common settings that serve requests to one or more applications that are assigned to that application pool. Since application pools allow a set of web apps to share one or more similarly configured worker processes, they provide an easy way to isolate a group of web applications from other web applications on the server machine.

With the help of application pools, we can achieve the level of application isolation required in terms of availability and security by deploying applications across multiple application pools. Each worker process is separated by process boundaries. Therefore, problems with applications in one application pool have no effect on sites or applications in other application pools. Application pools significantly increase the dependability and management of your web infrastructure.

Site
A site is a container for applications and virtual directories that can be accessed through one or more unique bindings. Binding has two major communication properties:

    Binding Protocol: It defines the protocol over which communication between the server and the client occurs. It can be either HTTP or HTTPS.
    Binding Information: It defines the information that is used to access the site. It is the combination of IP address, port, and optional host header.

If a site requires different protocols or binding information, it may have more than one binding.

Note
In earlier versions of IIS, only the HTTP and HTTPS protocols were supported, but in IIS 7 and above, bindings can apply to any protocol.

Application
An application is a set of files that delivers content or provides services over a protocol, such as HTTP. When you create an application in IIS, the path to the application becomes part of the URL of the site.

Virtual Directory
A virtual directory is a directory name (also called a path) that you specify in IIS and mapped to a physical/virtual directory on the system.

Note
Virtual Directories aren't supported with ASP.NET Core apps. An ASP.NET Core app can be hosted as an IIS sub-application.

In short, a site can contain more than one application or virtual directory, an application can contain more than one application or virtual directory, and a virtual directory can contain more than one application.

Prerequisites

    IIS (Internet Information Services)
    Running Project (Here, I am using an ASP.NET web application).
    Web Browser (Whatever you use, but I like Microsoft Edge)

IIS (Internet Information Services) Setup Configurations

This section will tell you how to set up IIS (Internet Information Services) in your system. First of all, we have to check whether our system has IIS enabled or not? For this open any of your favorite browsers and just type the following URL, "IIS Windows".

If you get this page, it means that you have already enabled IIS in your system. So, you can skip this section and go to the next section.
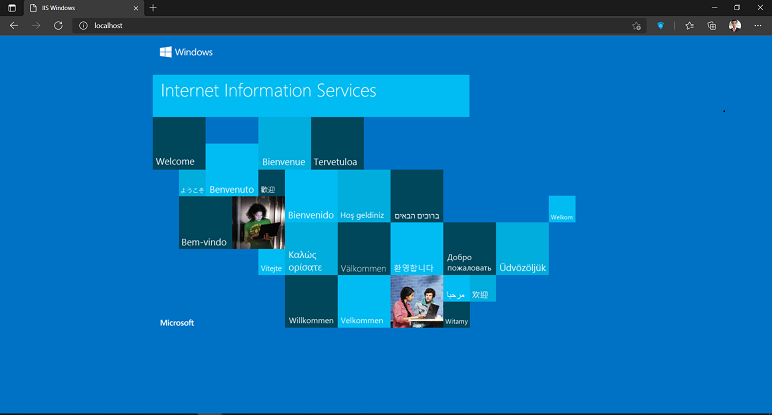
If you get this error, it means you need to enable it. So, stay with us and follow the steps given below very carefully. (Make sure you are connected to the Internet when configuring it).

Note
You can also check if you have IIS enabled on your system by searching for "IIS" in your Universal Search, which is next to the Start button.

Step 1
Click Start and type "Turn Windows features on or off" in the search bar. Then, click Turn Windows features on or off to open Windows Features.

Step 2
Search for "Internet Information Services" and check it and every box that appears in it needs to be checked. Click on the "OK" button to proceed.

Note
Make sure you have checked every box inside it. Because if some features are left, it will cause problems in IIS while mapping your application.

Step 3

After successful installation, a message will appear on the screen "Windows completed the requested changes". Now, click Close. (Now, you have to restart your system to apply all the changes).

After the system restarts, search for IIS again in your Universal Search Bar near the Start button. You will see the IIS as a result. Now, click on, to open it. (Alternatively, you can confirm it by typing the following URL, IIS Windows in any of your favorite browsers).

Congratulations, you have successfully enabled IIS in your system.

Changing Localhost to Custom Domain Name Configurations
Step 1
Click Start and type "IIS". Then click "Internet Information Services (IIS) Manager" to open the Internet Information Services (IIS) Manager.
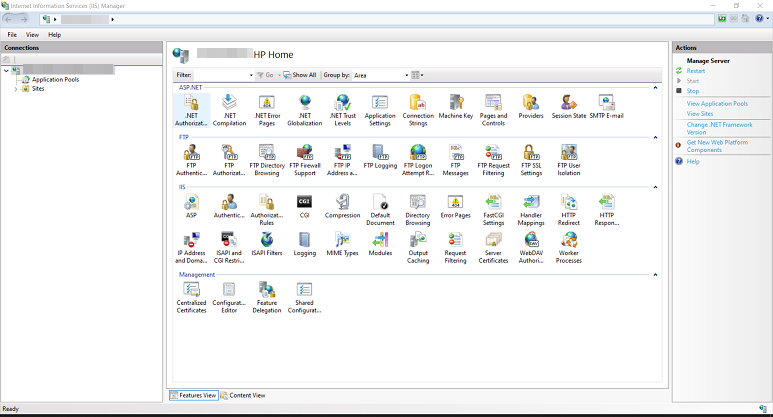
Step 2
First, we create a new application pool to host our new application. Follow steps 2a and 2b very carefully to create a new application pool.

Step 2a
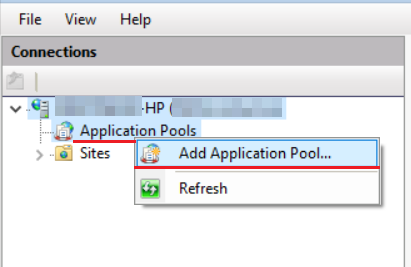
Right-click on the Application Pools, and click on "Add Application Pool...".
Step 2b
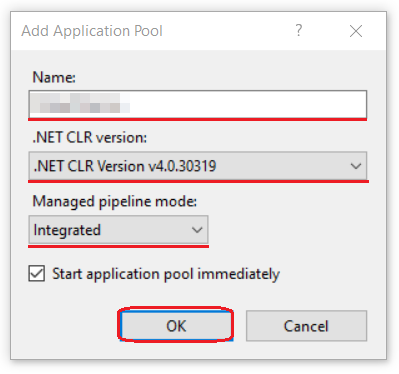
Now, create a new application pool by choosing the following configurations. (Note, if you are using the latest version of the .NET framework, select the following options).
    Give a name to your new application pool
    Select ".NET CLR Version v4.0.30319" option from .NET CLR Version
    Select the "Integrated" option from Managed pipeline mode
Step 3
Right-click on the Sites and select the "Add Website..." option from the list.
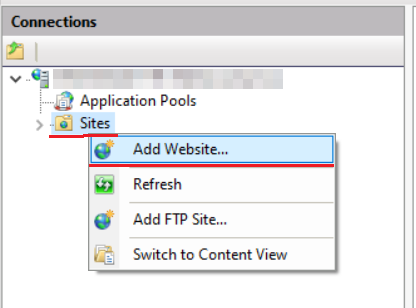
Step 4
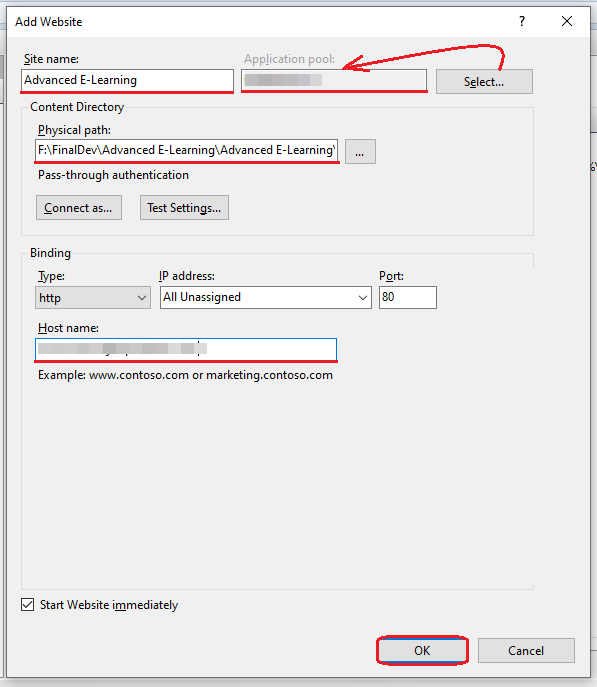
Now, enter the details as per the given fields and your requirements. And, click the "OK" button.

    Site Name: Choose a name for your new website.
    Application pool: Select the "Application pool" that you have created earlier, by clicking on the "Select" option.
    Physical path: Select the main (root) directory of the application.
    Host name: Now, it's time to set up your custom domain name. In the "Host name" field, type the custom domain name you want for your application.
Note
If you do not select the Application Pool, a new application pool is created using the name of the site when the site is added. IIS defaults to one application pool per site.

Step 5It's time to register/map your custom domain name with your local IP (127.0.0.1). To do this, navigate to the following path, "C:\Windows\System32\drivers\etc" and open the "hosts" file in any text editor with the Administrator privileges. Remember that, you will need administrator privileges to save your changes in the "hosts" file.

This is a sample HOSTS file used by Microsoft TCP/IP for Windows. This file contains the mappings of IP addresses to host names. Each entry should be kept on an individual line. The IP address should be placed in the first column followed by the corresponding host name. The IP address and the host name should be separated by at least one space. Additionally, comments may be inserted on individual lines or following the machine name denoted by a '#' symbol.

For example:

  • 102.54.94.97     rhino.acme.com      # source server
  • 38.25.63.10       x.acme.com           # x client host

Now, map your custom domain name as in the following example and save the file.
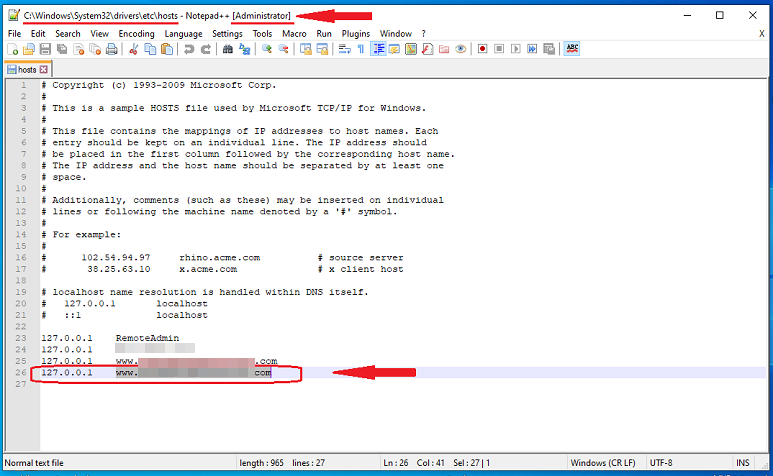


Congratulations, you have successfully changed localhost to the custom domain name for your application.


IIS 8 Hosting Germany - HostForLIFE.eu :: WordPress on Windows Server 2012 with IIS 8 and SQL Server 2012

clock October 18, 2019 11:09 by author Peter

Yesterday I decided to install WordPress for my new blog, both because it seemed like good product for the job and also to get some experience in running it (and thus also PHP) on Windows Server 2012 with IIS 8 Hosting. There are some good resources scattered around the web, but none seemed up to date, so I decided to share my notes from the install on here. I’m assuming you already have Windows Server 2012 and SQL Server 2012 installed.

IIS 8 CONFIGURATION
The configuration of IIS 8 is quite easy: you just enable the Web Server role through Server Manager. Just to be complete, the screenshot below shows the options I currently have installed, but keep in mind that I’m also running ASP.NET on my server.

Yesterday I decided to install WordPress for my new blog, both because it seemed like good product for the job and also to get some experience in running it (and thus also PHP) on Windows Server 2012 with IIS 8. There are some good resources scattered around the web, but none seemed up to date, so I decided to share my notes from the install on here. I’m assuming you already have Windows Server 2012 and SQL Server 2012 installed.

IIS 8 CONFIGURATION
The configuration of IIS 8 is quite easy: you just enable the Web Server role through Server Manager. Just to be complete, the screenshot below shows the options I currently have installed, but keep in mind that I’m also running ASP.NET on my server.I also highly recommend you install PHP Manager (http://phpmanager.codeplex.com/) as it will help us in enabling/disabling PHP extensions from within IIS Manager later on and provides an easy way to access php.ini as well.

PREREQUISITE INSTALLATION
To make things easy, you can install and configure PHP quite easily using the Microsoft Web Platform Installer. When you run the Web Platform Installer (Web PI), you can do a quick search for “sql php” and it comes up a few results. When you select “Microsoft Drivers 3.0 for PHP v5.4 for SQL Server in IIS”, which is what we need, all other prerequisites will be automatically installed as well as dependencies (PHP and URL Rewrite for IIS).

After Web PI finishes, you will have PHP installed and configured for use in IIS. Time to do a little test to see if everything is running smoothly. Create a new file under C:\inetpub\wwwroot\ (or wherever your Default Web Site is pointing to) named test.php with the following content:
<?php echo phpinfo(); ?>

This will output information about your PHP configuration.

Time to try it out: navigate to the page (likely http://localhost/test.php). If you are greeted with a screen with purple blocks of information about your PHP configuration, you’re all set and you can skip ahead to the WORDPRESS INSTALLATION section. Chances are you’re going to be greeted with an IIS 403.1 error screen, however, which is due to the fact that the user account that IIS is currently using for the anonymous access to your site doesn’t have the proper privileges to access your wwwroot (or equivalent) folder on disk. This is solved quite easily by granting this user (called IUSR by default) access to the wwwroot folder through Windows Explorer or your other favorite method.

Retry and bask in the glory of the phpinfo() output.

WORDPRESS INSTALLATION

Now we can start downloading the actual WordPress files and start the installation. First off, grab the latest version (or the version of your choice) of WordPress. We will also need the WP Db Abstraction plugin. After downloading, unblock and unZIP both files in a folder under wwwroot (or your Web Site’s location). Installation of the WP Db Abstraction plugin is quite easy, just follow the steps outlined in the readme.txt:Upload wp-db-abstraction.php and the wp-db-abstraction directory to wp-content/mu-plugins. This should be parallel to your regular plugins directory. If the mu-plugins directory does not exist, you must create it.

Put the db.php file from inside the wp-db-abstraction.php directory to wp-content/db.php
Visit $your_wordpress_url/wp-content/mu-plugins/wp-db-abstraction/setup-config.php to generate your wp-config.php file

Before you perform the last step, though, go to IIS Manager and enter PHP Manager (it’s located on the Features page of your server under IIS). Scroll down and click the “Enable or disable an extension” link. You need to make sure that php_pdo_sqlsrv.dll and php_sqlsrv.dll are both enabled. You can also go ahead and disable the *mysql*.dll extensions. Here’s my list of enabled extensions:

Now we can visit the setup-config.php page as outlined above. The steps here are quite straightforward, so I’m not going to walk you through them. You will need to create a user on your SQL Server 2012 installation with SQL Server authentication that has access to a database that you also need to create to use for your WordPress installation.

One note about this process: I had some issues when choosing the default selected “SQL Server using MS PHP driver” and went with the “PDO SqlSrv” option the second time to eliminate these issues.

If the wizard has trouble automatically creating the wp-config.php file, you can either choose to give IUSR write permissions on the folder you created to hold all your WordPress files or you can manually create the file under that folder and paste the output you see on screen in there (I chose the latter). After the wp-config.php file is created, you can start the installation of WordPress by clicking the link on the bottom of the page you’re on.

WORDPRESS CONFIGURATION

After the install, which should only take a minute tops, you are now ready to log in to your WordPress admin dashboard and start configuring it how you’d like. As you can see, there’s a sample post and comment already waiting for you. If your experience is anything like mine, you will notice that when you navigate to the Posts -> All Posts option on the top left of your dashboard you won’t actually see these posts in the list. It took some hunting around the web to figure this out, but apparently there’s a line in the translations.php file of the WP Db Abstraction plugin that’s causing this (thanks to tm3ister on http://sourceforge.net/projects/wp-sqlsrv/forums/forum/1124403/topic/5004241 for figuring this out!). The solution is to manually edit the translate_limit function in the mu-plugins/wp-db-abstraction/translations/sqlsrv/translations.php file:

Change

// Check for true offset
if ( (count($limit_matches) == 5  )  && $limit_matches[1] != '0' ) {
    $true_offset = true;
} elseif ( (count($limit_matches) == 5 )  && $limit_matches[1] == '0' ) {
    $limit_matches[1] = $limit_matches[4];
}

To

// Check for true offset
if ( (count($limit_matches) == 5  )  && $limit_matches[1] != '0' ) {
    $true_offset = true;
} elseif ( (count($limit_matches) >= 5 )  && $limit_matches[1] == '0' ) {
    $limit_matches[1] = $limit_matches[4];
}

And voila, your posts will now show up.

The last thing we’re going to configure is Permalinks (or pretty URLs) for our posts. When you navigate to Settings -> Permalinks on the admin dashboard, you’ll see some options to rewrite URLs to be more human and search engine friendly. For now, select Custom Structure and enter /%year%/%monthnum%/%postname%/ in the text field and hit Save Changes. The last step is to create a web.config file in our WordPress folder to rewrite the URLs according to this scheme with IIS URL Rewrite. Create a new web.config file (if you don’t have one already) in the folder you installed WordPress to and copy in the following:

<?xml version="1.0" encoding="utf-8"?>
<configuration>
  <system.webServer>
    <rewrite>
      <rules>
        <rule name="wordpress" patternSyntax="Wildcard">
          <match url="*" />
          <conditions>
            <add input="{REQUEST_FILENAME}" matchType="IsFile" negate="true" />
            <add input="{REQUEST_FILENAME}" matchType="IsDirectory" negate="true" />
          </conditions>
          <action type="Rewrite" url="index.php"/>
        </rule>
      </rules>
    </rewrite>
  </system.webServer>
</configuration>

You’re now all set to use WordPress on Windows Server 2012 with IIS 8 and SQL Server 2012!


IIS 8.0 Hosting - HostForLIFE.eu :: How to Fix PUT/POST/DELETE Verb Errors On Site ?

clock March 13, 2019 09:41 by author Peter

A customer was getting errror when utilizing PUT/POST/DELETE verbs on their web application as of late. The error looks like this:
<h2>405 - HTTP verb used to access this page is not allowed.</h2>

<h3>The page you are looking for cannot be displayed because an invalid method (HTTP verb) was used to attempt access</h3>

After some troubleshooting the error was disengaged to the way that WebDav was installed on the server and was catching those requests for its own service use.

Instead of removing Webdav from the server, we made a go at searching for an alternate solution. Thankfully somebody on Twitter comprehended the issue and gave an illustration of changes to make to the customer's web.config record with a specific end goal to disable (remove) the Webdav module for simply that particular webpage without requiring any requiring managerial activities on the server.

The code updates to make to your web.config record to intention this error are:
<configuration>
  <system.webServer>
    <handlers>
      <remove name="WebDAV" />
      <remove name="ExtensionlessUrlHandler-ISAPI-4.0_32bit" />
      <remove name="ExtensionlessUrlHandler-ISAPI-4.0_64bit" />
      <remove name="ExtensionlessUrlHandler-Integrated-4.0" />
      <add name="ExtensionlessUrlHandler-ISAPI-4.0_32bit" path="*." verb="GET,HEAD,POST,DEBUG,PUT,DELETE,PATCH,OPTIONS" modules="IsapiModule" scriptProcessor="%windir%\Microsoft.NET\Framework\v4.0.30319\aspnet_isapi.dll" preCondition="classicMode,runtimeVersionv4.0,bitness32" responseBufferLimit="0" />
      <add name="ExtensionlessUrlHandler-ISAPI-4.0_64bit" path="*." verb="GET,HEAD,POST,DEBUG,PUT,DELETE,PATCH,OPTIONS" modules="IsapiModule" scriptProcessor="%windir%\Microsoft.NET\Framework64\v4.0.30319\aspnet_isapi.dll" preCondition="classicMode,runtimeVersionv4.0,bitness64" responseBufferLimit="0" />
      <add name="ExtensionlessUrlHandler-Integrated-4.0" path="*." verb="GET,HEAD,POST,DEBUG,PUT,DELETE,PATCH,OPTIONS" type="System.Web.Handlers.TransferRequestHandler" preCondition="integratedMode,runtimeVersionv4.0" />
    </handlers>
    <modules>
      <remove name="WebDAVModule" />
    </modules>
  </system.webServer>
</configuration>

HostForLIFE.eu IIS 8.0 Hosting
HostForLIFE.eu is European Windows Hosting Provider which focuses on Windows Platform only. We deliver on-demand hosting solutions including Shared hosting, Reseller Hosting, Cloud Hosting, Dedicated Servers, and IT as a Service for companies of all sizes. We have customers from around the globe, spread across every continent. We serve the hosting needs of the business and professional, government and nonprofit, entertainment and personal use market segments.


European IIS 10 Hosting - HostForLIFE.eu :: Set Default Page For A Website In IIS

clock January 18, 2019 10:07 by author Peter

In a few Web sites, if we type the Web site name, (like www.someurl.com) it will automatically load the page www.someurl.com/index.aspx. This is because of the setting of the “Default Document” feature of IIS. In this post we are going to discuss this feature of IIS.

  1. Open IIS, type the command “inetmgr” in Run window.
  2. Select “Default Document” and click.
  3. In the feature view, we can see some type of Document orderly kept.
  4. The top most had the highest priority and the last one had the least priority.

As per the above figure, the document “Default.htm” had the highest priority and the file “Default.aspx” had the lowest priority. This means whenever the user types a url (like www.someurl.com), then IIS looks for any one of the files that exist in the above order on that Virtual Directory. If it finds any one of the files, it will load that page.

IIS also allows, adds/removes the custom default document per Web site. For example, if we specify a page (say home.htm) as the default document which does not exist in the website, then IIS will look into that website and alert the user as shown below, which explicitly states that each time we type the url, IIS will look in that order.


As per the alert, it is advisable to move the default document at the top level, which will increase the performance in the sense IIS can avoid going further down in the list.


IIS 8 Hosting - HostForLIFE.eu :: How to Config ASP.NET and IIS Request Length?

clock April 8, 2016 20:30 by author Anthony

In this post, i will show you how to configuring ASP.NET and IIS request length for post data. One of the most infuriating things about IIS configuration in general is how the Request length is configured in IIS and ASP.NET. There are several places that control how much content you can send to the server and over the years this setting has changed in a number of ways. The places where it's configured is not super obvious and they can be fluid because some of these features are optionally installed IIS features.

So here are the two main places where the request length is set in IIS and ASP.NET:

  • IIS Request Filtering
  • HttpRuntime maxRequestLength

Let's start with the IIS level setting, which is also a relatively new setting. It's based around the Request Filtering module in IIS which is an optional IIS component, but that is a required component if you have ASP.NET installed on your server (at least in the latest versions). If you have ASP.NET enabled in IIS the Request Filtering module is also enabled and the following settings apply.

If you don't use ASP.NET you can still install Request Filtering, but it's an optional component. So if you only use ISAPI or CGI scripts and no ASP.NET content Request Filtering may not be enabled in which case the following settings cannot be set and aren't required. Since most people do run ASP.NET at least for some sites, for all intents and purposes we can assume that the Request Filtering module is installed on IIS.

So to configure the posted content size you can use the following web.config based configuration settings:

<?xml version="1.0" encoding="UTF-8"?>
<configuration>
    <system.webServer>
     <security>
      <requestFiltering>
        <requestLimits maxAllowedContentLength="500000000"  />
      </requestFiltering>
    </security> 
   </system.webServer>
</configuration>

The maxAllowedContentLength determines the size of the POST buffer allowed in bytes. Above I've set the value to 500megs.

Or you can do the same thing in the IIS Management console using Request Filtering option in the IIS options:

As is usually the case you can apply the filtering at all levels of the IIS hierarchy – Machine, Site and Virtual/Application. Using web.config as shown above sets the settings at the Application level.

Because these are IIS settings, the value controls the IIS upload settings so they are applied against any and all requests that are fired against IIS, including ASP.NET, ASP, ISAPI extensions, CGI/FASTCGI executables, IISNodeJs requests and so on.

ASP.NET traditionally has had its own httpRuntime element in the <system.web> section that control ASP.NET runtime settings one of which is the maxRequestLength. This setting controls the ASP.NET pipeline's acceptance of file uploads and it needs to be configured in addition to the Request Filtering settings described above.

<?xml version="1.0" encoding="UTF-8"?>
<configuration>
  <system.web>
    <httpRuntime maxRequestLength="500000000" executionTimeout="120" />
  </system.web>
</configuration>

You can also use the IIS Management Console and the Configuration Manager option, to view all of the options on the httpRuntime element:

What's interesting is that the settings you see here widely mirror the settings in the Request Filtering section, and they are not inherited. It's your responsibility to make sure the settings are set correctly in both places. I recommend that you take a minute and go through the values you care about and set them correctly in both places.

The above describes ASP.NET settings. If you're using another framework, like WCF you may end up with yet another different set of settings on the WCF bindings and Endpoints. Just be aware of the framework you're using and that it too might have specific filters to restrict request size.


HostForLIFE.eu IIS 8 Hosting

HostForLIFE.eu revolutionized hosting with Plesk Control Panel, a Web-based interface that provides customers with 24x7 access to their server and site configuration tools. Plesk completes requests in seconds. It is included free with each hosting account. Renowned for its comprehensive functionality - beyond other hosting control panels - and ease of use, Plesk Control Panel is available only to HostForLIFE's customers. They offer a highly redundant, carrier-class architecture, designed around the needs of shared hosting customers.


IIS 8 Hosting - HostForLIFE.eu :: How to Install SSL Certificate in IIS 8?

clock April 6, 2016 18:31 by author Anthony

In this tutorial, I will show you how to install SSL certificate in IIS 8.0. To communicate securely over the web requires the use of encryption on the messages passed back and forth.  Encryption on the web is accomplised through the use of Transport Layer Security (TLS). Http traffic layered over SSL/TLS is called Https.  It would be all too easy to venture down the rabbit hole and explain in great detail how TLS establishes a secure connection, but the crypto minutia is likely a bit out of scope for the purposes of this discussion.  However, a basic understanding of the mechanisms used by TLS to secure the communication channel will make understanding the use of SSL certificates much easier.

TLS uses public key cryptography, which requires the distribution of a public key.  This public key is transmitted as part of an SSL certificate, along with other identifying information meant to establish trust that a server is who it is supposed to be (and not a malicious eavesdroper).  While it is possible to create self-signed certificates, browsers do not trust these certificates and will give users dire warning when they are encountered (this would be like me printing my own drivers license and saying "See, I am who I say I am... really!").  For a certificate to be trusted, it must be issued by a trusted Certificate Authority (CA).  When a secure connection is made using a trusted certificate, most browsers will display an indicator that the connection is secure.  In Chrome, clicking the green lock icon will reveal information regarding the details of the connection:

And this is what a self-signed certificate will get you:

So to fully take advantage of Https you need to have a certificate from a trusted CA (Symantec [GeoTrust, VeriSign], Comodo, GlobalSign, etc).  Getting a certificate involves first creating a Certificate Signing Request (CSR).  IIS has the capability of creating a CSR, and their are other tools available, including the linux command line using OpenSSL.  This is what it looks like in IIS:

You'll transmit the CSR in one form or another to the CA you are getting your certificate from, and after they've performed whatever level of due diligence they'll send you your SSL certificate.  Once you have the certificate, you'll need to install it on the server hosting your site.  For .NET based web applications, that likely means IIS or Azure.

  • Installing SSL Certificate in IIS 8.0

In IIS Manager, under Server Certificates, there is an option for "Complete Certificate Request".  Here you'll browse to the *.cer file that contains your certificate, add a friendly name to make management easier it doesn't change anything in the certificate and add the certificate to the Personal certificate store.  This installs the certificate to the server.  To use it in your site, you have to bind it.  Navigate to the site settings in IIS, go to bindings, and add a binding for https using port 443 and the created certificate.

  • Using Https in the application

Using the URL Rewrite rule described in the Azure SSL instruction involved adding this rule to the web.config file:

<system.webServer>
  <rewrite>
    <rules>
      <rule name="Force HTTPS" enabled="false">
        <match url="(.*)" ignoreCase="false"/>
      <conditions>
        <add input="{HTTPS}" pattern="off"/>
      </conditions>
        <action type="Redirect" url="https://{HTTP_HOST}/{R:1}"
                appendQueryString="true" redirectType="Permanent"/>
      </rule>
    </rules>
  </rewrite>
  </system.webServer>

In MVC, using the [RequireHttps] attribute gives fine grained control over what portions of the site will need to use https:

[RequireHttps]
public ActionResult About()
{
    ViewBag.Message = "Your application description page.";
 
    return View();
}

HostForLIFE.eu IIS 8 Hosting

HostForLIFE.eu revolutionized hosting with Plesk Control Panel, a Web-based interface that provides customers with 24x7 access to their server and site configuration tools. Plesk completes requests in seconds. It is included free with each hosting account. Renowned for its comprehensive functionality - beyond other hosting control panels - and ease of use, Plesk Control Panel is available only to HostForLIFE's customers. They offer a highly redundant, carrier-class architecture, designed around the needs of shared hosting customers.


IIS 8.0 Hosting Germany - HostForLIFE.eu :: How To Access A Folder With No Default Document

clock October 31, 2015 01:02 by author Rebecca

In this post, I will tell you how to access a folder with no document in IIS. It's easy, just follow these steps:

Step 1

Create a folder called Original--IIS-Files

Step 2

Move all the files into folder Original-IIS-Files

Step 3

Navigate to your web server. By default, the Web Server will render the following message when the folder has no default documents.

And you're done! Simple, right?

HostForLIFE.eu IIS 8.0 Hosting
HostForLIFE.eu is European Windows Hosting Provider which focuses on Windows Platform only. We deliver on-demand hosting solutions including Shared hosting, Reseller Hosting, Cloud Hosting, Dedicated Servers, and IT as a Service for companies of all sizes. We have customers from around the globe, spread across every continent. We serve the hosting needs of the business and professional, government and nonprofit, entertainment and personal use market segments.


IIS 8.0 Hosting France - HostForLIFE.eu :: How to Configure DNS Record for Sub Domain

clock October 16, 2015 11:34 by author Rebecca

In this article, I will tell you how to configure DNS record for sub domain.

Step 1

Open your domain control panel then go to DNS manager.

Step 2

Add following A records for domain.com and www.domain.com which point to IIS server IP address:

domain.com  IN A XXX.XXX.XXX.XXX
www.domain.com  IN A XXX.XXX.XXX.XXX
service.domain.com IN A XXX.XXX.XXX.XXX

First two rows will ensure that whenever user browse domain.com or www.domain.com at that time it will be routed to IIS server and rest will be take care by IIS then it will serve public site. The third row in above is important for next step.

Step 3

Now add following wildcard CNAME record:

*.domain.com  IN CNAME service.domain.com

In above wildcard entry ensure that any sub domain request for domain.com will be routed to server which is pointed by service.domain.com.

In IIS setup, you have to edit website binding to include domain.com and www.domain.com as host header, by this way you can tell IIS that any request from domain.com and www.domain.com will be handled by this particular website. So, whenever user browse domain.com or www.domain.com it is serving public website without any problem.

While in case of sub domain it is showing error that “The connection was reset” this is because IIS does not found host header entry for requested domain in any websites. So, you need to add host header entry in service.domain.com website created in IIS setup because service.domain.com is actual website which is going to serve hosted service application when it is browse from sub domain. Use the following code to add host header entry programmatically in IIS:

private string GetWebSiteId(string serverName, string websiteName)

{

    string result = "-1";


    DirectoryEntry w3svc = new DirectoryEntry(string.Format("IIS://{0}/w3svc", serverName));


    foreach (DirectoryEntry site in w3svc.Children)

    {

        if (site.Properties["ServerComment"] != null)

        {

            if (site.Properties["ServerComment"].Value != null)

            {

                if (string.Compare(site.Properties["ServerComment"].Value.ToString(),

                                        websiteName, true) == 0)

                {

                    result = site.Name;

                    break;

                }

            }

        }

    }


    return result;

}


private void AddHostHeader(string hostHeader, string websiteID)

{

    DirectoryEntry site = new DirectoryEntry("IIS://localhost/w3svc/" + websiteID);

    PropertyValueCollection serverBindings = site.Properties["ServerBindings"];


    serverBindings.Add(hostHeader);


    Object[] newList = new Object[serverBindings.Count];

    serverBindings.CopyTo(newList, 0);


    site.Properties["ServerBindings"].Value = newList;

    site.CommitChanges();

}  


AddHostHeader("127.0.0.1:80:user1.domain.com", GetWebSiteId("localhost", "service.domain.com"));

HostForLIFE.eu IIS 8.0 Hosting
HostForLIFE.eu is European Windows Hosting Provider which focuses on Windows Platform only. We deliver on-demand hosting solutions including Shared hosting, Reseller Hosting, Cloud Hosting, Dedicated Servers, and IT as a Service for companies of all sizes. We have customers from around the globe, spread across every continent. We serve the hosting needs of the business and professional, government and nonprofit, entertainment and personal use market segments.


About HostForLIFE.eu

HostForLIFE.eu is European Windows Hosting Provider which focuses on Windows Platform only. We deliver on-demand hosting solutions including Shared hosting, Reseller Hosting, Cloud Hosting, Dedicated Servers, and IT as a Service for companies of all sizes.

We have offered the latest Windows 2016 Hosting, ASP.NET Core 2.2.1 Hosting, ASP.NET MVC 6 Hosting and SQL 2017 Hosting.


Tag cloud

Sign in