
September 6, 2019 11:23 by
 Peter
PeterThis post teaches how to fix a message:

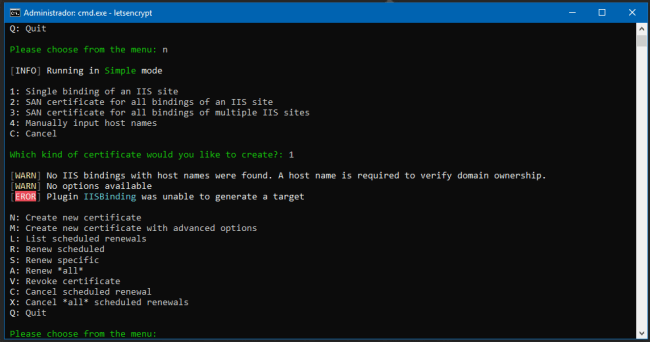
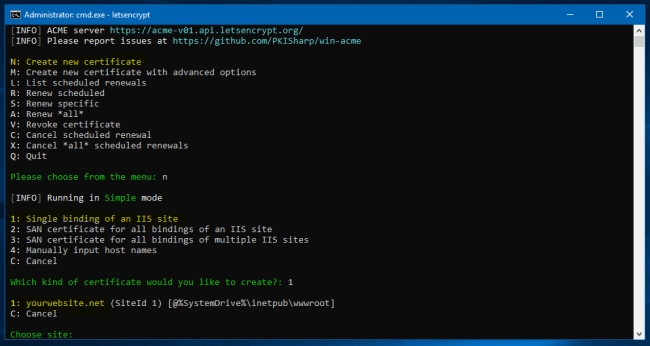
"ERROR: Plugin IISBinding was unable to generate a target" while enabling the SSL Certificate for your website.
So, let us start.
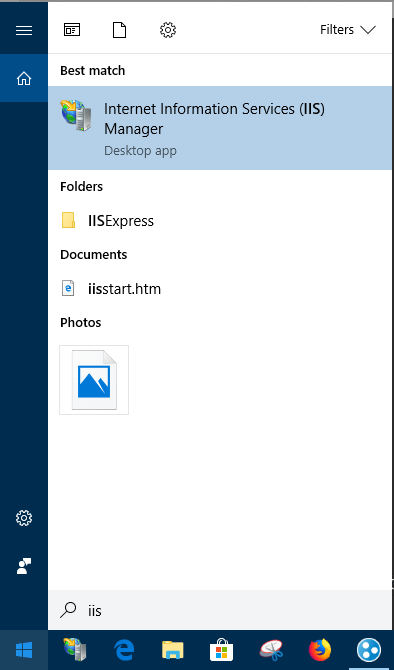
Open IIS - Internet Information Services (IIS).
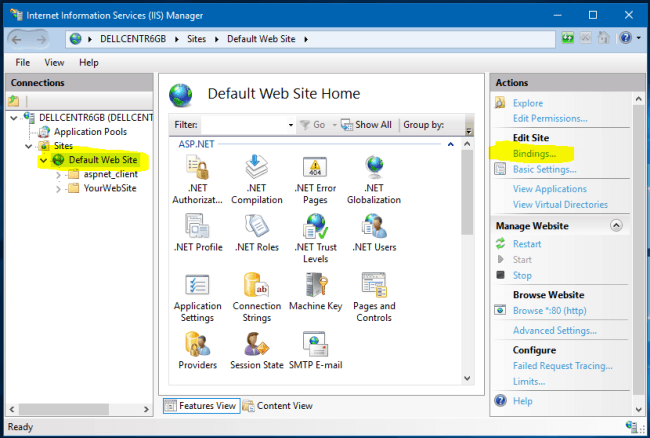
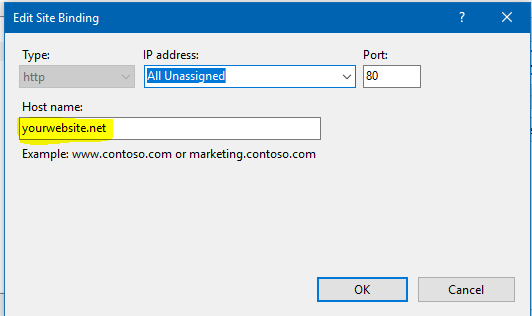
Select "Default Web Site" and click on "Bindings...."
Edit "HTTP" host to put your websitURLrl.
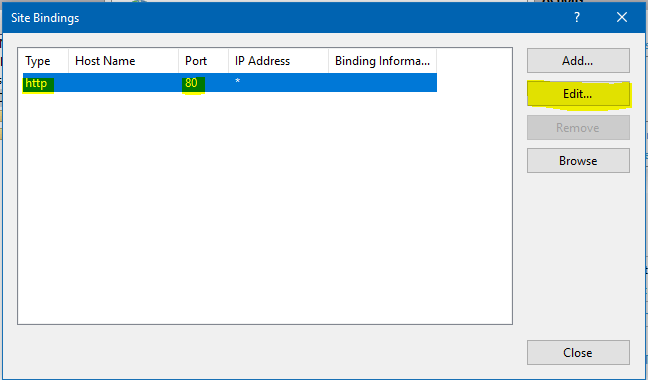
Insert your website URL and press "OK".
Continue the process as the original POST recommends.
Fixing Plugin IISBinding Was Unable To Generate A Target
CONCLUSION
This IISBinding error appeared to me when I moved the website from a Server to another before enabling my HTTPS certification. This solution worked for me pretty awesomely. If you find any other solution, please comment below.
September 6, 2019 11:23 by
PeterThis post teaches how to fix a message:
"ERROR: Plugin IISBinding was unable to generate a target" while enabling the SSL Certificate for your website.
So, let us start.
Open IIS - Internet Information Services (IIS).
Select "Default Web Site" and click on "Bindings...."
Edit "HTTP" host to put your websitURLrl.
Insert your website URL and press "OK".
Continue the process as the original POST recommends.
Fixing Plugin IISBinding Was Unable To Generate A Target
CONCLUSION
This IISBinding error appeared to me when I moved the website from a Server to another before enabling my HTTPS certification. This solution worked for me pretty awesomely. If you find any other solution, please comment below.
August 2, 2019 11:01 by
PeterThis article explains how to register ASP.Net with IIS when installing ASP.Net in IIS so that an ASP.Net page can make a request to recognize or respond from IIS. If it is not registered with an Internet Information Services then when you make an ASP.Net page request to the web server (IIS) then the web server will not get a response. And also we will get the error as in the following.
ASP.Net 2.0
“ASP.NET 2.0 has not been registered on the Web Server. You need to manually configure you Web server for ASP.NET 2.0 in order for your site to run correctly.”
(OR)
ASP.Net 4.0
“ASP.NET 4.0 has not been registered on the Web server. You need to manually configure your Web server for ASP.NET 4.0 in order for your site to run correctly”
Note: It is an available version of ASP.Net on your system.
Solutions Procedure
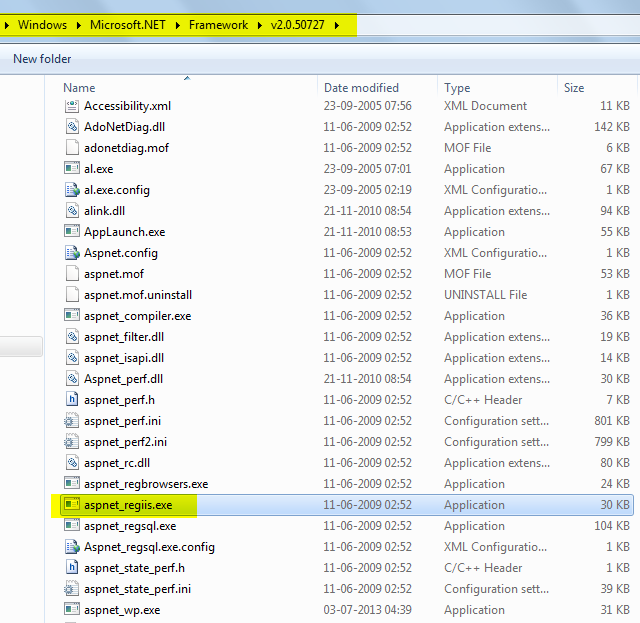
To find the location for the aspnet_regiis.exe file, go to the location C:\Windows\Microsoft.NET as in the following:
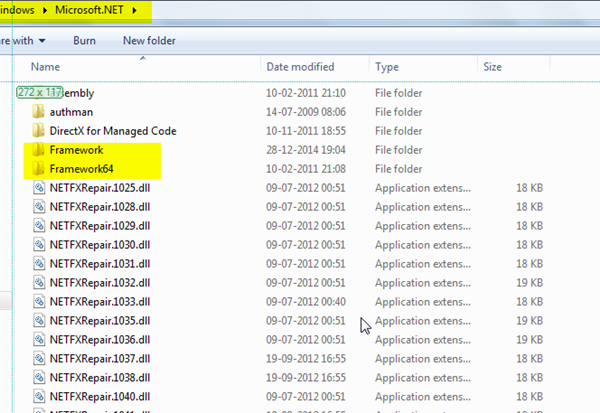
Kindly check, based on your system's bits (32 0r 64) for the .NET Framework location.
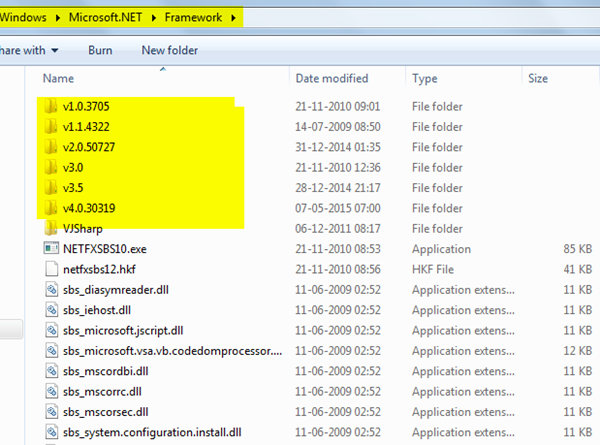
Kindly check whether you're using an ASP.Net version with IIS and based on that you have opened the specified version folder.
Go to a Visual Studio command prompt.
Then you will register ASP.Net with IIS as in the following command (aspnet_regiis.exe):
“C:\WINDOWS\Microsoft.NET\Framework\v2.0.50727\aspnet_regiis.exe –I”
Copy and paste to the Visual Studio command prompt.
Then Enter.
You have finished the installation of ASP.Net.
July 5, 2019 11:47 by
PeterIn this post, I will tell you about using the PHP Runtime with IIS 8. First step you must do is download PHP. Download the "Non Thread Safe" distributive from the download page of the PHP Web webpage and install it utilizing the installer. On the off chance that you utilize a x86 server you may download an older version of PHP, yet in the event that you utilize a x64 server you can utilize just PHP 5.5.
Arrange IIS to run PHP using the accompanying guideline:
Verify that you Don’t select the "Webdav Publishing" part amid design.
Enable SSL and SOAP in PHP
Open the php.ini file in the folder where you have installed PHP.
Find and uncomment the lines below:
extension_dir = "ext"
extension=php_soap.dll
extension=php_openssl.dll
Install "URL Rewrite"
Install the "URL Rewrite" Module from IIS Application Gallery on the off chance that you utilize IIS 8 or IIS 8.5 or download and install it physically from http://www.iis.net/downloads/microsoft/url-rewrite
Make endpoint
- Make an endpoint and design URL mapping for every APS Application API.
- Make a site on IIS which indicates the organizer where the endpoint's records are spotted.
- Arrange redirection for every APS administration to the relating PHP script.
You may utilize the accompanying sample of Web.config which demonstrates to design the redirection from administration Urls "/applications" and "/associations" to "applications.php" and "organizations.php" respectively:
<?xml version="1.0" encoding="UTF-8"?>
<configuration>
<system.webServer>
<rewrite>
<rules>
<rule name="APS Application API" stopProcessing="true">
<match url="([_0-9a-zA-Z\-]+)(.*)" />
<conditions logicalGrouping="MatchAny">
<add input="{R:1}" pattern="^applications$" />
<add input="{R:1}" pattern="^organizations$" />
</conditions>
<action type="Rewrite" url="{R:1}.php{R:2}" logRewrittenUrl="true" />
</rule>
</rules>
</rewrite>
</system.webServer>
</configuration>
December 17, 2014 05:20 by
PeterAt this post, I will explain you how to disable Client Certificate Revocation (CRL) Checking in IIS 8. The Public Key Infrastructure (PKI) is an important because certificates are used in so many scenarios when testing Microsoft products and technologies. And one of the trickiest parts of PKI is availability of the Certificate Revocation List (CRL). That is because some solutions require a successful CRL check and some don’t. The problem is that Microsoft documentation doesn’t always make it clear which is the case for a particular scenario, so you end up having to guess whether it is required or not (or worse, going through the entire configuration process and finding that it doesn’t work).

When performing on a system with no internet access it's vital to confirm that CRL checking is disabled. If not disabled you'll always receive a 403.13 error once coming.
And here is the code to Show All Binding and Their Verify Client Certificate Revocation Setting:
netsh http show sslcert
Code for Delete SNI Binding:
netsh http delete sslcert hostnameport=www.yourwebsite.com:443
This is code for Add SNI Binding:
netsh http add sslcert hostnameport=www.yourwebsite.com:443 certhash=78dd6cc2bf5785a123654d1d789c530fcb5687c2 appid={3cc2a456-a78c-2cc9-bcc9-782bc83bb789} certstorename=My verifyclientcertrevocation=disable
Hope this tutorial works for you!
December 10, 2014 07:13 by
Peter
The WebAdministration module has a Function called IIS :. It basically acts as a drive letter or an uri protocol. The extremely convenient and makes accessing appPool, site info, and ssl bindings simple. I recently noticed 2 issues with assigning values with the IIS : protocol as well as objects and that is works along with :
StartMode Can’t Be Set Directly
For a few cause, utilizing Set-ItemProperty to line the startMode value directly throws an error. However, in case you retrieve the appPool into your variable and established the value using an = operator, every thing works good.
# https://connect.microsoft.com/PowerShell/feedbackdetail/view/1023778/webadministration-apppool-startmode-cant-be-set-directly
ipmo webadministration
New-WebAppPool "delete.me"
Set-ItemProperty IIS:\AppPools\delete.me startMode "AlwaysRunning" # throws an error
$a = Get-Item IIS:\AppPools\delete.me
$a.startMode = "AlwaysRunning"
Set-Item IIS:\AppPools\delete.me $a # works
Here is the error that gets thrown:
Set-ItemProperty : AlwaysRunning is not a valid value for Int32.
At C:\Issue-PowershellThrowsErrorOnAppPoolStartMode.ps1:6 char:1
+ Set-ItemProperty IIS:\AppPools\delete.me startMode "AlwaysRunning" # throws an e ...
+ ~~~~~~~~~~~~~~~~~~~~~~~~~~~~~~~~~~~~~~~~~~~~~~~~~~~~~~~~~~~~~~~~~~
+ CategoryInfo : NotSpecified: (:) [Set-ItemProperty], Exception
+ FullyQualifiedErrorId :
System.Exception,Microsoft.PowerShell.Commands.SetItemPropertyCommand
CPU’s resetLimit Can’t Immediately Use New-TimeSpan’s Result
I believe the example can show the trouble much better than I will describe it :
# https://connect.microsoft.com/PowerShell/feedbackdetail/view/1023785/webadministration-apppools-cpu-limit-interval-resetlimit-cant-be-set-directly
ipmo webadministration
New-WebAppPool "delete.me"
$a = Get-ItemProperty IIS:\AppPools\delete.me cpu
$a.resetInterval = New-TimeSpan -Minutes 4 # this will throw an error
Set-ItemProperty IIS:\AppPools\delete.me cpu $a
$a = Get-ItemProperty IIS:\AppPools\delete.me cpu
$k = New-TimeSpan -Minutes 4 # this will work
$a.resetInterval = $k
Set-ItemProperty IIS:\AppPools\delete.me cpu $a
And Here is the error that gets thrown:
Set-ItemProperty : Specified cast is not valid.
At C:\Issue-PowershellThrowsErrorOnCpuLimitReset.ps1:8 char:1
+ Set-ItemProperty IIS:\AppPools\delete.me cpu $a
+ ~~~~~~~~~~~~~~~~~~~~~~~~~~~~~~~~~~~~~~~~~~~~~~~
+ CategoryInfo : NotSpecified: (:) [Set-ItemProperty], InvalidCastException
+ FullyQualifiedErrorId : System.InvalidCastException,Microsoft.PowerShell.Commands.SetItemPropertyCommand
The links on every section correspond with bug reports for the problems, thus hopefully they can get looked into.
December 4, 2014 06:50 by
Peter
IIS loves to inform the world that the web site runs on IIS, it does so using the Server response header as shown beneath. During this article I’ll show you how you can rewrite and eliminate unwanted response headers in IIS, as a result of we don’t need to provide hackers a lot of info concerning our servers.
The response of a standard HTTP HEAD appearance such as:
HTTP/1.1 200 OK
Content-Length: 0
Content-Type: text/html; charset=UTF-8
Vary: Accept-Encoding
Server: Microsoft-IIS/8.0
X-UA-Compatible: IE=Edge,chrome=1
Date: Thu, 04 Dec 2014 10:05:34 GMT
Connection: close
And right listed below IIS shows the version info by using the Server response header. As using the ETag header, you are able to rewrite and empty this Server response header along with an IIS URL Rewrite outboundRule:
<rewrite>
<outboundRules rewriteBeforeCache="true">
<rule name="Remove Server header">
<match serverVariable="RESPONSE_Server" pattern=".+" />
<action type="Rewrite" value="" />
</rule>
</outboundRules>
</rewrite>
The outboundRule looks for Server inside the output response stream and rewrites the value along with nothing. The end result is an empty Server response header line:
HTTP/1.1 200 OK
Content-Length: 0
Content-Type: text/html; charset=UTF-8
Vary: Accept-Encoding
Server:
X-UA-Compatible: IE=Edge,chrome=1
Date: Thu, 04 Dec 2014 10:06:08 GMT
Connection: close
Rewrite Server : Microsoft-IIS/8. 0 with your personal information
The enjoyable section of rewriting response headers is that you may show your own string, for instance giving in an value inside the Rewrite action, which message is displayed:
<action type="Rewrite" value="europeanwindowshosting" />
HTTP/1.1 200 OK
Content-Length: 0
Content-Type: text/html; charset=UTF-8
Vary: Accept-Encoding
Server: Saotn Server Software systems, LTD.
X-UA-Compatible: IE=Edge,chrome=1
Date: Thu, 04 Dec 2014 11:19:16 GMT
Connection: close
Eliminate X-Powered-By header in IIS utilizing customHeaders
By default IIS tells the world it’s powered by ASP. NET, by putting an X-Powered-By header:
HTTP/1.1 200 OK
Content-Length: 0
Content-Type: text/html; charset=UTF-8
Vary: Accept-Encoding
Server:
X-Powered-By: ASP.NET
X-UA-Compatible: IE=Edge,chrome=1
Date: Thu, 04 Dec 2014 10:07:37 GMT
Connection: close
This response header could be removed having a customHeaders setting in web. config, placed inside the node:
<httpProtocol>
<customHeaders>
<remove name="X-Powered-By" />
</customHeaders>
</httpProtocol>
Currently the X-Powered-By header is removed from the response header output:
HTTP/1.1 200 OK
Content-Length: 0
Content-Type: text/html; charset=UTF-8
Vary: Accept-Encoding
Server:
X-UA-Compatible: IE=Edge,chrome=1
Date: Thu, 04 Dec 2014 10:10:02 GMT
Connection: close
X-AspNet-Version HTTP header
The X-AspNet-Version HTTP Header broadcasts to the world what version of ASP.NET has been used. Add the listed content inside node with your application’s web. config file:
<httpRuntime enableVersionHeader="false" />
Eliminate HTTP headers in global.asax
ASP.NET programmers can also eliminate or change server HTTP response headers through a global.asax file With your global.asax.cs add this :
protected void Application_PreSendRequestHeaders()
{
// Response.Headers.Remove("Server");
Response.Headers.Set("Server","My httpd server");
Response.Headers.Remove("X-AspNet-Version");
Response.Headers.Remove("X-AspNetMvc-Version");
}
December 3, 2014 05:09 by
PeterWhen IIS 7 was released the FTP service were totally redesigned from the bottom up along with security on your mind. This was a welcome change indeed from IIS 6. Along with supporting FTP more than SSL it introduced FTP User Isolation.
Multiple users on a similar FTP website could possibly be separated no matter that file path they had been becoming logged into without risk of somebody traversing up parent paths with other user folders.
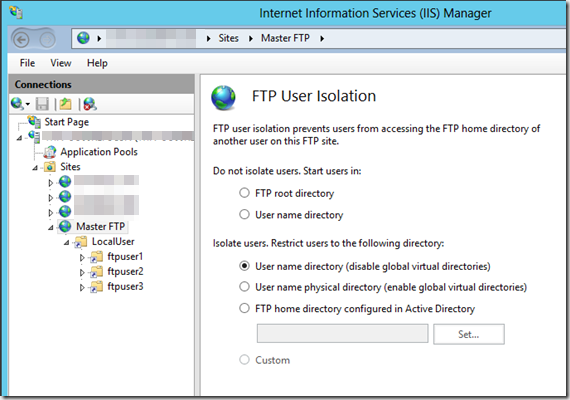
The FTP Authorization guidelines cause it to be simple to determine multiple users or perhaps local groups to get access to the FTP server. The user isolation is achieved by making a virtual directory referred to as LocalUser then selecting User name directory (disable global virtual directories). The LocalUser virtual directory ought to purpose towards the FTP root directory then you build a separate virtual directory for every FTP user that points to their destination path.
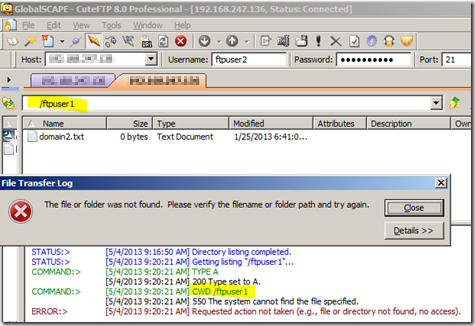
Along with FTP User Isolation configured your users can never have the ability to transfer up as much as a parent path beyond their individual root directory. Even if a user were able to accurately guess the username and virtual path of another FTP account upon the server they won't have the ability to achieve it. Because of the confines from the isolation the FTP session can not notice anything upon the server. In the illustration down below I login along with local account ftpuser2 and plan to change the path to/ftpuser1 but that path doesn't exist and hence isn't accessible to my user.
Conclusion
IIS 8 on Windows Server 2012 provides the foremost secure FTP service of any IIS version to day. You've multiple layers of FTP security accessible by leveraging FTP Logon Attempt Restrictions, FTP Over SSL, and FTP User Isolation. Your FTP server will certainly be nicely protected using these built-in modules. Along with internet security there isn't any ‘patch’ for complacence. A lot of security is usually much better so implement it when it’s readily accessible for you.
November 20, 2014 06:45 by
Peter
Recently I'd been a web hosting in this blog. Throughout the integration I found which default IIS 8.0 configuration don't compress static source when requested along with HTTP 1. 0. Thus in this quick & brief article we'll notice how you can enable static source compression for HTTP 1. 0 request in IIS.

So I made a decision to look into IIS 8.0 log and I found that uses HTTP 1. 0 to request custom origin server.
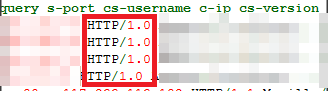
I didn't anticipated HTTP 1. 0 request here thus once again I requested origin server along with HTTP 1. 0 using fiddler and also as a surprise IIS returned un-compressed response. In IIS by default compression for HTTP 1. 0 request is disabled. We have to explicitly enable compression for HTTP 1. 0 request. To Allow compression for HTTP 1. 0 request we have to alter web. config as beneath.
<configuration>
<system.webServer>
<httpCompression noCompressionForHttp10="false" noCompressionForProxies="false">
</httpCompression>
</system.webServer>
</configuration>
When changing web. config as above, IIS started to server compressed response for HTTP 1. 0. Hope this quick and brief publish could be useful !