IIS 7.5 and IIS 8.0 European Hosting

BLOG about IIS 7.5 Hosting, IIS 8.0 Hosting and Its Technology - Dedicated to European Windows Hosting Customer

IIS 8.0 Hosting France - HostForLIFE.eu :: How to Configure IIS to PHP Server

clock April 6, 2015 09:59 by author Rebecca

In this tutorial, I will show you how to install PHP and configure IIS to PHP Webpages Server. PHP is a widely used general-purpose scripting language that is especially suited for Web development and can be embedded into HTML. This guide is recommended for IIS 8.0.


Follow this step to configure IIS to PHP Server:

1. You must download PHP for Windows 

Click here to download

2.  Extract the downloaded zip ( C:php )

3.  Download PHP manager for IIS ( it's an extension  for managing PHP from IIS control panel)

Click here to download

These are the some features of PHP Manager:

  1.     Register PHP with IIS
  2.     Validate and properly configure existing PHP installations
  3.     Run multiple PHP versions side by side on the same server and even within the same web site
  4.     Check PHP runtime configuration and environment (output of phpinfo() function)
  5.     Configure various PHP settings
  6.     Enable or disable PHP extensions
  7.     Remotely manage PHP configuration in php.ini file.
  8.     Easily install, configure, and manage troubleshoot in one or many PHP versions on the same IIS server.

4. Open PHP manager and click on "register new php installation"

5. Choose "php-cgi.exe" then click OK

6. Now, check phpinfo and choose "error reporting"

7. Testing Time: open your favorite code editor and type

For example:

<?php echo "Hello World !" ; ?>

Save this as hello.php ( or anything ) on c:inetpubwwwroot and open http://localhost/hello.php

Then you'll get an output like the picture below:

HostForLIFE.eu IIS 8.0 Hosting
HostForLIFE.eu is European Windows Hosting Provider which focuses on Windows Platform only. We deliver on-demand hosting solutions including Shared hosting, Reseller Hosting, Cloud Hosting, Dedicated Servers, and IT as a Service for companies of all sizes. We have customers from around the globe, spread across every continent. We serve the hosting needs of the business and professional, government and nonprofit, entertainment and personal use market segments.


IIS 8.5 Hosting Russia - HostForLIFE.eu :: Create a Virtual Directory With IIS

clock March 31, 2015 07:50 by author Peter

In this tutorial, we will perceive how to make a virtual host utilizing IIS Web Server on Windows Server 2012. Virtual Directory or virtual hosting is a procedure for hosting numerous domain names on a single server. This is basically sharing the services of a single server for multiple companies or for multiple websites. Now and again its called Vhost. A Virtual Host is ususally utilized by an organization or association that would like to keep up or buy numerous servers. Virtual Hosting can be supported using IIS Web Server or utilizing Apache Web Server.

1. First, you should Install IIS on your server and then restart it.
2. Open the IIS manager and browse to your site (or choose default site).

3. And then, Choose your site and right-click the mouse and select “Add Virtual Directory“ as you can see on the picture below.

In this window set the alias name and physical path where your website page is put away. Press the OK button so it will make a virtual registry. The alias name is the name to get to this index over the web. For instance with an alias of abc_alias we can get to it utilizing the accompanying URL: www.domain.com/abc_alias/.

Now make the default website page on that "Physical Path index", for instance home.html, default.asp and abc.html. This default site page must be added to the Default Document Set. So it load when the virtual directory is hit over the internet.

Then include the default website page passage into the "Default Document" of the current Virtual Directory. Open it by twofold clicking on the Default Document Icon.

Click Add from the top-right corner and include your default page name with extension. For example homepage.html.

Now test your sub-domain in the web program utilizing IIS or with a URL. Syntax: Host_Name/Virtual_Directory_Name.

Use the same process for creating multiple Virtual Directories. As shown in the preceding image there are three Virtual Directories created that can be accessible using the following URLs.

www.domain.com/aaa/
www.domain.com/bbb/

www.domain.com/subdomain/

HostForLIFE.eu IIS 8.0 Hosting
HostForLIFE.eu is European Windows Hosting Provider which focuses on Windows Platform only. We deliver on-demand hosting solutions including Shared hosting, Reseller Hosting, Cloud Hosting, Dedicated Servers, and IT as a Service for companies of all sizes. We have customers from around the globe, spread across every continent. We serve the hosting needs of the business and professional, government and nonprofit, entertainment and personal use market segments.


IIS 8.0 Hosting Spain - HostForLIFE.eu :: Import the Server Authentication Certificate with IIS

clock March 17, 2015 08:45 by author Peter

In this article, I will explain you how to Import the Server Authentication Certificate with IIS.

First step, you must select and click on the Start Menu and from there open the Administrative Tools looks on the below picture:

When in Administrative Tools, there is a list of options will be available. And then, click on the IIS Manager and open it.

In IIS Manager Wizard, here on the right hand side the Connections Pane will be available, click on the server name.


In Center Pane an option will be available named Server Certificates, double-click on this option to open it.

When the Page open, All certificates will be shown that are currently working on your system. Right-click on any certificate and choose to Import as you can see on the following picture:

Choosing the Import will open a New Wizard, here first give the name to the Certificate File that you need to import and after that give password for that certificate. After that click on the "Ok" button to import the file.


HostForLIFE.eu IIS 8.0 Hosting
HostForLIFE.eu is European Windows Hosting Provider which focuses on Windows Platform only. We deliver on-demand hosting solutions including Shared hosting, Reseller Hosting, Cloud Hosting, Dedicated Servers, and IT as a Service for companies of all sizes. We have customers from around the globe, spread across every continent. We serve the hosting needs of the business and professional, government and nonprofit, entertainment and personal use market segments.


IIS 8.0 Hosting Italy - HostForLIFE.eu :: How to Fix "Unable to Launch the IIS Express Web Server" Error ?

clock March 10, 2015 08:25 by author Peter

Today, I experienced the issue "Unable to launch the IIS Express Web Server" while I was running my Visual Studio 2012. So I considered imparting how to determine that issue.

Since we needed to do a "Get the Latest files from the server". (We are using TFS.) Then when I run my application I was getting this problems. The reason for this error is, somebody has checked in the solution file with his port number (the port number he was using).

When I took the most recent, it was situated in my answer record too. We must take the latest solution file only when it is required. So here I will impart the solution for the first issue.

1. Right-click on your solution and select Properties as indicated in the following picture:

2. Choose “Web” from the left menu.

3. Under the “Use local IIS server” change the port number from http://localhost:58030/ to another one.   

4. In this example, I’ve changed http://localhost:58030/ to http://localhost:58031/

5. Now run again your Apps. The issue will be solved. I Hope it works for you!

HostForLIFE.eu IIS 8.0 Hosting
HostForLIFE.eu is European Windows Hosting Provider which focuses on Windows Platform only. We deliver on-demand hosting solutions including Shared hosting, Reseller Hosting, Cloud Hosting, Dedicated Servers, and IT as a Service for companies of all sizes. We have customers from around the globe, spread across every continent. We serve the hosting needs of the business and professional, government and nonprofit, entertainment and personal use market segments.


IIS 8.0 Hosting Italy - HostForLIFE.eu :: How to Configure IIS to Run Silverlight Services

clock February 10, 2015 15:38 by author Peter

In this post, I will tell you about How to Configure IIS to Run Silverlight Services. When you have been installed the Silverlight, we still need to install/enable IIS using the following steps.

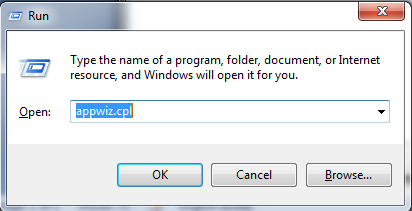
Either we can open it from "Run" - "appwiz.cpl" - "Turn Windows features on or off - by enabling Internet Information Services & Microsoft .NET Framework 3.5.1" or we can do it from the Control Panel.

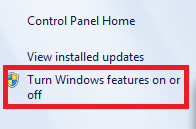
Selecting Turn Windows Features on or off

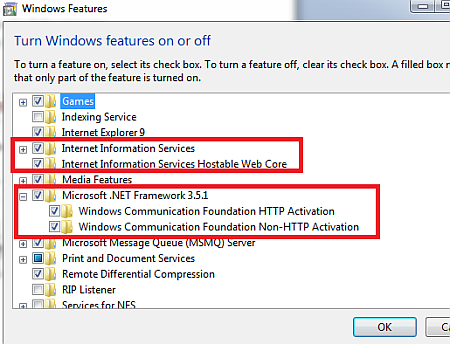
Enabling IIS and .NET Framework

When you preceding has been done you need to add MIME types in IIS.

First step, open the IIS with this command: 

"Run" - "inetmgr"For the first time, it will ask you to connect. When you connect & choose the instance on the right hand side under "Features View" there is IIS. Below the IIS there is "MIME Types"; click on that looks like the picture below.

In MIME Types check whether we have an extension for .SVC since we are using services in our Silverlight project. If we do not have the extension then add a new extension on right hand side at the top there is an add under Action. I already added it in my IIS, That’s why the File Name Extension is showing as un-editable.

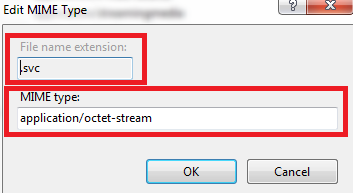
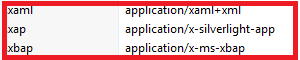
Now, must do the same for xaml, xap and xbap extensions.

And now we are going to configure IIS from the command prompt. Since we already installed Framework and Silverlight. It is installed at the following location: c:\Windows\Microsoft.NET\Framework\v4.0.30319\
Next step, Open the CMD with Administrative privileges. And go to the above path.

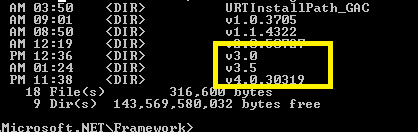
In my case we’ll need both V3.0 & V4.0.30319, now first we will go to version V4.0.30319 and run the following command:
aspnet_regiis /i

The command above will install the ASP.NET and enables the service for IIS. Now we will go to version V3.0 at the following path: c:\Windows\Microsoft.NET\Framework\v3.0\Windows Communication Foundation.

Now, type and run the following command:
ServiceModelReg.exe /i

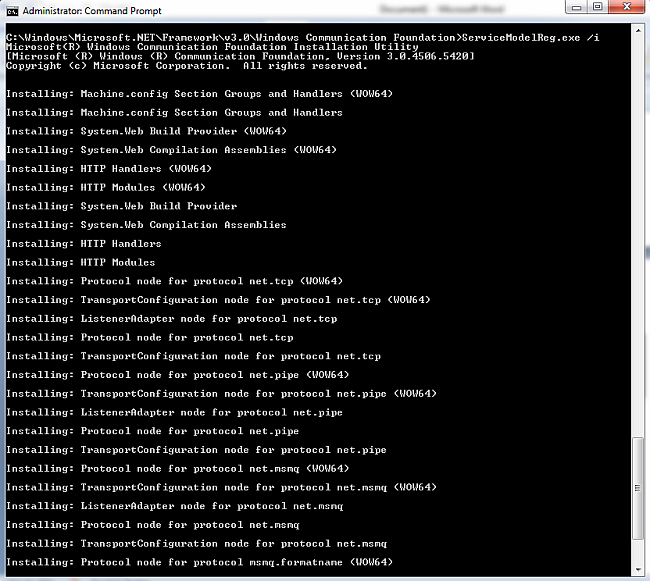
It’ll install a few things that we require to repare our IIS to publish our SilverlightServices and run. Now our IIS is ready to use Silverlight enable services.

HostForLIFE.eu IIS 8.0 Hosting
HostForLIFE.eu is European Windows Hosting Provider which focuses on Windows Platform only. We deliver on-demand hosting solutions including Shared hosting, Reseller Hosting, Cloud Hosting, Dedicated Servers, and IT as a Service for companies of all sizes. We have customers from around the globe, spread across every continent. We serve the hosting needs of the business and professional, government and nonprofit, entertainment and personal use market segments.


IIS 8.0 Hosting Netherlands - HostForLIFE.eu :: How to use Shared Configuration in IIS ?

clock February 3, 2015 08:36 by author Peter

In this short article, I will tell you about Shared Configuration in IIS. Before we start, first thing that you should do is backup the following configuration files for your sites on both servers, administration.config and applicationHost.config.The default location for that files are in C:\Windows\System32\inetsrv\config.  If you got an error you can use the files to restore the configuration back to its original state. 

1. Now, from server1 in IIS Management chopse the server name and on the right Window pane under Management click the “Shared Configuration” icon like the picture below:

2. Next, on the Actions pane select “Export Configuration” as shown on the picture below:

Then Select the location to store the files and provide an Encryption key password (keep track of it for use on server2)

3. Copy the files to a folder location on server2 (administration.config and applicationHost.config)
4. Now, Open the Shared Configuration icon in IIS Manager for server2
5. Tick on the box to “Enable shared configuration”
6. Now, Enter the path to the exported configuration files on server2

7. Next step Click Apply and input the Encryption key password.  You’ll receive the message below.

8. Close and open up IIS Manager, choose the server name, click the Management Service icon and choose Restart under the Actions menu (you may additionally choose to run iisreset at the command line)

Now make sure the sites are in place. you'll disable “Shared Configuration” if everything is setup properly. when you go to disable “Shared Configuration” you will be prompted to choose “Yes” if yo wish to copy the new configuration back to the default folder location or select “No” if you do not want to import the new configuration however instead revert back to your original configuration. Select “Yes” to overwrite your original file configuration with the new configuration.  Check the Event Viewer to assist troubleshoot any problems you run into with the sites.

HostForLIFE.eu IIS 8.0 Hosting
HostForLIFE.eu is European Windows Hosting Provider which focuses on Windows Platform only. We deliver on-demand hosting solutions including Shared hosting, Reseller Hosting, Cloud Hosting, Dedicated Servers, and IT as a Service for companies of all sizes. We have customers from around the globe, spread across every continent. We serve the hosting needs of the business and professional, government and nonprofit, entertainment and personal use market segments.


About HostForLIFE.eu

HostForLIFE.eu is European Windows Hosting Provider which focuses on Windows Platform only. We deliver on-demand hosting solutions including Shared hosting, Reseller Hosting, Cloud Hosting, Dedicated Servers, and IT as a Service for companies of all sizes.

We have offered the latest Windows 2016 Hosting, ASP.NET Core 2.2.1 Hosting, ASP.NET MVC 6 Hosting and SQL 2017 Hosting.


Tag cloud

Sign in