A user's request does not go to the database every time they visit a website in order to answer every detail. As an alternative, some data is extracted directly, which speeds up and improves efficiency. This tactic enables the server to process numerous requests from various users without interfering with the database. Important information is stored in the server's memory so that it can respond to your request promptly.

Given that data is typically saved in databases, you may be asking how the server obtains, stores, and locates this data.
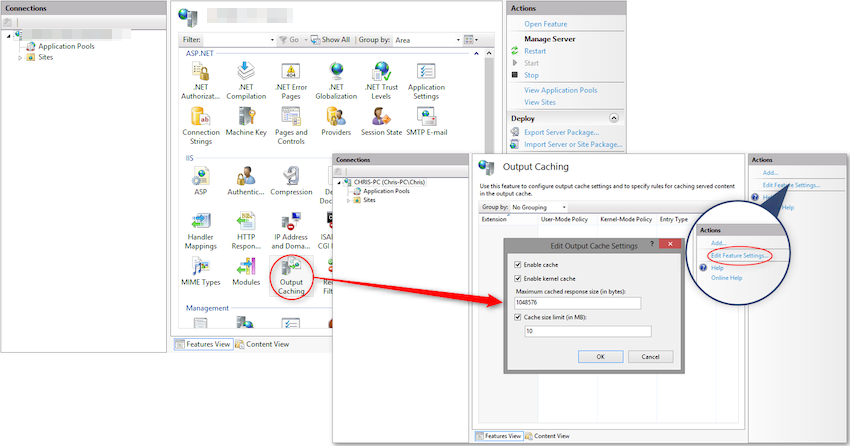
Thus, the Internet Information Services, or IIS, serves as the operation's beating heart.
Output Caching is the name of the operation.
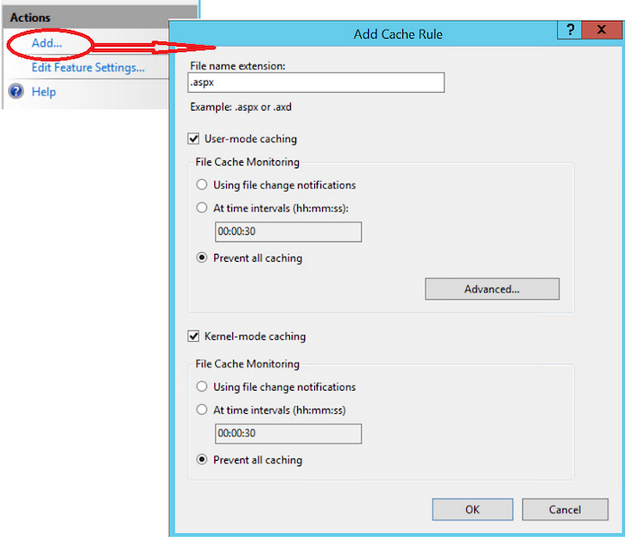
Even the type of file and duration of storage are customizable. by using the easy steps listed below.
- On your server, open the Internet Information Services (IIS) Manager.
- Access your web application by navigating through the Connections pane.
- Give the "Output Caching" feature a double-click.
- Examine the cached items, their expiration dates, and other pertinent details in the "Output Caching" feature.

But how can the cache be kept there?
Installing System is hence the first step.Net.Caching from the Nuget bundle
Caching in System.Web
You can implement caching within a server-side web application, usually hosted by Internet Information Services (IIS), by using the classes provided by the System.Web.Caching namespace. The caching method uses the server's RAM to cache data when you use the System.Web.Caching namespace in an ASP.NET web application hosted on Internet Information Services (IIS).
Create
HttpRuntime.Cache.Insert("yourkey","your value");To do CRUD activities with such caches, there are a few methods under this namespace.
This is how the cache is set. You might have noticed, though, that the code above doesn't indicate when this caching item expires. This suggests that unless the web application is terminated or restarted, the caching item won't be destroyed. As a result, you must also include an expiration.
Here's another method to get there:
HttpRuntime.Cache.Insert(
string key,
object value,
System.Web.Caching.CacheDependency dependencies,
DateTime absoluteExpiration,
TimeSpan slidingExpiration
);
You are aware of the value and key in this case, but what about the other parameters?
Dependencies: When any of a cache item's dependencies are altered or eliminated, the cache item will be automatically cleared.
Nonetheless, if you would like it to stay in the cache until further specified expiration conditions (such absolute or sliding expiration) are satisfied or until it is manually deleted.
Absolute Expiration: The cache can have a precise expiration time that you specify. To set its value, there are three options:
- Absolute Time of Expiration: AbsoluteTime belongs to the DateTime type. You designate a precise day and time for the cache item to expire. The cache expires when this date and time are reached.
- Save.NoAbsoluteExpiration: This constant value means that the item will stay in the cache until it is manually removed, and it does not have an absolute expiration period.
- Blending using Adaptive Expiration: The slidingExpiration parameter needs to be set to NoSlidingExpiration if you are utilizing absolute expiration.
Declining Expiration
1. Sliding Expiration makes sure that the cache item lifespan will be increased by the interval value if the data is accessed within the designated time frame. For instance, a session with a 10-minute expiration is introduced.
TimeSpan.FromMinutes(5), TimeSpan.FromSeconds(30), NoSlidingExpiration, etc. are few examples.
2. Combining with AbsoluteExpiration: NoAbsoluteExpiration is required as the absolute expiration argument if sliding expiration is being used.