IIS 7.5 and IIS 8.0 European Hosting

BLOG about IIS 7.5 Hosting, IIS 8.0 Hosting and Its Technology - Dedicated to European Windows Hosting Customer

IIS 8.0 Hosting - HostForLIFE.eu :: DHCP Installation in Windows Server 2016 Using Powershell

clock March 29, 2019 09:24 by author Peter

Now, I want to do the same thing, but this time, using PowerShell. We can easily achieve this with the help of PowerShell and typing a few simple commands.

Before we begin with DHCP installation process, first we need to make sure that it’s not installed in our Server 2016. We can verify this in two ways., which are given below.

  • Using Server Manager.
  • Using PowerShell.

As you can see below, I opened my Server Manager to check (Left side , under Dashboard), if DHCP is already installed, as we can see in the screenshot given below, DHCP Server roles are not installed yet.

Server Manager
Let’s verify this, using PowerShell. All you need to do is, just open your PowerShell and type the command given below.

Get-WindowsFeature


You can notice in the screenshot given above, install Sate for DHCP says “Available”, which means that it’s available for the installation and it’s not installed yet. Thus, we can continue with our installation process..

To install this DHCP server role using PowerShell, we need to use the command given below.

Install-WindowsFeature -Name ‘DHCP’
After installing this DHCP Server role, type the commands given below to install DHCP Management Tools.


We have successfully installed DHCP Server role and all the required tools to manage it. We can verify this in two ways. We can go back to Server Manager to see, if there is a DHCP Server role, the other way is suing PowerShell…Let’s first verify this, using Server Manager.

Go to —> Server Manager and check for DHCP under Roles and Server Groups (See the screenshot given below.)

We can also verify this using PowerShell, using the command given below.
Get-WindowsFeature.


HostForLIFE.eu IIS 8.0 Hosting
HostForLIFE.eu is European Windows Hosting Provider which focuses on Windows Platform only. We deliver on-demand hosting solutions including Shared hosting, Reseller Hosting, Cloud Hosting, Dedicated Servers, and IT as a Service for companies of all sizes. We have customers from around the globe, spread across every continent. We serve the hosting needs of the business and professional, government and nonprofit, entertainment and personal use market segments.


IIS 8.0 Hosting - HostForLIFE.eu :: How to Fix PUT/POST/DELETE Verb Errors On Site ?

clock March 13, 2019 09:41 by author Peter

A customer was getting errror when utilizing PUT/POST/DELETE verbs on their web application as of late. The error looks like this:
<h2>405 - HTTP verb used to access this page is not allowed.</h2>

<h3>The page you are looking for cannot be displayed because an invalid method (HTTP verb) was used to attempt access</h3>

After some troubleshooting the error was disengaged to the way that WebDav was installed on the server and was catching those requests for its own service use.

Instead of removing Webdav from the server, we made a go at searching for an alternate solution. Thankfully somebody on Twitter comprehended the issue and gave an illustration of changes to make to the customer's web.config record with a specific end goal to disable (remove) the Webdav module for simply that particular webpage without requiring any requiring managerial activities on the server.

The code updates to make to your web.config record to intention this error are:
<configuration>
  <system.webServer>
    <handlers>
      <remove name="WebDAV" />
      <remove name="ExtensionlessUrlHandler-ISAPI-4.0_32bit" />
      <remove name="ExtensionlessUrlHandler-ISAPI-4.0_64bit" />
      <remove name="ExtensionlessUrlHandler-Integrated-4.0" />
      <add name="ExtensionlessUrlHandler-ISAPI-4.0_32bit" path="*." verb="GET,HEAD,POST,DEBUG,PUT,DELETE,PATCH,OPTIONS" modules="IsapiModule" scriptProcessor="%windir%\Microsoft.NET\Framework\v4.0.30319\aspnet_isapi.dll" preCondition="classicMode,runtimeVersionv4.0,bitness32" responseBufferLimit="0" />
      <add name="ExtensionlessUrlHandler-ISAPI-4.0_64bit" path="*." verb="GET,HEAD,POST,DEBUG,PUT,DELETE,PATCH,OPTIONS" modules="IsapiModule" scriptProcessor="%windir%\Microsoft.NET\Framework64\v4.0.30319\aspnet_isapi.dll" preCondition="classicMode,runtimeVersionv4.0,bitness64" responseBufferLimit="0" />
      <add name="ExtensionlessUrlHandler-Integrated-4.0" path="*." verb="GET,HEAD,POST,DEBUG,PUT,DELETE,PATCH,OPTIONS" type="System.Web.Handlers.TransferRequestHandler" preCondition="integratedMode,runtimeVersionv4.0" />
    </handlers>
    <modules>
      <remove name="WebDAVModule" />
    </modules>
  </system.webServer>
</configuration>

HostForLIFE.eu IIS 8.0 Hosting
HostForLIFE.eu is European Windows Hosting Provider which focuses on Windows Platform only. We deliver on-demand hosting solutions including Shared hosting, Reseller Hosting, Cloud Hosting, Dedicated Servers, and IT as a Service for companies of all sizes. We have customers from around the globe, spread across every continent. We serve the hosting needs of the business and professional, government and nonprofit, entertainment and personal use market segments.


European IIS 8 Hosting in Cloud - France :: How to Host Your WCF Service in IIS 8?

clock June 11, 2014 10:10 by author Scott

It sounds like it should be trivial: Create a WCF web library and host it in IIS. Surely lots of people need to do this, and it will be easy in a fairly modern version of Visual Studio like 2012? Previously I have created this article about how to host WCF Service in IIS 8, however I will explain more details in this article.

Whatever the reason, I hope this page will offer a useful step-by-step guide to set up a WCF Service Library project to be run from its development folder on Windows 8.0 or Windows 2012, IIS 8.0 – and I have been using VS 2012 and .Net Framework 4.5 as the target.  Also, before I begin, and something of a spoiler alert; you may prefer to publish your website to a specific location, and host it in IIS from there, rather than try and host it from your development folder.  This option is covered after the walk-through below.

Please Make Sure that You Have Integrated your ASP.NET with IIS

The easiest way to check this is to create a minimalistic web application (e.g. ASP.NET MVC with “No Authentication”) and try to host it in IIS (see configuration steps below). If something is missing, make sure that:

  • “Internet Information Services” and “Word Wide Web Services” are enabled in the “Turn Windows Features on or off” dialog.
  • If IIS is up and running, but the ASP.NET integration is missing (you can check the ISAPI filters in IIS Manager), you should run “%WINDIR%\Microsoft.NET\Framework64\v4.0.30319\aspnet_regiis.exe –i” and hope for the best (maybe restart the machine afterwards).

Take a look at WCF Service

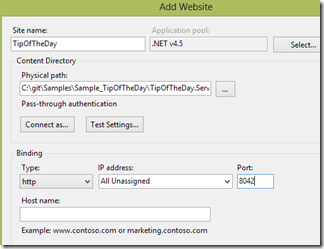
I assume that you have created WCF service called “WCF Service Application”. Hosting this application in IIS means that you create a virtual directory in IIS, where you link the root folder of your project to a URL. You also need to specify an app pool to be used, which should match to the .NET framework you target (e.g. “.NET v4.5”).

If you have configured your.svc files within the specified URL, you should see a page with some positive messages and links to the WSDL contracts. If you see this, then stop reading, you are done.

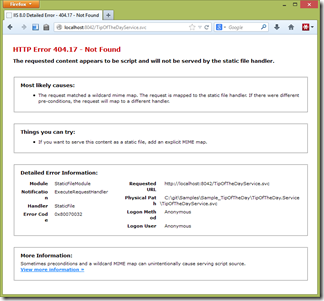
However, you can receive an error page, “HTTP Error 404.17 – Not Found”, “The requested content appears to be script and will not be served by the static file handler.”. This most probably means that your IIS is not configured to host WCF services (this seems to be the default).

With .NET 3.5, you had to run the “ServiceModelReg.exe” tool, but this doesn’t seem to be necessary anymore for .NET 4.0+ (“aspnet_regiis” does this already). If you look into the details of the IIS settings, you can see some references to WCF.

The only thing you have to do is to enable “HTTP Activation” in the “Turn Windows Features on or off” dialog under the “WCF Services” node. With this, you basically enable the creation of WCF service instances to serve requests coming through HTTP.

Then, please test it again and you wont see any error message anymore.

I hope this article will help you a lot.


IIS 8 Netherlands Hosting - HostForLIFE.eu :: Using Outbound Rewrite Rules to Offload Your Content on IIS 8

clock March 10, 2014 09:06 by author Peter

Recently a colleague of mine wrote an article on setting up a CDN (Content Delivery Network). This made me experiment a bit with some IIS 8 settings. It is possible to set up IIS to rewrite all outgoing requests in such a way that your static content (e.g. images, style-sheets, etc) will be downloaded from a separate location. The main benefit of this method is (in my opinion) that it doesn’t requiren any adjustments on your target site. All it requires is some tweaking of your web.config and ofcourse a working CDN.

Outbound rewrite rules are a pretty powerful thing, when used properly. When used incorrectly, they can slow your site down to a screeching halt. Lucky for us, the outbound rewrite rules can be used to filter out specific requests. In this case we will use them to rewrite all outgoing HTML code. We want to search out all static content (in this example .jpg and .png files) and rewrite it on the fly to be downloaded from a CDN. So, first we want to set the proper precondition. Loads of data leaves a webserver, so let’s make sure we only look at the relevant parts of it. We start by setting up a precondition:

<preConditions>

      <preCondition name="CheckHTML"> 

           <add input="{RESPONSE_CONTENT_TYPE}" pattern="^text/html" /> 

      </preCondition> 

</preConditions> 

Now we’re looking at all HTML only it’s time to get even more specific. Outbound rules allow you to filter a tag you want to look for. In this case we assume all images are located in tags. So we can use the following filtering before actually matching it to a pattern:

<rule name="CDN"stopProcessing="false">  
      <match filterByTags="Img" pattern="(https?:\/\/www.(.*)\.(jpg|png))" />  
      <action type="Rewrite" value="http://cdn.{R:2}.{R:3}" />  
 </rule> 

Noticed the ugly regex I used there? Let’s take a look at it:

(https?:\/\/www.(.*)\.(jpg|png))

All this baby does is matching all url’s containing .jpg or .png on the end. So basically it makes sure we catch all outgoing image url’s before they reach the browser. This same regex gives us 3 backreferences. We only need two of them: {R:2} and {R:3}. These contain (in my case) the stripped url (no more http://www.) and the extension. We use these later on to rebuild the url for our CDN. You might want to adjust this regular expression to suit your specific needs.

For me: this one is all I need. Now it’s time for rewriting our url. I can use the backreferences that are given to re-assemble the image location to something that should be working on the CDN. How the data gets there is up to you. I’m only pointing out how you can redirect traffic there ;) After your done, the following can be used in your web.config:

<rewrite> 

      <outboundRules>

          <rule name="CDN" preCondition="CheckHTML" stopProcessing="false"> 

                <match filterByTags="Img" pattern="(https?:\/\/www.(.*)\.(jpg|png))" /> 

                <action type="Rewrite" value="http://cdn.{R:2}.{R:3}" /> 

           </rule> 

           <preConditions> 

                <preCondition name="CheckHTML"> 

                     <add input="{RESPONSE_CONTENT_TYPE}" pattern="^text/html" /> 

                </preCondition> 

          </preConditions> 

      </outboundRules>

</rewrite>


About HostForLIFE.eu

HostForLIFE.eu is European Windows Hosting Provider which focuses on Windows Platform only. We deliver on-demand hosting solutions including Shared hosting, Reseller Hosting, Cloud Hosting, Dedicated Servers, and IT as a Service for companies of all sizes.

We have offered the latest Windows 2016 Hosting, ASP.NET Core 2.2.1 Hosting, ASP.NET MVC 6 Hosting and SQL 2017 Hosting.


Tag cloud

Sign in