IIS 7.5 and IIS 8.0 European Hosting

BLOG about IIS 7.5 Hosting, IIS 8.0 Hosting and Its Technology - Dedicated to European Windows Hosting Customer

HostForLIFE.eu Launches New Data Center in Frankfurt (Germany)

clock March 10, 2015 12:00 by author Peter

HostForLIFE.eu, a leading Windows hosting provider with innovative technology solutions and a dedicated professional services team proudly announces new Data Center in Frankfurt (Germany) for all costumers. HostForLIFE’s new data center in Frankfurt will address strong demand from customers for excellent data center services in Europe, as data consumption and hosting services experience continued growth in the global IT markets.

The new facility will provide customers and our end users with HostForLIFE.eu services that meet in-country data residency requirements. It will also complement the existing HostForLIFE.eu. The Frankfurt (Germany) data center will offer the full range of HostForLIFE.eu web hosting infrastructure services, including bare metal servers, virtual servers, storage and networking.

HostForLIFE.eu expansion into Frankfurt gives them a stronger European market presence as well as added proximity and access to HostForLIFE.eu growing customer base in region. HostForLIFE.eu has been a leader in the dedicated Windows & ASP.NET Hosting industry for a number of years now and we are looking forward to bringing our level of service and reliability to the Windows market at an affordable price.

The new data center will allow customers to replicate or integrate data between Frankfurt data centers with high transfer speeds and unmetered bandwidth (at no charge) between facilities. Frankfurt itself, is a major center of business with a third of the world’s largest companies headquartered there, but it also boasts a large community of emerging technology startups, incubators, and entrepreneurs.

Our network is built from best-in-class networking infrastructure, hardware, and software with exceptional bandwidth and connectivity for the highest speed and reliability. Every upstream network port is multiple 10G and every rack is terminated with two 10G connections to the public Internet and two 10G connections to our private network. Every location is hardened against physical intrusion, and server room access is limited to certified employees.

All of HostForLIFE.eu controls (inside and outside the data center) are vetted by third-party auditors, and we provide detailed reports for our customers own security certifications. The most sensitive financial, healthcare, and government workloads require the unparalleled protection HostForLIFE.eu provides.

Frankfurt (Germany) data centres meet the highest levels of building security, including constant security by trained security staff 24x7, electronic access management, proximity access control systems and CCTV. HostForLIFE.eu is monitored 24/7 by 441 cameras onsite. All customers are offered a 24/7 support function and access to our IT equipment at any time 24/7 by 365 days a year. For more information about new data center in Frankfurt, please visit http://hostforlife.eu/Frankfurt-Hosting-Data-Center

About HostForLIFE.eu
HostForLIFE.eu is an European Windows Hosting Provider which focuses on the Windows Platform only. HostForLIFE.eu deliver on-demand hosting solutions including Shared hosting, Reseller Hosting, Cloud Hosting, Dedicated Servers, and IT as a Service for companies of all sizes.

HostForLIFE.eu is awarded Top No#1 SPOTLIGHT Recommended Hosting Partner by Microsoft (see http://www.asp.net/hosting/hostingprovider/details/953). Our service is ranked the highest top #1 spot in several European countries, such as: Germany, Italy, Netherlands, France, Belgium, United Kingdom, Sweden, Finland, Switzerland and other European countries. Besides this award, we have also won several awards from reputable organizations in the hosting industry and the detail can be found on our official website.


IIS 8.0 Hosting Italy - HostForLIFE.eu :: How to Fix "Unable to Launch the IIS Express Web Server" Error ?

clock March 10, 2015 08:25 by author Peter

Today, I experienced the issue "Unable to launch the IIS Express Web Server" while I was running my Visual Studio 2012. So I considered imparting how to determine that issue.

Since we needed to do a "Get the Latest files from the server". (We are using TFS.) Then when I run my application I was getting this problems. The reason for this error is, somebody has checked in the solution file with his port number (the port number he was using).

When I took the most recent, it was situated in my answer record too. We must take the latest solution file only when it is required. So here I will impart the solution for the first issue.

1. Right-click on your solution and select Properties as indicated in the following picture:

2. Choose “Web” from the left menu.

3. Under the “Use local IIS server” change the port number from http://localhost:58030/ to another one.   

4. In this example, I’ve changed http://localhost:58030/ to http://localhost:58031/

5. Now run again your Apps. The issue will be solved. I Hope it works for you!

HostForLIFE.eu IIS 8.0 Hosting
HostForLIFE.eu is European Windows Hosting Provider which focuses on Windows Platform only. We deliver on-demand hosting solutions including Shared hosting, Reseller Hosting, Cloud Hosting, Dedicated Servers, and IT as a Service for companies of all sizes. We have customers from around the globe, spread across every continent. We serve the hosting needs of the business and professional, government and nonprofit, entertainment and personal use market segments.


European IIS 8 Hosting - UK :: How to Optimize Your IIS 7.5/8 Performance

clock March 3, 2015 06:58 by author Scott

Most of you must be very familiar with IIS, moreover if you use Windows Server and deploy your ASP.NET application. In this tutorial, we will only give short tips about how to improve your IIS 7.5/8 performance. With good performance, IIS will serve better and faster web pages to your users.

Please Disable ASP Debugging

When you run your server in the production environment, you may not need to run ASP debugging mode. Stopping debugging mode will save you a great amount of processing power. To disable debugging, click on your server name in IIS and then right click on it to enable feature view. One the right pane, click on ‘compilation’ and then click on ‘debugging properties’. Next, set the following values as given below:

Server side debugging: false

Client side debugging: false

Limit ASP Threads per Processor

This limits the number of ASP requests handled by IIS simultaneously. Normally, the default value is 25. The maximum allowed number is 100. You can increase it to 50 and monitor the performance level of your IIS. To change this value click on your server and then double click on ASP under IIS in the feature view mode. Next, click on “limit properties” and set the value, as you consider suitable to match your processing needs.

Enable HTTP Compression

This is something that our clients ask to configure and it is really effective to make your site run faster. This feature helps to transfer data faster between IIS and client browsers and saves your bandwidth. You can compress HTTP in both website level and server level. To enable server level http compression, right click on sever name in IIS and then double click on compression under IIS on the right pane. You can enable both static and dynamic http compression.

Setup Logging Option

With default settings, IIS logs almost everything under the hood.  You either can disable logging option or can select a number of essential events to log in your server. To set logging option, click on “Sites” in IIS server, and then select the parameters that you want to keep as a log in your server. Remember to enable the “feature view” by right clicking on the server name in IIS. In the feature view pane, click on ‘log’ and set the logging feature; to disable logging completely click on the disable option on the right pane. Remember that you can set logging option both in server level and website level.

Setup HTTP Response Header

This feature helps to minimize the number of http requests send to IIS by website visitors. HTTP expires header will help the client browser to cache webpages and its elements such as images, CSS etc.  To set http expires you need to click on HTTP response headers in the IIS, and then click on “set common headers”. Next select ‘expire web contents” and select the number of days or hours—this is total time your contents will be cached in the client’s browser.

Enable Output Caching

When you enable output caching, IIS will keep a copy of requested webpages. If a new user requests the very same webpage located in the cache, IIS will send the copy from its cache without reprocessing the contents. Output caching can significantly improve your server response time for dynamic contents.

Modify ASP queue length property

This value represent how often IIS will send “server too busy” message (HTTP error 503) to the users when ASP is receiving high number of requests. If the queue length time is too high, IIS will send “busy message” to users with longer delay, which make the users feel that the server may be out of service.  Too low queue length will cause the server send “server busy message” quite often, consuming resources of the server. If you are unsure about this setting, you can follow Microsoft’s recommendation for one-to-one ratio, which means if you have four processors in your server with ASP thread processor value set to the default 25, you can set the queue length to 25*4=100.

You can change the queue length by going at “limit properties”—the same way you change the ASP thread processor value.

Control the connection limits

This option can give you to control the connection in three ways: controlling connection timeout, controlling maximum bandwidth per website, controlling concurrent connections.

This connection limit option will allow you to set the maximum bandwidth per second and the maximum concurrent connection per second.  The maximum allowed bandwidth make a site use only a certain amount of bandwidth per second—thus improving the performance of other sites in a shared web-hosting environment.

Controlling the number of concurrent connection is another way to improve IIS performance and to improve the security of IIS as well. This option will allow only the specified number of clients to connect to the website at a given moment. So, if any malicious program tries to send numerous connection requests will be rejected by the IIS, and thus prevent your server becoming overloaded with requests during a DDoS attack.

After changing the performance settings, check the performance level of your server by gradually increasing load to a desired level. You can also consider using Google page speed tool to check whether page-loading time has been improved.

Hope above tutorial bring benefits for you. Thanks for reading.


IIS 7.5 Hosting UK - HostForLIFE.eu :: Retrieve IIS Application Pool Password

clock February 11, 2015 13:20 by author Peter

In this short article, I am going to explain you about Retrieve IIS Application Pool Password. I had to induce the password for application pool account in SharePoint so as to require the control on an existing environment. Here are the tools helped me to get app pool password:

1. IIS Metabase explorer - a part of IIS Resource kit - ensure "Secure Data" is checked.

2. SharePoint Manager - excellent tool for exploring the server objects. simply navigate to the target application pool, get the password from properties pane.

3. using APPCMD command tool to get App Pool Password:
Appcmd could be a command tool for managing IIS 7 and higher than. you'll be able to notice it under: C:\Windows\System32\inetsrv.

To retrieve the IIS Application Pool's password enter this command:
appcmd list apppool “<Your Application Pool Name>” /text:*

HostForLIFE.eu IIS 8.0 Hosting
HostForLIFE.eu is European Windows Hosting Provider which focuses on Windows Platform only. We deliver on-demand hosting solutions including Shared hosting, Reseller Hosting, Cloud Hosting, Dedicated Servers, and IT as a Service for companies of all sizes. We have customers from around the globe, spread across every continent. We serve the hosting needs of the business and professional, government and nonprofit, entertainment and personal use market segments.


IIS 8.0 Hosting Italy - HostForLIFE.eu :: How to Configure IIS to Run Silverlight Services

clock February 10, 2015 15:38 by author Peter

In this post, I will tell you about How to Configure IIS to Run Silverlight Services. When you have been installed the Silverlight, we still need to install/enable IIS using the following steps.

Either we can open it from "Run" - "appwiz.cpl" - "Turn Windows features on or off - by enabling Internet Information Services & Microsoft .NET Framework 3.5.1" or we can do it from the Control Panel.

Selecting Turn Windows Features on or off

Enabling IIS and .NET Framework

When you preceding has been done you need to add MIME types in IIS.

First step, open the IIS with this command: 

"Run" - "inetmgr"For the first time, it will ask you to connect. When you connect & choose the instance on the right hand side under "Features View" there is IIS. Below the IIS there is "MIME Types"; click on that looks like the picture below.

In MIME Types check whether we have an extension for .SVC since we are using services in our Silverlight project. If we do not have the extension then add a new extension on right hand side at the top there is an add under Action. I already added it in my IIS, That’s why the File Name Extension is showing as un-editable.

Now, must do the same for xaml, xap and xbap extensions.

And now we are going to configure IIS from the command prompt. Since we already installed Framework and Silverlight. It is installed at the following location: c:\Windows\Microsoft.NET\Framework\v4.0.30319\
Next step, Open the CMD with Administrative privileges. And go to the above path.

In my case we’ll need both V3.0 & V4.0.30319, now first we will go to version V4.0.30319 and run the following command:
aspnet_regiis /i

The command above will install the ASP.NET and enables the service for IIS. Now we will go to version V3.0 at the following path: c:\Windows\Microsoft.NET\Framework\v3.0\Windows Communication Foundation.

Now, type and run the following command:
ServiceModelReg.exe /i

It’ll install a few things that we require to repare our IIS to publish our SilverlightServices and run. Now our IIS is ready to use Silverlight enable services.

HostForLIFE.eu IIS 8.0 Hosting
HostForLIFE.eu is European Windows Hosting Provider which focuses on Windows Platform only. We deliver on-demand hosting solutions including Shared hosting, Reseller Hosting, Cloud Hosting, Dedicated Servers, and IT as a Service for companies of all sizes. We have customers from around the globe, spread across every continent. We serve the hosting needs of the business and professional, government and nonprofit, entertainment and personal use market segments.


IIS 8.0 Hosting Netherlands - HostForLIFE.eu :: How to use Shared Configuration in IIS ?

clock February 3, 2015 08:36 by author Peter

In this short article, I will tell you about Shared Configuration in IIS. Before we start, first thing that you should do is backup the following configuration files for your sites on both servers, administration.config and applicationHost.config.The default location for that files are in C:\Windows\System32\inetsrv\config.  If you got an error you can use the files to restore the configuration back to its original state. 

1. Now, from server1 in IIS Management chopse the server name and on the right Window pane under Management click the “Shared Configuration” icon like the picture below:

2. Next, on the Actions pane select “Export Configuration” as shown on the picture below:

Then Select the location to store the files and provide an Encryption key password (keep track of it for use on server2)

3. Copy the files to a folder location on server2 (administration.config and applicationHost.config)
4. Now, Open the Shared Configuration icon in IIS Manager for server2
5. Tick on the box to “Enable shared configuration”
6. Now, Enter the path to the exported configuration files on server2

7. Next step Click Apply and input the Encryption key password.  You’ll receive the message below.

8. Close and open up IIS Manager, choose the server name, click the Management Service icon and choose Restart under the Actions menu (you may additionally choose to run iisreset at the command line)

Now make sure the sites are in place. you'll disable “Shared Configuration” if everything is setup properly. when you go to disable “Shared Configuration” you will be prompted to choose “Yes” if yo wish to copy the new configuration back to the default folder location or select “No” if you do not want to import the new configuration however instead revert back to your original configuration. Select “Yes” to overwrite your original file configuration with the new configuration.  Check the Event Viewer to assist troubleshoot any problems you run into with the sites.

HostForLIFE.eu IIS 8.0 Hosting
HostForLIFE.eu is European Windows Hosting Provider which focuses on Windows Platform only. We deliver on-demand hosting solutions including Shared hosting, Reseller Hosting, Cloud Hosting, Dedicated Servers, and IT as a Service for companies of all sizes. We have customers from around the globe, spread across every continent. We serve the hosting needs of the business and professional, government and nonprofit, entertainment and personal use market segments.


IIS 7.5 Hosting UK - HostForLIFE.eu :: How to Enable HTTPS on IIS ?

clock January 27, 2015 07:35 by author Peter

First, you may have to be compelled to purchase a 2048-bit SSL certificate(s) and configure IIS. you'll got to purchase a multi-domain or wildcard certificate based mostly upon your wants. There are free certificates obtainable for bloggers and non-commercial organizations.

Create certificate request file
First we want to create a certificate request file. Once making the certificate request, we'll copy/paste the contents of the certificate request file into the SSL provider web site. Once their verification we'll be ready to download the resulting SSL certificate files.

Create Certificate Request
On the primary screen of the wizard you may have to be compelled to give the details for your organization. The important part is to specify the Common name as your fully qualified domain name (FQDN) — together with appropriate subdomain. Here i'm simply using “www.example.com”.

Next, make certain to specify the bit length of your certificate to 2048. supported todays standards, this is often the length to decide on. Any shorter isn't secure enough, and any further isn't necessary and can produce unnecessary cpu cycles on your server.

The next step is to specify the file name for the certificate request file. I store all of my SSL certificates and associated files in folder on the C drive: C:\ssl. Then, merely click the finish button.

We will currently open up the resulting .txt file and copy and paste the contents into the SSL provider’s web site. however and wherever you do this can rely on the SSL provider you selected.

Install certificate in IIS
Once you have got completed the certificate signing request, your SSL supplier can notify you once the SSL certificate is prepared and accessible for you to transfer. After downloading the SSL certificate file (csr), complete the certificate request in IIS.

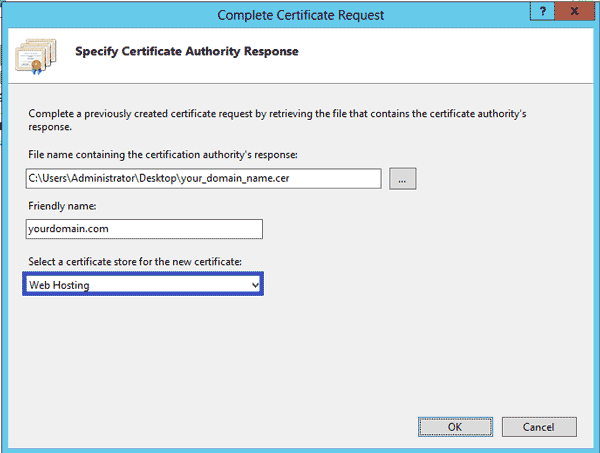
To complete the certificate request, choose the SSL certificate file (crt) and enter the Friendly name. The friendly name is for you to understand that SSL certificate is that in IIS. For best practices, I continuously name these to match the absolutely qualified domain name.

Add HTTPS Binding
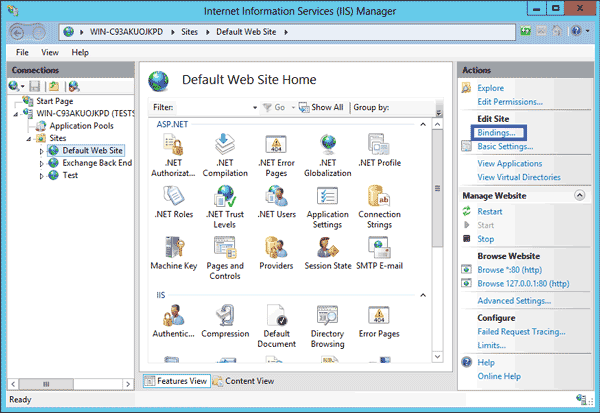
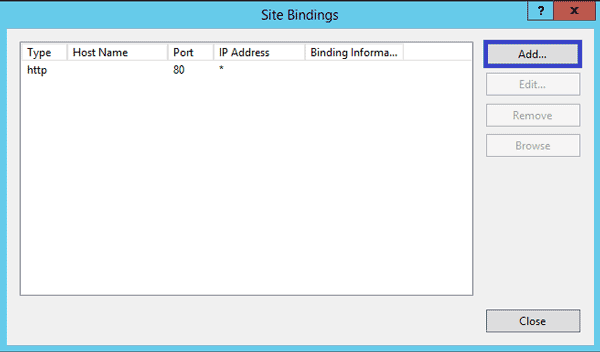
The last step is to bind our web site in IIS to the HTTPS port (443). Note that the common name (FQDN) for the certificate should match the host name for the location that you just are configuring.  To get started right click on the site in IIS and choose Edit Bindings.

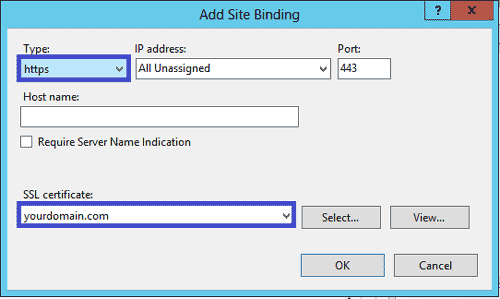
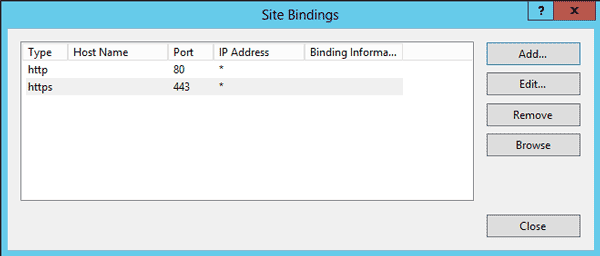
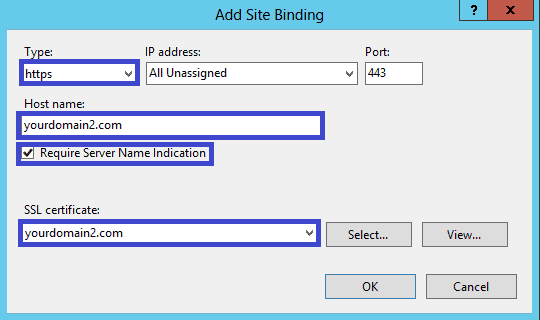
Then click the Add… button to add a replacement binding. we'll choose https because the kind, the suitable IP address on the server to bind the web site to, then choose the SSL certificate file and click on OK. you're now serving the web site using HTTPS. move and open your browser and enter the full domain with the https:// protocol specification to look at the location a new HTTPS.

HostForLIFE.eu IIS 7.5 Hosting
HostForLIFE.eu is European Windows Hosting Provider which focuses on Windows Platform only. We deliver on-demand hosting solutions including Shared hosting, Reseller Hosting, Cloud Hosting, Dedicated Servers, and IT as a Service for companies of all sizes. We have customers from around the globe, spread across every continent. We serve the hosting needs of the business and professional, government and nonprofit, entertainment and personal use market segments.


HostForLIFE.eu Proudly Launches Sitefinity 7.3 Hosting

clock January 26, 2015 10:13 by author Peter

HostForLIFE.eu, a leading web hosting provider, has leveraged its gold partner status with Microsoft to launch its latest Sitefinity 7.3 Hosting support.

European Recommended Windows and ASP.NET Spotlight Hosting Partner in Europe, HostForLIFE.eu, has announced the availability of new hosting plans that are optimized for the latest update of the Sitefinity 7.3 hosting technology.

HostForLIFE.eu supports Sitefinity 7.3 hosting on our latest Windows Server and this service is available to all our new and existing customers. Sitefinity 7.3 offers a natural extension to all customer SharePoint workflows and wrap a compelling presentation around client core business documents. Contextual task-oriented approach to organizing documentation on any topic.

HostForLIFE.eu hosts its servers in top class data centers that is located in Amsterdam, London, Paris and Seattle (US) to guarantee 99.9% network uptime. All data center feature redundancies in network connectivity, power, HVAC, security, and fire suppression. All hosting plans from HostForLIFE.eu include 24×7 support and 30 days money back guarantee. All hosting plans from HostForLIFE.eu include 24×7 support and 30 days money back guarantee. The customer can start hosting our Sitefinity 7.3  site on our environment from as just low €3.00/month only.

Sitefinity 7.3 is a Web Content and Experience Management Platform that enables business to engage, convert and retain customers through multiple channels. Sitefinity 7.3 is the only truly mobile web content management on the market that supports all three mobile strategies out of the box – responsive design, mobile apps and mobile sites.

Sitefinity 7.3’s intuitive user interface delights both developers and business users alike, making it a more efficient environment to get more work done faster. There’s no long training required, so even new non-technical users will be up and running in no time. Because it’s built on a modern code-base, Sitefinity is best equipped to meet the long term needs of today’s expanding businesses, including tackling challenges like mobile, ecommerce, multisite management, content personalization, and so much more.

HostForLIFE.eu is a popular online Windows based hosting service provider catering to those people who face such issues. The company has managed to build a strong client base in a very short period of time. It is known for offering ultra-fast, fully-managed and secured services in the competitive market. Our powerful servers are specially optimized and ensure Sitefinity 7.3 performance.

For more information about this new product, please visit http://hostforlife.eu/European-Sitefinity-73-Hosting

About HostForLIFE.eu :
HostForLIFE.eu is awarded Top No#1 SPOTLIGHT Recommended Hosting Partner by Microsoft (see http://www.asp.net/hosting/hostingprovider/details/953). Our service is ranked the highest top #1 spot in several European countries, such as: Germany, Italy, Netherlands, France, Belgium, United Kingdom, Sweden, Finland, Switzerland and other European countries. Besides this award, we have also won several awards from reputable organizations in the hosting industry and the detail can be found on our official website.HostForLIFE.eu Proudly Launches Sitefinity 7.3 Hosting


IIS 7.5 Hosting UK - HostForLIFE.eu :: How to Fix NetworkService Account Not GZIPing IIS Responses ?

clock January 14, 2015 06:43 by author Peter

After following several posts and tutorials on properly fixing IIS dynamic compression for JSON responses, i used to be still reaching a dead finish. For no matter reason, my responses were still uncompressed. Apparently, using the NetworkService account doesn’t perpetually play nicely with static or dynamic content compression.

The NetworkService account doesn’t have permission to the IIS Temporary Compressed Files folder, preventing it from writing and reading out compressed streams. The best thanks to get around this can be by adding the NetworkService account to the IIS_IUSRS group (which already has permissions to the IIS temporary folder).

1. First step, Open the local Users and groups management console.

2. Next, Select Groups from the sidebar.

3. Now, open the IIS_IUSRS property window.

4. Click Add, then enter Network Service as the user. Make sure to have your nearby workstation as the area, then Check Names to make certain you entered everything effectively. Click OK.

5. Next, Click OK on the IIS_IUSRS property window.

6. Close the Local Users and Groups management console
7. Restart IIS

Dynamic compression should be working now!


IIS 8.0 Hosting UK - HostForLIFE.eu :: How to Fix HTTP Error 500.21 in IIS?

clock January 13, 2015 05:24 by author Peter

If you've setup another IIS site and application pool and using a .NET application, you may run into this problem:
HTTP Error 500.21 – Internal Server Error Handler “ExtensionlessUrlHandler-Integrated-4.0″ has a bad module “ManagedPipelineHandler” in its module list.

And here is the solution to solve this error:
First, Run the "aspnet_regiis.exe" program from Command Line (in the Command Prompt) and type this syntax:

run %windir%\Microsoft.NET\Framework\v4.0.30319\aspnet_regiis.exe –i

Note: if your computer is 64 bit, then use the following:
%windir%\Microsoft.NET\Framework64\v4.0.30319\aspnet_regiis.exe –i
Restart IIS.

If above solution doesn’t work for you, try the other method below:
Click Start -> All Programs -> Accessories -> Run
In the Open textbox paste in the following line

For silent repair on 32 bit computer with .Net Framework version 4.0.30319 use:
%windir%\Microsoft.NET\Framework\v4.0.30319\SetupCache\Client\setup.exe /repair /x86 /x64 /ia64 /parameterfolder Client /q /norestart

For silent repair on 64 bit computer with .Net Framework version 4.0.30319 use:
%windir%\Microsoft.NET\Framework64\v4.0.30319\SetupCache\Client\setup.exe /repair /x86 /x64 /ia64 /parameterfolder Client /q /norestart

Click OK to start the repair
After, the repair ran for a few minutes, restart IIS.


About HostForLIFE.eu

HostForLIFE.eu is European Windows Hosting Provider which focuses on Windows Platform only. We deliver on-demand hosting solutions including Shared hosting, Reseller Hosting, Cloud Hosting, Dedicated Servers, and IT as a Service for companies of all sizes.

We have offered the latest Windows 2016 Hosting, ASP.NET Core 2.2.1 Hosting, ASP.NET MVC 6 Hosting and SQL 2017 Hosting.


Tag cloud

Sign in