This article contains brief information about CPU Throttling in the IIS 8. What the differences approach between CPU Throttling in IIS 7 and IIS 8.
CPU Throttling in IIS 7 (and 7.5)
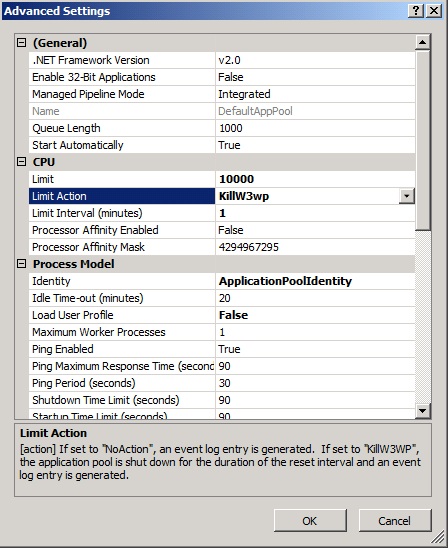
IIS 7 introduced support for CPU Throttling at an Application Pool level. You could specify a limit of CPU usage and a corresponding action to take when that limit was exceeded. The two available options were NoAction or KillW3wp. The names accurately reflect what each option does: Doing nothing in the case of NoAction, or killing the worker process for KillW3wp.
Let’s take a look at what the KillW3wp option looks like in practice.
First, I will configure the DefaultAppPool with a limit of 10% CPU. I have also set the Limit Interval to 1 minute to make it easier to demonstrate how the process is killed and then allowed to restart.
Next, I will apply load to the server using a load generation tool (WCAT, available for download here).
Here is how things look in the Performance Monitor:
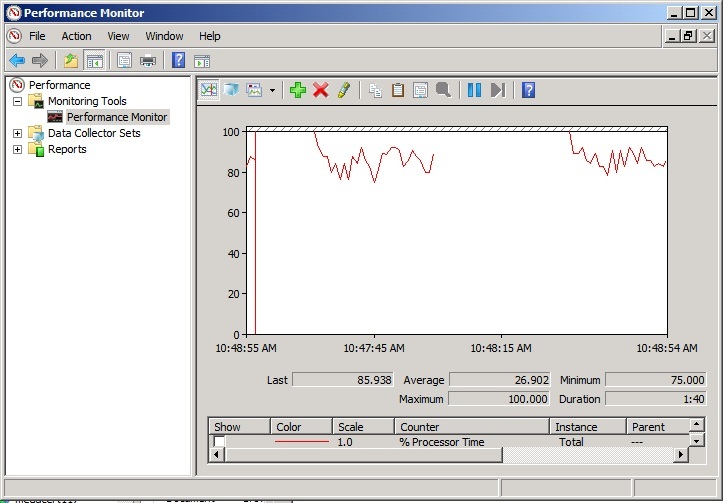
As you can see, the CPU usage is high when the process starts, then the line goes away. What is happening is that the process is using a high amount of CPU, and after some time IIS realizes that they would use more than their 10% limit within 1 minute (the Limit Interval we configured earlier), so it kills the process for the remainder of the Limit Interval. The process is prevented from restarting until the Limit Interval expires. During this time, any user requests will fail with a HTTP 500 error. After the Limit Interval is reached, the process is allowed to restart, it uses a high amount of CPU again, and it gets killed again. This cycle will continue to repeat for this application that uses high CPU.
CPU Throttling in IIS 8.0
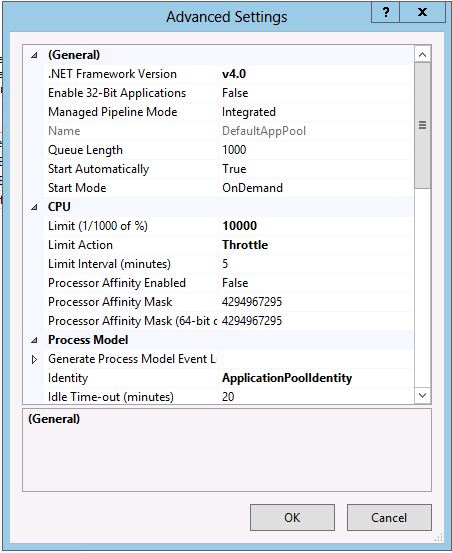
In IIS 8.0, we’ve worked closely with the Windows Kernel team to deliver a much better CPU throttling experience. Unlike IIS 7 where the only solution was killing W3WP, in Windows 8 we have two additional throttling options: Throttle and ThrottleUnderLoad. The Throttle option will always restrict the application to the specified amount of CPU utilization, while the ThrottleUnderLoad option will allow the process to use more than the specified amount of CPU, provided that there is no contention for CPU resources.
The CPU throttling settings are made on the Application Pool. So if you use the recommended configuration of having each application use its own App Pool, each application will have its own setting for maximum CPU utilization.
For this example we will use the Throttle option:
As with the IIS 7 scenario, I am using WCAT to apply load to the server. Here is the CPU graph during the test:

As you can see from the graph, the CPU utilization stays around 10% all the time, instead of climbing higher and having the process be killed like IIS 7.
Let’s try another example, using PHP this time. As you know, PHP will use multiple processes for serving requests. We will see that the CPU utilization stays near 10% even when multiple processes are running. The sum of CPU usage for all of these processes will be limited to 10%. Here is a view of Task Manager showing the FastCGI processes running when I put load on the system. Note how the sum of all 5 processes is 10.4%.

Conclusion
In this post you’ve seen a comparison between the CPU throttling approaches in IIS 7 and IIS 8. The investments in CPU throttling in IIS 8 provide a much better sandbox that you can use to limit CPU use by an application.