IIS 7.5 and IIS 8.0 European Hosting

BLOG about IIS 7.5 Hosting, IIS 8.0 Hosting and Its Technology - Dedicated to European Windows Hosting Customer

European IIS 10 Hosting - HostForLIFE.eu :: How To Manage IIS Server Online?

clock December 14, 2018 08:41 by author Peter

Hey folks, now it’s possible to manage your IIS (Internet Information Services) Server right from the Browser. I am going to share the steps , which I was required to perform before it started running. It was simple though. Right now, the Service is in “Preview” mode, hope to see this launched very soon!

“To start, head over to https://manage.iis.net and download IIS Administration Setup.

As soon the download starts, it shows you another screen waiting for the Service to be installed and run and let you proceed further.


The installation failed twice. It asked me to install “Microsoft Visual C++ 2015 Redistributable (x64)” first and then asked to install “Microsoft .NET Core 1.0.1 Windows Server Hosting”. I had no other trouble during the installation. My machine config at the time is Windows 10 Enterprise (x64) / i5 / 12 GB. I did an IIS reset and the waiting Window started receiving signals. The first screen prompted me with a default port (PORT# 55539) on the localhost address and asked me to supply an “Access Token”.

The link, given below in the input box lets you generate or refresh the access token. In the background, it installed “Microsoft IIS Administation Service” exposing a Web Service on port 55539. I’ve yet to figure out, if the port is configurable or not.

Generate an access token and supply to IIS Management form and you are done. It also allows you to set how soon the access token should be expired.

IIS Administration Setup needs to be installed on the machine running IIS Server. To manage any IIS Server online, you just need the Access Token.

The steps are given below.

  1. Install IIS Administration Setup and its dependencies on IIS Server machine. (It will install and start “Microsoft IIS Admistration” Service).
  2. Generate Access Token on the machine.
  3. Use the token any where in the world to access IIS Server, which belongs to the token. Make sure the port 55539 is allowed from the network, which you’re trying to access the IIS Server over the Web.

You can refresh the key anytime, which you want to (or an access token has been compromised).

Server and Website Administration is very smooth with the Web console. All the options from IIS Manager are available online and are very user friendly. You can do pretty much everything from the Web console, which comes available with IIS Manager on Windows.

Exploring websites

Create a Website.

Managing IIS Server


I’ll leave the rest of the exploration for you. Hope, you enjoyed it. Thanks for reading.


European IIS 10 Hosting - HostForLIFE.eu :: Dedicated Servers As The Secured Solutions

clock November 14, 2018 10:42 by author Peter

When it comes to the option of dedicated servers, you may find it costly in comparison to other web hosting options. But ultimately, the choice is worth making because plenty of commercial benefits are integrated into this web hosting plan. Let’s see how it is a better option than others web hosting plans.

Better uptime
In dedicated hosting arrangements, the service provider reserves the SLA,  including the solution of hardware failure. The service provider maintains a support team for 24x7. With expert skill sets and ITIL complaint methods you can be sure about a high uptime.

Cost efficiency
This is a cost efficient option. According to the plan, a dedicated hosting service provider is responsible for upgradates and maintenance of hardware for maintaining connectivity, and for offering a friendly physical environment. Under this plan, you as a user have no obligation to pay for the total server room or for employing a service administrator. Under this plan you have to pay for the services you will be using.

Reliable bandwidth
Under this web hosting plan you will get to enjoy higher internet speed. There is no chance to lose the speed as there is no risk of sharing the connection. This will help in faster communication, upload management, and uninterrupted business presence.

Complete control on applications
If you select dedicated web hosting, you will enjoy a complete monopoly of decisions about using site management tools and allied other applications to boost your hosting environment. However, about the tools, you need to get prior approval from your hosting service provider that they will be able to give you backend support to maintain them.

Better security arrangement
Dedicated hosting service offers uninterrupted access to physical server. The security arrangement includes supervision cameras, Biometric Access Control System, round-the-clock patrolling, etc. for improved security. Advanced service providers often provide additional supports like DDos guard, web application firewall, VAPT, and security event management.

These reasons can clearly  justify why Dedicated Server is a better option. It is clearly understood that although expensive, this category of web hosting service offers excellent ROI (Return over investment).


European IIS 10 Hosting - HostForLIFE.eu :: How to Enable HTTP Strict-Transport-Security (HSTS) on IIS?

clock November 8, 2018 11:23 by author Peter

In this article, we will only show simple tutorial about how to enable and serve HTTP Strict Transport Security (HSTS) response header in IIS.

Definition HTTP Strict Transport Security (HSTS)

HTTP Strict Transport Security (HSTS) is a web security policy mechanism which is necessary to protect secure HTTPS websites against downgrade attacks, and which greatly simplifies protection against cookie hijacking.

HSTS improves security and prevents man-in-the-middle attacks, downgrade attacks, and cookie-hijacking.

It allows web servers to declare that web browsers (or other complying user agents) should only interact with it using secure HTTPS connections, and never via the insecure HTTP protocol. HSTS is an IETF standards track protocol and is specified in RFC 6797.

The HSTS Policy is communicated by the server to the user agent via an HTTP response header field named Strict-Transport-Security. HSTS Policy specifies a period of time during which the user agent should only access the server in a secure fashion.

Therefore, adding a HSTS header is important after you’ve added SSL to your WordPress website, so browsers automatically request your HTTPS address.

All you need to add to your web.configconfiguration file is an Outbound Rule, to rewrite request responses and sending the HTTP Strict Transport Security response header:

<outboundRules>
  <rule name="Add Strict-Transport-Security when HTTPS" enabled="true">
    <match serverVariable="RESPONSE_Strict_Transport_Security" pattern=".*" />
    <conditions>
      <add input="{HTTPS}" pattern="on" ignoreCase="true" />
    </conditions>
    <action type="Rewrite" value="max-age=31536000" />
  </rule>
</outboundRules>

HSTS and includeSubdomains #

Do you have your SSL (TLS) certificate on your www. subdomain? Then you need to include it using includeSubdomains. The outboundRules rule then becomes:

<rule name="Add Strict-Transport-Security when HTTPS" enabled="true">
  <match serverVariable="RESPONSE_Strict_Transport_Security" pattern=".*" />
  <conditions>
    <add input="{HTTPS}" pattern="on" ignoreCase="true" />
  </conditions>
  <action type="Rewrite" value="max-age=31536000; includeSubDomains; preload" />
</rule>

HSTS header in WordPress functions.php #

You can set a HSTS header through your functions.php theme file as well. For this to happen, you can hook into the send_headers action.

Use the following code in your functions.php to send a HSTS header:

<?php
add_action( 'send_headers', 'saotn_add_hsts_header' );
function saotn_add_hsts_header() {
  header( 'Strict-Transport-Security: max-age=31536000; includeSubDomains; preload' );
}


European IIS Hosting - HostForLIFE.eu :: How to Enable Reverse DNS Lookup in IIS

clock February 21, 2017 10:37 by author Scott

This article explains how to enable reverse Domain Name System (DNS) lookup for all versions of Internet Information Services (IIS).

When reverse DNS lookups are enabled on the web server, the IP address of each web client that connects to the IIS server is resolved to a DNS name, and the DNS name instead of the web client IP address is placed in the IIS log files.  Enabling reverse DNS also affects what CGI and ISAPI extensions see as a value of the Remote_Host variable.

Microsoft KB article 297795 gives a step-by-step demonstration how to enable RDNS for IIS4, IIS5 and IIS6, but all you need to do is run the following in a command prompt from the ADScripts folder:

For IIS4 run:

adsutil set w3svc/EnableReverseDNS TRUE

For IIS5 and IIS6 run:

cscript adsutil.vbs set /wesvc/EnableReverseDNS "TRUE"

In IIS7, you must install the IP and Domain Restrictions role service for the Web Server (IIS) role.  You can do this in Server Manager or from the command line using the following command:

ServerManagerCMD -install Web-IP-Security

In Windows Server 2008 R2, the ServerManagerCMD.exe program is deprecated and has been replaced with the ServerManager Powershell cmdlets.  The following two cmdlets are used to install the IP and Domain Restrictions role service:

Import-Module ServerManager
Add-WindowsFeature Web-IP-Security

Now that the role service is installed, you can configure reverse DNS lookups, as follows:

  • Open Internet Information Services (IIS) Manager.
  • Navigate to the Server Name in the Connections pane.  If you only want to enable reverse lookups on a particular website, navigate to that website.
  • Double-click IP Address and Domain Restrictions in the center pane and click Edit Feature Settings in the Actions pane.
  • Put a checkmark in Enable domain name restrictions and click OK.

You will see the following warning:

Restricting access by domain name requires a DNS reverse lookup on each connection. This is a very expensive operation and will dramatically affect server performance. Are you sure you want to enable restrictions based on domains?

Clicking Yes will enable reverse lookups for all clients connecting to the web server.  I have not noticed any more than a 1-2% increase in CPU performance and the websites are just as performant as before.

Each of these changes go into effect immediately.  There is no need to restart IIS.


European IIS Hosting - HostForLIFE.eu :: How to Check Trace is Enabled on IIS Server

clock December 9, 2016 07:33 by author Scott

Trace \ Track is a vulnerability that is usually identified on an IIS server when we run PCI compliance and find this vulnerability. A hacker can run a Trace attack on IIS Website and get information about the Backend server and other important information.

In latest versions on IIS (IIS 6.0, 7.5) Trace is disabled by default but still it is good idea to make sure that Trace is disabled on IIS.

Testing if Trace \ Track is Enabled on a IIS website or not

Follow these steps :

1. Go to command Prompt of your Machine.
2. Type telnet <URL of the website> 80 (this will open a telnet session of that website on port 80)
3. Type following commands on the telnet session screen in exact same order: 

    TRACE / HTTP/1.0
    Host: <hostname_you_are_testing>
    TestA: Hello
    TestB: World


4. Press enter twice. 

If Trace is enabled on your server, you should see following results:

    HTTP/1.1 200 OK
    Server: Microsoft-IIS/7.5
    Date: Tue, 05 Dec 2016 08:17:15 GMT
    Content-Type: message/http
    Content-Length: 76 


And If you receive following results on the telnet screen, then Trace is enabled :

     HTTP/1.1 501 Not Implemented
    Content-Type: text/html
    Server: Microsoft-IIS/7.5
    X-Powered-By: ASP.NET
    Date: Tue, 06 Dec 2016 09:32:58 GMT
    Content-Length: 1508


    Connection: close

Disabling Trace or Track on IIS

The easiest way to mitigate the risk of Trace \ Track on iis is  : installing URLScan from Microsoft, 
The urlscan.ini file is included as part of URLScan . This sets by default a configuration setting "UseAllowVerbs=1".  In this [AllowVerbs] section of the ini file, only http methods that are allowed are GET, HEAD, and POST so simply by installing URLScan on an IIS server , we can assume that it  protected from TRACE or TRACK.  


IIS 8 Hosting - HostForLIFE.eu :: How to Config ASP.NET and IIS Request Length?

clock April 8, 2016 20:30 by author Anthony

In this post, i will show you how to configuring ASP.NET and IIS request length for post data. One of the most infuriating things about IIS configuration in general is how the Request length is configured in IIS and ASP.NET. There are several places that control how much content you can send to the server and over the years this setting has changed in a number of ways. The places where it's configured is not super obvious and they can be fluid because some of these features are optionally installed IIS features.

So here are the two main places where the request length is set in IIS and ASP.NET:

  • IIS Request Filtering
  • HttpRuntime maxRequestLength

Let's start with the IIS level setting, which is also a relatively new setting. It's based around the Request Filtering module in IIS which is an optional IIS component, but that is a required component if you have ASP.NET installed on your server (at least in the latest versions). If you have ASP.NET enabled in IIS the Request Filtering module is also enabled and the following settings apply.

If you don't use ASP.NET you can still install Request Filtering, but it's an optional component. So if you only use ISAPI or CGI scripts and no ASP.NET content Request Filtering may not be enabled in which case the following settings cannot be set and aren't required. Since most people do run ASP.NET at least for some sites, for all intents and purposes we can assume that the Request Filtering module is installed on IIS.

So to configure the posted content size you can use the following web.config based configuration settings:

<?xml version="1.0" encoding="UTF-8"?>
<configuration>
    <system.webServer>
     <security>
      <requestFiltering>
        <requestLimits maxAllowedContentLength="500000000"  />
      </requestFiltering>
    </security> 
   </system.webServer>
</configuration>

The maxAllowedContentLength determines the size of the POST buffer allowed in bytes. Above I've set the value to 500megs.

Or you can do the same thing in the IIS Management console using Request Filtering option in the IIS options:

As is usually the case you can apply the filtering at all levels of the IIS hierarchy – Machine, Site and Virtual/Application. Using web.config as shown above sets the settings at the Application level.

Because these are IIS settings, the value controls the IIS upload settings so they are applied against any and all requests that are fired against IIS, including ASP.NET, ASP, ISAPI extensions, CGI/FASTCGI executables, IISNodeJs requests and so on.

ASP.NET traditionally has had its own httpRuntime element in the <system.web> section that control ASP.NET runtime settings one of which is the maxRequestLength. This setting controls the ASP.NET pipeline's acceptance of file uploads and it needs to be configured in addition to the Request Filtering settings described above.

<?xml version="1.0" encoding="UTF-8"?>
<configuration>
  <system.web>
    <httpRuntime maxRequestLength="500000000" executionTimeout="120" />
  </system.web>
</configuration>

You can also use the IIS Management Console and the Configuration Manager option, to view all of the options on the httpRuntime element:

What's interesting is that the settings you see here widely mirror the settings in the Request Filtering section, and they are not inherited. It's your responsibility to make sure the settings are set correctly in both places. I recommend that you take a minute and go through the values you care about and set them correctly in both places.

The above describes ASP.NET settings. If you're using another framework, like WCF you may end up with yet another different set of settings on the WCF bindings and Endpoints. Just be aware of the framework you're using and that it too might have specific filters to restrict request size.


HostForLIFE.eu IIS 8 Hosting

HostForLIFE.eu revolutionized hosting with Plesk Control Panel, a Web-based interface that provides customers with 24x7 access to their server and site configuration tools. Plesk completes requests in seconds. It is included free with each hosting account. Renowned for its comprehensive functionality - beyond other hosting control panels - and ease of use, Plesk Control Panel is available only to HostForLIFE's customers. They offer a highly redundant, carrier-class architecture, designed around the needs of shared hosting customers.


European IIS 8 Hosting - UK :: Using IIS Auto - Start Feature to Speed Up Your ASP.NET Site

clock November 27, 2015 20:50 by author Scott

One of ASP.NET feature that we can use to speed up our application is using IIS Auto-Start Feature. Auto-Start, introduced with IIS 7.5, allows an ASP.NET application deployed to IIS to be available immediately after deployment.  In the simplest sense, enabling this feature causes IIS to prime an application as soon as it is deployed removing the warm-up time often required of “cold hits” to a website.  In this article we’ll see how we can enable this feature either through IIS Manager or configuration files and even how we can perform more advanced application warm-up routines, such as priming a cache.

Configuring Auto-Start with IIS Manager

Enabling Auto-Start via IIS is actually quite simple, though the settings can be tricky to find the first time.

  • Open Internet Information Services (IIS) Manager.
  • In the Connections pane, select the Application Pools node, revealing the Application Pools pane in the main view.
  • Select the application pool for which you wish to enable Auto-Start.
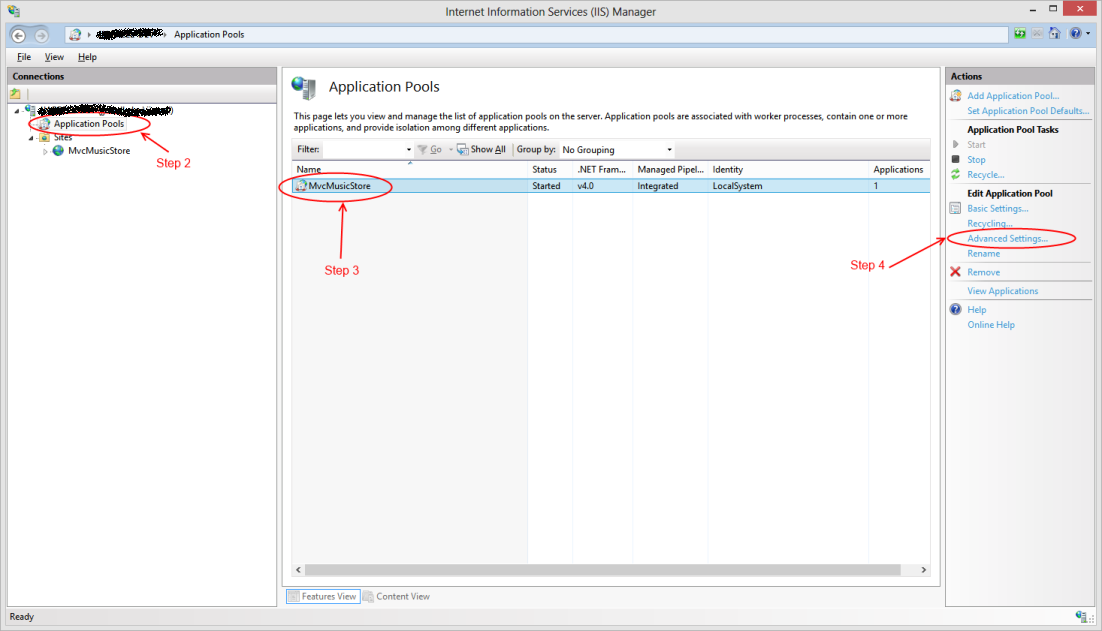
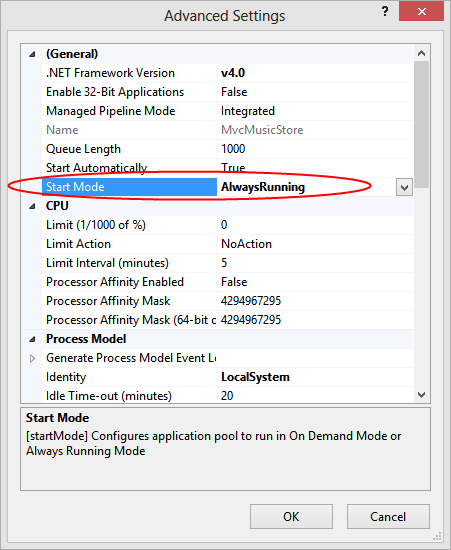
  • Click Advanced Settings…
  • Locate the Start Mode option under the General group and set it to AlwaysRunning.
Configuration Auto-Start with applicationHost.config

Enabling Auto-Start using the IIS Manager UI is quick and simple, but tweaking the settings for all of your application pools via the user interface may not be scalable.  For example, imagine that you were rolling out your website to a large web server farm and need to automate the configuration of all your application pools.

In this case, we can also enable Auto-Start by tweaking the applicationHost.config file which controls the application domains for all instances running on that server. applicationHost.config can be found at <Windows>\System32\inetsrv\config\applicationHost.config.

Inside of the applicationHost.config file, locate the <applicationPools> node located under<configuration>/<system.applicationHost>. Inside of the <applicationPools> node, locate the entry whose name attribute corresponds to your application pool, and add a startMode attribute with the value of “AlwaysRunning”.

<applicationPools>
        <add name="MvcMusicStore" startMode="AlwaysRunning" />
    ...
</applicationPools>

The addition of the startMode attribute will override the default start mode of “OnDemand“.

Advanced Application Warm Up with Auto-Start

We’ve seen how to work around the “cold-hit” problem that often affects websites running on IIS.  However, imagine that early requests to your site can still cause delays, perhaps due to expensive data that has to be retrieved.  In these cases you can certainly cache the data after it’s retrieved to make subsequent requests faster, but the unlucky visitor who first makes the request still has to bear the brunt of the work for others.

While in the past it wasn’t unheard of for developers to prime their caches with these expensive data requests in the Application_Start() function of Global.asax.cs, IIS now provides a cleaner way through the use of Auto-Start Providers.

For example, let’s imagine that the home page of your application contains a rather expensive call.  In the fact, the call is so expensive that we’ve elected to cache the results improve the performance of subsequent requests.  However, this still lays the bulk of the work at the feet of the site’s first visitor.

        public ActionResult Index()
        {
           var albums = HttpRuntime.Cache["TopSellingAlbums"];
           if (albums == null)
           {
                var service = new TopSellingAlbumsService();
                albums = service.GetTopFiveSellingAlbums();
                HttpRuntime.Cache["TopSellingAlbums"] = albums;
            }
            return View(albums);
         }

While this technique does improve the performance for subsequent visitors, it still lays the bulk of the work at the feet of the site’s first.  However, IIS now provides a better place to perform these types of warm-up tasks.

Preload clients, which implement the IProcessHostPreloadClient interface, contain a single method Preload(…) which can be used to cleanly perform these warm-up tasks.

    public class MvcMusicStoreApplicationPreloadClient : IProcessHostPreloadClient
    {
        public void Preload(string[] parameters)
        {
            var service = new TopSellingAlbumsService();
            HttpRuntime.Cache["TopSellingAlbums"] = service.GetTopFiveSellingAlbums();
        }
   }

However, this class will not be loaded automatically.  We need to tell IIS both about the existence of this class as well as which website it applies to.  To do this, we’ll need to return to our applicationHost.config file.

First, we’ll need to add an element called <serviceAutoStartProviders> to the<configuration>/<system.applicationHost> node.

        <serviceAutoStartProviders>
            <add name="MvcMusicStoreAutoStartProvider" type="MvcMusicStore.MvcMusicStoreApplicationPreloadClient, MvcMusicStore" />
        </serviceAutoStartProviders>

This element registers our custom preload client with the name MvcMusicStoreAutoStartProvider.  Be sure to fully qualify the type name in the type attribute so the assembly loader can locate it.

Finally, we’ll locate the entry for our site under the sites node and register our preload client in our site’s application node.

            <site name="MvcMusicStore" id="1" serverAutoStart="true">
                <application path="/" applicationPool="MvcMusicStore" serviceAutoStartEnabled="true" serviceAutoStartProvider="MvcMusicStoreAutoStartProvider">
                </application>
       . . .
            </site>

This is done by adding the serviceAutoStartEnabled attribute, set to true, and by adding theserviceAutoStartProvider attribute, set to the name of the serviceAutoStartProvider entry we added in the previous step.

Wrapping Up

With just a few easy steps we’ve ensured that our application is always ready to go when a user a visits.  In addition, we’ve also discovered an easy way to offload time intensive operations, such as priming a cold cache, from the first user to the initial startup of the application.  With these two tips in hand we’re sure to have a fast and responsive application that our users will rave about.


European IIS 8 Hosting - UK :: Tips to Secure Your IIS Installation

clock November 18, 2015 20:55 by author Scott

You have just finished installing IIS on your Windows OS. You’re probably thinking that you can delve into the web development world and forget all about the underlying web server. After all, IIS is a Microsoft product so it should install with the right default configuration settings, right? That is far from true with IIS.

In this article, I will provide 8 tips that you can use to secure your IIS installation.

Move the Inetpub folder to a different drive

The Inetpub folder is the default location for your web content, IIS logs and so on. By default IIS 7 and upwards install the Inetpub folder in the system drive. It’s good practice to move the Inetpub folder to a different partition so that the web content is separate from the operating system. This folder can be moved after IIS installation is completed.

Install the appropriate IIS modules

IIS includes more than 30 modules  – you should only install the ones which are needed by your web applications. Disable any modules that are not required, to minimize the capacity of potential attacks. Periodically review the modules that are installed and enabled and remove any that are no longer required. You can use IIS Manager to list all the modules that are enabled.

  • Open IIS Manager
  • Select the name of the machine to view the modules for the whole machine, or change to the specific web site to view the modules enabled for the selected site
  • Double click on ‘Modules’
  • To disable a module, click on the module from the list and select ‘Remove’ from the Actions pane
  • Confirm the removal by pressing Yes

Disable the OPTIONS method

The OPTIONS method provides a list of methods that are supported by the web server. Although this might seem beneficial, it also provides useful information to an attacker. This will provide information to an attacker at the reconnaissance stage of this attack. Therefore it’s recommended to disable the OPTIONS method completely. This can be done by denying the OPTIONS verb from the HTTP Verb request filtering rules in IIS.

  • Open IIS Manager
  • Select the name of the machine to configure this globally (or change to the specific web site for which you need to configure this)
  • Double click on ‘Request Filtering’
  • Change to the HTTP Verbs tab
  • From the Actions pane, select ‘Deny Verb’
  • Insert ‘OPTIONS’ in the Verb, and press OK to save changes

Enable Dynamic IP Restrictions

The Dynamic IP Restrictions module helps blocks access to IP addresses that exceed a specified number of requests and thus helps prevent Denial of Service (DoS) attacks. This module will inspect the IP address of each request sent to the web server and will filter these requests in order to temporarily deny IP addresses that follow a particular attack pattern. The Dynamic IP Restrictions module can be configured to block IP addresses after a number of concurrent requests or by blocking IP addresses that perform a number of requests over a period of time. Depending on your IIS version you will need to enable either the ‘IP Security’ feature or the “IP and Domain Restrictions”  as explained in this Microsoft article.

This will include the ‘IP Address and Domain Restrictions module in the IIS Manager, from where dynamic IP restrictions can be set.

  • Open IIS Manager
  • Select the name of the machine to configure this globally (or change to the specific web site for which you need to configure this)
  • Double click on ‘IP Address and Domain Restrictions’
  • From the Actions pane, select ‘Edit Dynamic Restriction Settings’
  • Modify and set the dynamic IP restriction settings as needed and press OK to save changes

Enable and Configure Request Filtering Rules

It is also a good idea to restrict the types of HTTP requests that are processed by IIS. Setting up exclusions and rules can prevent potentially harmful requests from passing through to the server, since IIS can block these requests on the basis of the request filtering rules defined. For example, a rule can be set to filter traffic for SQL Injection attempts. Whilst SQL Injection vulnerabilities should be fixed at source, filtering for SQL Injection attacks is a useful mitigation. This can be set from the Rules tab found in the Request Filtering page in IIS Manager.

  • Open IIS Manager
  • Select the name of the machine to configure this globally (or change to the specific web site for which you need to configure this)
  • Double click on ‘Request Filtering’
  • Change to the Rules tab
  • From the Actions pane, select ‘Add Filtering Rule’Set the required rules, and press OK to save changes

The rule set in the below screenshot would instruct IIS to check for the provided strings in requests for .asp and .aspx pages. IIS will then block the request if any of these strings are found.

You can also filter requests that contain things like high-bit characters or double escape characters. This and other similar filtering options are explained at http://technet.microsoft.com/en-us/library/hh831621.aspx

Enable logging

Configuring IIS logging will cause IIS to log various information from HTTP requests received by the server. This will come in handy and can give a better understanding of issues that might have occurred on your website when things go wrong. It’s the place where you will start the troubleshooting process in such situations.

The server’s logs can also be continuously or periodically monitored in order to review the server’s performance and provide optimizations if needed. This can be automated using various server monitoring tools. Make sure to keep a backup of the logs. Microsoft also provide Log Parser, which is a tool that can be used to query and retrieve specific data from IIS logs. Additionally, log consolidation tools prove useful for consolidating and archiving data from logs in a more meaningful way.

IIS logging can be enabled and configured from IIS Manager > select the machine name or the specific site you want to configure > Logging. Since these log files might grow quite large, it would be a good idea to start a new file periodically.

Use the Security Configuration Wizard (SCW) and the Security Compliance Manager (SCM)

Both of these Microsoft tools can be used to test your IIS security. The Security Configuration Wizard (SCW) runs different checks and provides advice and recommendations on how to boost your server’s security. The Security Compliance Manager (SCM) tool performs security tests on your server and compares server configurations to predefined templates as per industry best practices and security guide recommendations.

Updates

Finally, ensure that you keep up to date with the latest updates and security patches. It is interesting how often this basic security requirement is missed. The majority of hacks affecting the web server occur on unpatched servers. This just demonstrates how important it is to always keep your IIS web server up to date.


European IIS Hosting - Amsterdam :: How to Host WCF Service in IIS 8 (Windows Server 2012)

clock April 25, 2013 06:56 by author Scott

This blog cover brief information how to host your WCF service in IIS8 (Windows Server 2012).

Here is the solution.

Server Roles

1. First make sure you have enabled IIS function and .net 3.5 in Features.
For the IIS features, please remember to enable ASP.NET3.5 and ASP.NET 4.5

2. Second, check the IIS Hostable WebCore
3. Finally, I think the most important is this:

Check Application Sever->Web Server (IIS) Support

I have also check the HTTP Activation in Windows Process Activation Service Support, but I do not know if it is required.

For the freatures,

1. Check all items in .NET 3.5
2. Check WCF Service in .NET 4.5

That’s it.

Last but not least, I have register the WCF Service from

C:\Windows\Microsoft.NET\Framework\v3.0\Windows Communication Foundation\ServiceModelReg.exe –i

Run the above in command line.


European IIS Hosting - Amsterdam :: IIS 7 Url Rewrite Rules for SEO and Security

clock December 14, 2012 09:02 by author Scott

With IIS 7 url rewriting and redirecting has never been easier thanks to Microsoft’s Url Rewrite module. The rewriting is done by rules which are specified in the web.config under <system.webserver> element. Using IIS Manager you can use the Url Rewrite gui to create and maintain your rules.

You can also just put the rules directly into the web.config without using the gui. For example:

<system.webserver>
 <rewrite>
 <rules>
 <rule name="xyz">...blah...</rule>
 </rules>
 <rewrite>
</system.webserver>

IIS 7 Url Rewrite WWW

One of the most common needs for SEO is to force your site to use www for all page requests so that search engines will go to www.mydomain.com instead of domain.com. This is very easy to do with IIS 7′s Url Rewrite. Here is the rule:

<rewrite>
<rules>
<rule name=”Redirect to www” patternSyntax=”Wildcard” stopProcessing=”true”>  
<match url=”*” />
<conditions>
<add input=”{HTTP_HOST}” pattern=”abc.com” />
  </conditions>
 <action type=”Redirect” url=”http://www.abc.com/{R:0}” />
</rule>
</rules>
<rewrite>

This works really well and it is a completely seamless experience for your web site visitors.  Here is how the rule looks in the IIS Manager gui.

IIS 7 Url Rewrite HTTP to HTTPS

Probably the 2nd most common use of Url Rewrite is for sites that have SSL certificates installed and need to seamlessly redirect page requests using the certificate for either the entire site or a particular folder. Here is the Url Rewrite rule for redirecting requests on the entire site. You simply detect if the request is not secure and then redirect to the secure channel:

<rewrite>
 <rules>  <rule name="HTTP Redirect to HTTPS" enabled="true" stopProcessing="true">  <match url="(.*)" ignoreCase="false" />  <conditions>  <add input="{HTTPS}" pattern="off" />  </conditions>  <action type="Redirect" url="https://{HTTP_HOST}/{R:1}" appendQueryString="true" redirectType="Permanent" />  </rule>  </rules>  </rewrite>

IIS 7 Url Rewrite HTTP to HTTPS on Subfolder

The example above is great but running your entire site in HTTPS will have a performance impact so you don’t need to do it unless there is a specific business requirement for it. So then we need a rule to redirect requests to HTTPS for just one folder. In this example we’ll use a folder called “/secure”. In this instance we use the same rule as above however now we only want page requests for the “secure” folder. This is done by modifying the “match url” element.

<rewrite>
 <rules>
  <rule name="HTTPS on subfolder" enabled="true">
         <match url="(^secure/.*)" ignoreCase="false" />
         <conditions>
             <add input="{HTTPS}" pattern="off" />
         </conditions>
         <action type="Redirect" url="https://{HTTP_HOST}/{R:1}" appendQueryString="true" redirectType="Permanent" />
     </rule>
 <rules>
 <rewrite>


We’ve covered 3 of the most common uses of IIS 7 Url Rewrite but if you notice the rules above are really for redirecting and not url rewriting.


About HostForLIFE.eu

HostForLIFE.eu is European Windows Hosting Provider which focuses on Windows Platform only. We deliver on-demand hosting solutions including Shared hosting, Reseller Hosting, Cloud Hosting, Dedicated Servers, and IT as a Service for companies of all sizes.

We have offered the latest Windows 2016 Hosting, ASP.NET Core 2.2.1 Hosting, ASP.NET MVC 6 Hosting and SQL 2017 Hosting.


Tag cloud

Sign in