December 10, 2014 07:13 by
 Peter
Peter
The WebAdministration module has a Function called IIS :. It basically acts as a drive letter or an uri protocol. The extremely convenient and makes accessing appPool, site info, and ssl bindings simple. I recently noticed 2 issues with assigning values with the IIS : protocol as well as objects and that is works along with :

StartMode Can’t Be Set Directly
For a few cause, utilizing Set-ItemProperty to line the startMode value directly throws an error. However, in case you retrieve the appPool into your variable and established the value using an = operator, every thing works good.
# https://connect.microsoft.com/PowerShell/feedbackdetail/view/1023778/webadministration-apppool-startmode-cant-be-set-directly
ipmo webadministration
New-WebAppPool "delete.me"
Set-ItemProperty IIS:\AppPools\delete.me startMode "AlwaysRunning" # throws an error
$a = Get-Item IIS:\AppPools\delete.me
$a.startMode = "AlwaysRunning"
Set-Item IIS:\AppPools\delete.me $a # works
Here is the error that gets thrown:
Set-ItemProperty : AlwaysRunning is not a valid value for Int32.
At C:\Issue-PowershellThrowsErrorOnAppPoolStartMode.ps1:6 char:1
+ Set-ItemProperty IIS:\AppPools\delete.me startMode "AlwaysRunning" # throws an e ...
+ ~~~~~~~~~~~~~~~~~~~~~~~~~~~~~~~~~~~~~~~~~~~~~~~~~~~~~~~~~~~~~~~~~~
+ CategoryInfo : NotSpecified: (:) [Set-ItemProperty], Exception
+ FullyQualifiedErrorId :
System.Exception,Microsoft.PowerShell.Commands.SetItemPropertyCommand
CPU’s resetLimit Can’t Immediately Use New-TimeSpan’s Result
I believe the example can show the trouble much better than I will describe it :
# https://connect.microsoft.com/PowerShell/feedbackdetail/view/1023785/webadministration-apppools-cpu-limit-interval-resetlimit-cant-be-set-directly
ipmo webadministration
New-WebAppPool "delete.me"
$a = Get-ItemProperty IIS:\AppPools\delete.me cpu
$a.resetInterval = New-TimeSpan -Minutes 4 # this will throw an error
Set-ItemProperty IIS:\AppPools\delete.me cpu $a
$a = Get-ItemProperty IIS:\AppPools\delete.me cpu
$k = New-TimeSpan -Minutes 4 # this will work
$a.resetInterval = $k
Set-ItemProperty IIS:\AppPools\delete.me cpu $a
And Here is the error that gets thrown:
Set-ItemProperty : Specified cast is not valid.
At C:\Issue-PowershellThrowsErrorOnCpuLimitReset.ps1:8 char:1
+ Set-ItemProperty IIS:\AppPools\delete.me cpu $a
+ ~~~~~~~~~~~~~~~~~~~~~~~~~~~~~~~~~~~~~~~~~~~~~~~
+ CategoryInfo : NotSpecified: (:) [Set-ItemProperty], InvalidCastException
+ FullyQualifiedErrorId : System.InvalidCastException,Microsoft.PowerShell.Commands.SetItemPropertyCommand
The links on every section correspond with bug reports for the problems, thus hopefully they can get looked into.

October 3, 2013 10:48 by
 Ronny
Ronny
There are several ways to enable IIS ISAPI CGI Restrictions. Enabling this feature can be directly in IIS or using Powershell. This section will explain How can enable IIS ISAPI CGI Restrictions with Powershell. Here below is the script for Powershell.

Import-Module webadministration
function Is64Bit
{
[IntPtr]::Size -eq 8
}
function EnableIsapiRestriction($isapiPath){
$isapiConfiguration = get-webconfiguration "/system.webServer/security/isapiCgiRestriction/add[@path='$isapiPath']/@allowed"
if (!$isapiConfiguration.value){
set-webconfiguration "/system.webServer/security/isapiCgiRestriction/add[@path='$isapiPath']/@allowed" -value "True" -PSPath:IIS:\
Write-Host "Enabled ISAPI - $isapiPath " -ForegroundColor Green
}
}
function EnableDotNet40Isapi($systemArchitecture){
$frameworkPath = "$env:windir\Microsoft.NET\Framework$systemArchitecture\v4.0.30319\aspnet_isapi.dll"
EnableIsapiRestriction $frameworkPath
}
function Main(){
if (Is64Bit){
EnableDotNet40Isapi "64"
}
EnableDotNet40Isapi
}
Main
Now IIS ISAPI CGI Restrictions have been active. Happy programming!

September 18, 2013 08:17 by
 Ronny
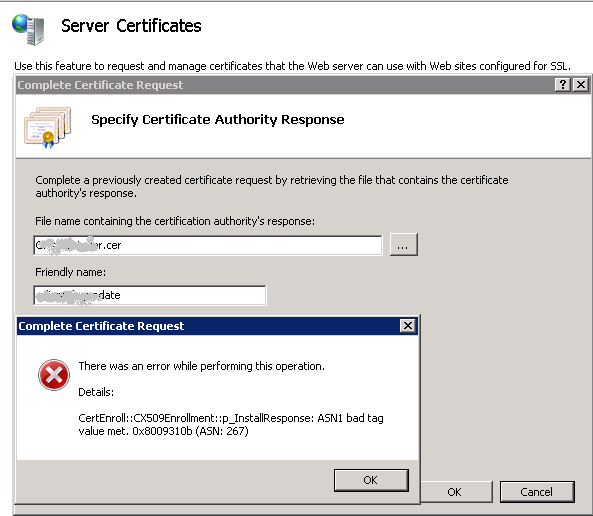
RonnyThis error means that the private key does not match the public key (the .crt file). The keypair is not successfully joined into a working SSL certificate.

Here solution to resolve this error
1. (Start button -> RUN -> Type : MMC)
2. Choose Tab “File”
3. Add/Remove Snap-ins -> certificates and click “Add >”.
4. Select “Computer account” and Finish. OK

5. Personal > Certificates > right-click and select All Tasks > select Import > guide to the .crt file.)
6. Double-click the crt certificate file you just imported -> select the Details tab, scroll all the way down to Thumbprint and highlight Thumbprint.
7. In the lower pane, block and copy all the letters of the thumbprint. Paste the thumbprint characters into notepad. Open the command prompt and run this command: Certutil /?
8. The command you’ll want to run is:
certutil -repairstore my “{PASTE THE CODE }”
9. When you see “CertUtil: -repairstore command completed successfully” the private key will be associated with the .CRT file in the personal store. The certificate should show up in IIS 7.5 under Server Certificates.
10. Now you should be able to assign the SSL certificate to the appropriate website(s).