IIS 7.5 and IIS 8.0 European Hosting

BLOG about IIS 7.5 Hosting, IIS 8.0 Hosting and Its Technology - Dedicated to European Windows Hosting Customer

European IIS 8 Hosting :: How To Set up SmarterMail as an IIS Site in IIS 8

clock December 17, 2013 06:44 by author Patrick

By default, SmarterMail installs a basic web server that allows administrators to start using the application immediately after installation. However, SmarterTools recommends moving to a more robust and secure Web server, such as Microsoft IIS.

Applies to SmarterMail 8 - 11.x
This article covers the following:

  • Disabling the SmarterMail Web server
  • Adding IIS ISAPI components
  • Adding a new application pool for SmarterMail
  • Adding SmarterMail to IIS 8
  • Verifying IIS Settings
  • Updating DNS
  • Testing the site

Disabling the SmarterMail Web Server

These steps will stop and disable the default web server that is included with SmarterMail. This will also have the side-effect of disabling any shortcut for SmarterMail that may be placed on your desktop until you update it with the new URL for the SmarterMail site created in IIS.

  • Click on Start -> Programs -> SmarterTools -> SmarterMail -> Configure SmarterMail Web Server
  • Click on the Stop button
  • Change the Startup Mode to Disabled
  • Click on the Apply button
  • Click the Close button
  • Add IIS ISAPI Components

Follow these sets to add the necessary IIS components

  1. Open up IIS
  2. When prompted Launch Internet Information Services (IIS) Manager
  3. Click on Products tab
  4. Click on Servers
  5. Install required components of: IIS: ASP.NET, .NET Extensibility, ASP, CGI, ISAPI Extensions, ISAPI Filters
  6. Install any other options components
  7. Click Install


Add an Application Pool
Follow these steps to add an application pool specifically for SmarterMail:

  • Open Internet Information Services (IIS) Manager
  • Right click on Application Pools from the tree view and choose Add Application Pool
  • Name the new application pool SmarterMail, or something similarly easy to identify
  • Set the .Net Framework Version to v4.0.x
  • Set the Application Pools Managed Pipeline to 'Integrated'
  • Make sure "Start application pool immediately" is checked
  • Click OK

Add SmarterMail to IIS 8
Follow these steps to add SmarterMail to IIS 8:

  • Open Internet Information Services (IIS) Manager
  • Click on your ServerName, and on the right side, under IIS, double-click ISAPI and CGI Restrictions
  • Verify that ASP.NET v4.0 is allowed (If not, right click on ASP.NET v4.0.x and select Allowed)
  • On the left side of the page, right click on Sites in the tree view and choose Add Website
  • Name the site SmarterMail
  • If you created an Application Pool name other than SmarterMail, click Select and choose the correct Application Pool
  • For the physical path, browse to the SmarterMail -> MRS folder. The default location is C:\Program Files (x86)\SmarterTools\SmarterMail\MRS
  • For Binding, choose an IP address to use for Webmail. If this IP address is shared with another Web site, you will need to use a different port or Host Headers. For more information about using Host headers, refer to the IIS documentation
  • Make sure "Start Web site immediately" is checked
  • Click OK

Verify IIS Settings
Follow these steps to verify the IIS settings. Please read each item carefully.

  1. In IIS Manager, click on your ServerName
  2. Under IIS, double click ISAPI and CGI Restrictions
  3. Verify that ASP .NET v4.0 is allowed. If it is not, right-click on ASP .NET v4.0 and select Allowed
  4. In the tree view, click Sites
  5. Expand (or double click) the SmarterMail site
  6. Click on the App_Themes folder
  7. Under IIS, double click HTTP Response Headers
  8. Under the Action menus, click Set Common Headers
  9. Enable the Expire Web content setting
  10. Click OK
  11. Click on Application Pools in the tree view
  12. Right click on the SmarterMail application pool and select Advanced Settings
  13. Under the Process Model heading, ensure the the Identity is set to the NetworkService account
  14. From the Start menu, open Administrative Tools and select Services, then verify that the World Wide Publishing Service is running


European IIS 8 Hosting - How to solve Could not load type ‘System.ServiceModel.Activation.HttpModule’

clock December 10, 2013 04:55 by author Patrick

Do you ever encountered an error if you deploying WebSocket server application which targeted .NET 4.5 to Windows Server 2012 plus IIS 8? Yes, it was an exception shown in browser whenever tried to open a web page. The exception said:


This problem is: the default configuration in applicationHost.config (in C:\Windows\System32\inetsrv\config) declared two conflicted modules and two conflicted handlers:


As we know, applicationHost.config contains the root settings for all web sites and web applications on the server. Therefore, any web application would have all the four conflicted modules and handlers loaded by default. “ServiceModel” and “svc-Integrated” were for .NET Activation 3.x while “ServiceModel-4.0” and “svc-Integrated-4.0” were for .NET Activation 4.x. Unfortunately, the 3.x items were declared before the 4.x items. That was why the exception occurred for a .NET 4.x web application!

Then how did such a situation happen? On Windows Server 2008, it could happen when you install .NET 3.x framework or IIS 7.5 with Activation features after .NET framework 4.x is installed. However, on Windows Server 2012, it always happens when you install .NET framework 3.x with Activation features.


Microsoft officially announced the solution (http://support.microsoft.com/kb/2015129) for Windows Server 2008 plus IIS 7.5: manually running “aspnet_regiis.exe /iru” for .NET framework 4.x (in C:\Windows\Microsoft.NET\Framework\v4.0.30319 or C:\Windows\Microsoft.NET\Framework64\v4.0.30319). However, aspnet_regiis.exe is not allowed to run for IIS 8.

The final solution was to delete the 3.x module and handler from IIS manager. You could delete them at the application or site level if you want to keep them in applicationHost.config. But if you wanted to delete them from applicationHost.config. So you should did the following steps:

1.      In IIS manager, click the machine name node.

2.      In “Features View”, double-click “Modules”.

3.      Find “ServiceModel” and remove it.

4.      Go back to the machine name node’s “Features View”, double-click “Handler Mappings”.

5.      Find “svc-Integrated” and remove it.

Now everything works well.


SSL Installation issue on Windows 2008r2: How to Fix a “CertEnroll::CX509Enrollment::p_InstallResponse: ASN1” Certificate Private Key Error

clock September 18, 2013 08:17 by author Ronny

This error means that the private key does not match the public key (the .crt file).  The keypair is not successfully joined into a working SSL certificate.


Here solution to resolve this error

1. (Start button -> RUN -> Type : MMC)

2. Choose Tab “File”

3. Add/Remove Snap-ins -> certificates and click “Add >”.

4. Select “Computer account” and Finish. OK


5. Personal > Certificates >  right-click and select All Tasks > select Import > guide to the .crt file.)

6. Double-click the crt certificate file you just imported -> select the Details tab, scroll all the way down to Thumbprint and highlight Thumbprint.

7. In the lower pane, block and copy all the letters of the thumbprint.  Paste the thumbprint characters into notepad.  Open the command prompt and run this command: Certutil /?

8. The command you’ll want to run is:

certutil -repairstore my “{PASTE THE CODE }”

9. When you see “CertUtil: -repairstore command completed successfully” the private key will be associated with the .CRT file in the personal store. The certificate should show up in IIS 7.5 under Server Certificates.

10. Now you should be able to assign the SSL certificate to the appropriate website(s).


European IIS 7.5 Hosting - Amsterdam :: Hosting Applications with IIS 7.5 (Chapter 3)

clock September 10, 2013 05:50 by author Ronny

After we read the post about Istalling and Using New IIS Services, now we continue with Hosting Applications with IIS 7.5, this is a continuation of my previous post titled Using New IIS Services. The IIS 7 .5 implementation in Windows Server 2008 R2 includes some major enhancements in its application hosting capabilities, as described in the following sections.

Running ASP.Net Applications

One of the most significant improvements in IIS 7.5 is that it now supports ASP .NET applications on computers running the Server Core installation of Windows Server 2008 R2. Server Core is a stripped-down version of the Windows Server operating system that eliminates many roles and features and most of the graphical interface.  One of the features not available in Windows Server 2008 Server Core is Microsoft .NET Framework, and IIS requires this fea- ture to support ASP .NET.  Because ASP .NET is one of the most commonly used development environments for Web applications today, this was a major shortcoming.  However, Windows Server 2008 R2 provides support for .NET Framework 2.0, 3.0, 3.5.1, and 4.0 in Server Core; IIS 7.5 can therefore host ASP .NET applications.

The ASP .NET implementation in IIS 7 .5 also now supports different Common Language Runtime (CLR) versions, enabling administrators to switch versions without modifying the underlying IIS infrastructure.  Microsoft has also incorporated this capability into Windows Server 2008 Service Pack 2. You can specify different CLR settings for individual application pools by creating custom ASPNET .config files. To use these files, you add code specifying their locations to the pool’s applicationHost .config file, as in the following example:

<applicationPools>
<add name=”MyApplicationPool” CLRConfigFile=”c:\InetPub\CLRConfigFile.txt”   />
</applicationPools>

IIS 7.5 also includes a new application auto-start feature in its ASP .NET 4.0 implementation. This feature enables an administrator to configure an application pool to start up automatically, while temporarily not processing HTTP requests.  This allows applications requiring extensive initialization to finish loading the data they need or to complete other processes before they begin accepting HTTP requests.  To use this feature, you must add code like the following to the pool’s applicationHost .config file:

<applicationPools>
<add name=”MyApplicationPool” startMode=”AlwaysRunning”   />
</applicationPools>

FastCGI Support in IIS 7.5

FastCGI is a language-independent extension to the Common Gateway Interface (CGI) that enables Web servers to execute applications more quickly and efficiently.  Unlike CGI, which creates a separate process for each incoming request, FastCGI uses a single process to handle multiple requests. IIS uses FastCGI to support the popular PHP scripting language, which makes it one of the more important features of the product.

IIS 7.5 includes a number of enhancements to its FastCGI support, including the following:

  • FastCgI configuration in IIS Manager - The graphical FastCGI administration interface, previously available only in Administration Pack for IIS 7.0, is now fully integrated into the Internet Information Services (IIS) Manager console, as shown in the following graphic.
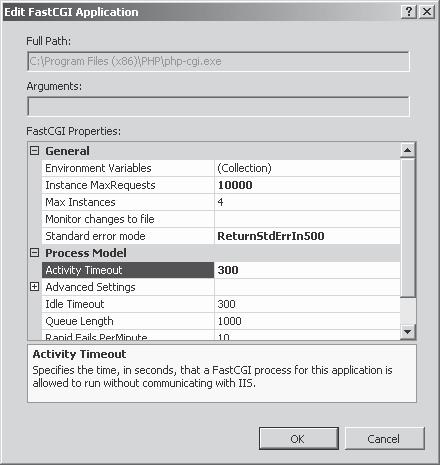
  • Real-time tuning - In the Edit FastCGI Application dialog box, the Max Instances property specifies the maximum number of FastCGI processes that IIS can launch for each application pool. This equates to the maximum number of FastCGI requests that IIS can process simultaneously for that application. The default value is 4, but in IIS 7.5, if you change the value to 0, the FastCGI module automatically shifts the number of requests up and down, based on the current system load and the number of queued requests.
  • Configuration file monitoring - In the Edit FastCGI Application dialog box, the Monitor Changes To File property enables you to specify the path to a configuration file, such as Php .ini, for each application. When IIS 7.5 detects a change to the specified file, it recycles the FastCGI processes for that application.
  • New error-handling options - IIS 7.5 now provides a choice of four FastCGI error handling options, which you configure in the Edit FastCGI Application dialog box using the Standard Error Mode property. These options enable you to specify what error information IIS logs and how much of it gets returned to users. You can also configure the property to terminate the FastCGI process when an error occurs.
  • Failed request tracing - In IIS 7.5, the FastCGI module can send the information in a process’ STDERR stream to the Failed Request Tracing (FREB) logs maintained by IIS for debugging purposes (as long as Failed Request Tracing is enabled).

Using Managed Service accounts

IIS 7.5 can use the managed service accounts—now supported by Active Directory Domain Services in Windows Server 2008 R2—as service identities, thus eliminating problems caused by expired application pool passwords. The Application Pool Identity is a concept first introduced in IIS 7 .0 which IIS uses to set permissions for an application pool’s configuration file. You can also use it for anonymous authentication in place of the IUSR account. In IIS 7.5, the Application Pool Identity is a man- aged service account, and IIS now uses it to run the W3wp .exe worker process in place of the Network Service account introduced in Windows Server 2003.


About HostForLIFE.eu

HostForLIFE.eu is European Windows Hosting Provider which focuses on Windows Platform only. We deliver on-demand hosting solutions including Shared hosting, Reseller Hosting, Cloud Hosting, Dedicated Servers, and IT as a Service for companies of all sizes.

We have offered the latest Windows 2016 Hosting, ASP.NET Core 2.2.1 Hosting, ASP.NET MVC 6 Hosting and SQL 2017 Hosting.


Tag cloud

Sign in