IIS 7.5 and IIS 8.0 European Hosting

BLOG about IIS 7.5 Hosting, IIS 8.0 Hosting and Its Technology - Dedicated to European Windows Hosting Customer

European IIS 8 Hosting - HostForLIFE.eu :: Dynamic Compression Issue in IIS 8.5

clock December 6, 2019 11:49 by author Peter

Windows Server 2012 R2 comes with IIS 8.5, and in this release an issue has been found in relation to the Dynamic Compression module.  The module sets the “Vary” header which is used to specify caching properties that the browser uses to determine whether the response should be cached or not. 

In IIS 8.0 and earlier, the Dynamic Compression module was overwriting the Vary header with the value “Accept-Encoding”, and as it happens this is the correct value to ensure that dynamic content is correctly cached – but – according to IIS it should be appending this value to the existing value and not overwriting it.

As it happens, this was supposed to be fixed in IIS 8.5 but the fix appears to be broken.  In IIS 8.5 (which ships with Windows Server 2012 R2) the Vary header is being set to “*” and the “Accept-Encoding” from the Dynamic Compression module is not appended.  The result of this is that no dynamic content is being cached by the browser.

Workaround

Thankfully there is an easy workaround in IIS 8.5 for this:

1. Select an IIS site, and go to Configuration Editor

2. Select system.web/caching/outputCache section, then set the omitVaryStar property to true

Setting this value results in the Vary header being returned with a value of “Accept-Encoding” and the browser then caches the dynamic content.


European IIS Hosting - HostForLIFE.eu :: How to Create Multiple 301 Redirects

clock December 15, 2016 08:33 by author Scott

Some of our clients sometimes ask about how to create URL Rewrite on their site. Previously, we have written about how to redirect HTTP to HTTPS in IIS. In this tutorial, we will advise how to create multiple redirection with a URL Rewrite Map.

URL Rewrite Module with IIS 7/IIS 8

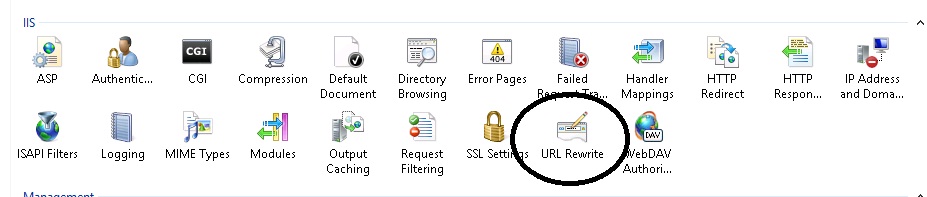
Now there’s an easier solution, and one that offers better performance.  Starting with IIS 7 one can implement different kinds of url rewriting and redirecting with ease by using the URL Rewrite Module. The various rules can be configured using the IIS 7 Manager GUI or by directly editing the web.config. To open the URL Rewrite Module simply double click the URL Rewrite icon on your site properties as shown below.

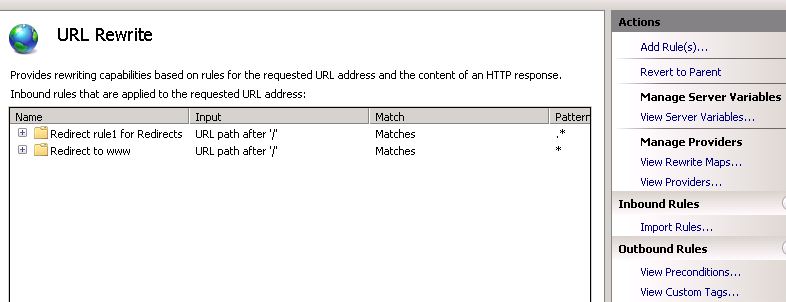
From there you will be able to maintain your existing rules or add new ones as seen in this picture.

This is a pretty easy way to create server-side rules for rewriting and redirecting, but what happens when you have 30 or 40 legacy URLs that need to be redirected to new pages? Do you have to enter each one manually? Of course not. The solution to that is to use a URL Rewrite Map.

URL Rewrite Map

By using a URL Rewrite Map it has never been easier to create and maintain multiple 301 redirects for different pages on your web site.  The rewrite rules are stored in the <system.webServer> section of your web.config so you can quickly make changes as needed.

Here is all the code you need to accomplish this:

<system.webServer>
<rewrite>
<rewriteMaps>
<rewriteMap name=”Redirects”>
<add key=”/test.aspx” value=”/test2.aspx” />
<add key=”/aboutus.aspx” value=”/about” />
</rewriteMap>
</rewriteMaps>
<rules>
<rule name=”Redirect rule1 for Redirects”>
<match url=”.*” />
<conditions>
<add input=”{Redirects:{REQUEST_URI}}” pattern=”(.+)” />
</conditions>
<action type=”Redirect” url=”{C:1}” appendQueryString=”false” />
</rule>
</rules>
</rewrite>
</system.webServer>

In the example above I’m performing a 301 redirect on the test.aspx file to test2.aspx file. There’s also a 301 redirect for the aboutus.aspx file to folder called /about, however, in this case it’s important to note that the /about folder will also need a default page or else a 404 error will result.

As you add more URLs to your Rewrite Map you’ll notice that your web.config can become a bit cluttered. The solution to this will be to store the redirect rules in an external file. Let’s call this file myrewritemaps.config. This file will now contain this code block:

<rewriteMaps>
<rewriteMap name=”Redirects”>
<add key=”/test.aspx” value=”/test2.aspx” />
<add key=”/aboutus.aspx” value=”/about” />
</rewriteMap>
</rewriteMaps>

In your web.config you add the following line of code under the <rewrite> section referencing the external config file:

<rewriteMaps configSource=”myrewritemaps.config” />

Your web.config will now look nice and clean like this:

<system.webServer>
<rewrite>
<rewriteMaps configSource=”myrewritemaps.config” />
<rules>
<rule name=”Redirect rule1 for Redirects”>
<match url=”.*” />
<conditions>
<add input=”{Redirects:{REQUEST_URI}}” pattern=”(.+)” />
</conditions>
<action type=”Redirect” url=”{C:1}” appendQueryString=”false” />
</rule>
</rules>
</rewrite>
</system.webServer>

There is no real limit on how many URLs can be configured for redirecting with the URL Rewrite Map.  You should perform regular search engine analysis to see when the new URLs have been picked up. Once the old URL is no longer indexed and traffic has dropped off you could remove it from your map.


European IIS 8.5 Hosting - HostForLIFE.eu :: How to Host Different SSL with 1 IP in IIS

clock October 7, 2016 18:56 by author Scott

That has been a question we have come across frequently. Before IIS 8, you could host multiple sites needing SSL on a single IP address if the sites utilized the same SSL certificate or used a wildcard SSL certificate.  A wildcard certificate was only beneficial if you needed SSL on the subdomain level of a current site/domain. But what if you had sites with different names? Well, you could get a Subject Alternative Names (SAN) SSL certificate.  This SSL certificate would allow you to protect multiple sites with a single SSL certificate. The last available option prior to IIS 8 required setting each additional SSL site on the same IP address but with a different SSL port number. This would allow you to utilize each site’s/domain’s SSL on the same IP address as another site.  By default, SSL certificates utilize port 443 for secure communication. This port doesn’t need to be specified in the URL since this is the standard port. When you use a different port number for SSL you will be required to add the non-standard SSL port number in the URL in order for it to work.  As you can imagine, this is not the way you want to run a public site. How would a user know to enter the port number and it’s not a common step that users are familiar with doing when browsing a site.

Adding an additional IP address to host another site needing SSL is the common method used but sometimes this isn’t an option for some people. With the inception of IIS 8 on Windows Server 2012, a new feature called Server Name Identification (SNI) was added. This feature offers an easier solution to hosting multiple sites that have a different or individual SSL on a single IP address. This feature is included in IIS 8 by default and doesn’t require the installation of any additional features to begin using it. Below, we will walk through the steps involved with configuring SNI. One thing to note with implementing SNI for your SSL solution, it will not work for those users running Internet Explorer on Windows XP. If your server has multiple IP addresses, you can implement SNI for some sites in addition to assigning individual sites to a single IP address for SSL. Both methods will work along side each other on different IP addresses without issue.

Steps:

1)  One of the first things you will need to do is import the SSL certificates for each site on the server if this hasn’t been done already
2)  Next, open IIS 8 Manager and add your first site that will need SSL
  a.  If the first site is already in place, proceed to step the next step
3)  After the site is added select the site and click Bindings… under the Actions menu pane on the right

4)  Click Add
  a.  Select https for the Type
  b.  You can leave the IP address to “All Unassigned” or choose the IP address you want to use
(If you have multiple IP’s on the server you will want to specify the one you want to use for SNI)
  c.  Enter your site/domain name for Host name
  d.  Check the box for “Require Server Name Indication”
  e.  Select the SSL certificate for the site from the drop down box
  f.  Click OK

5)  Create the second site and add the SSL binding following the steps below
6)  Select Bindings and click Add
  a.  Select https for the Type
  b.  You can leave the IP address to “All Unassigned” or choose the IP address you want to use
   (If you have multiple IP’s on the server you will want to specify the one you want to use for SNI)
  c.  Enter your site/domain name for Host name
  d.  Check the box for “Require Server Name Indication”
  e.  Select the SSL certificate for the site from the drop down box

7)  Click OK to complete the setup

That’s all that needs to be done.  Test SSL for the site to make sure each site is working properly.  If you have additional sites that need SSL added, you can continue following the steps above for adding the SSL binding for each new site.


About HostForLIFE.eu

HostForLIFE.eu is European Windows Hosting Provider which focuses on Windows Platform only. We deliver on-demand hosting solutions including Shared hosting, Reseller Hosting, Cloud Hosting, Dedicated Servers, and IT as a Service for companies of all sizes.

We have offered the latest Windows 2016 Hosting, ASP.NET Core 2.2.1 Hosting, ASP.NET MVC 6 Hosting and SQL 2017 Hosting.


Tag cloud

Sign in