Some of our clients sometimes ask about how to create URL Rewrite on their site. Previously, we have written about how to redirect HTTP to HTTPS in IIS. In this tutorial, we will advise how to create multiple redirection with a URL Rewrite Map.
URL Rewrite Module with IIS 7/IIS 8
Now there’s an easier solution, and one that offers better performance. Starting with IIS 7 one can implement different kinds of url rewriting and redirecting with ease by using the URL Rewrite Module. The various rules can be configured using the IIS 7 Manager GUI or by directly editing the web.config. To open the URL Rewrite Module simply double click the URL Rewrite icon on your site properties as shown below.

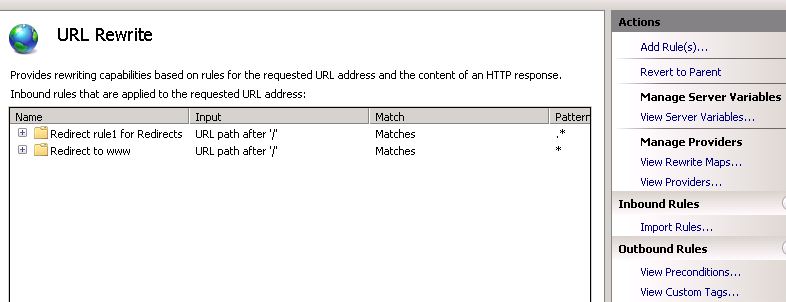
From there you will be able to maintain your existing rules or add new ones as seen in this picture.

This is a pretty easy way to create server-side rules for rewriting and redirecting, but what happens when you have 30 or 40 legacy URLs that need to be redirected to new pages? Do you have to enter each one manually? Of course not. The solution to that is to use a URL Rewrite Map.
URL Rewrite Map
By using a URL Rewrite Map it has never been easier to create and maintain multiple 301 redirects for different pages on your web site. The rewrite rules are stored in the <system.webServer> section of your web.config so you can quickly make changes as needed.
Here is all the code you need to accomplish this:
<system.webServer>
<rewrite>
<rewriteMaps>
<rewriteMap name=”Redirects”>
<add key=”/test.aspx” value=”/test2.aspx” />
<add key=”/aboutus.aspx” value=”/about” />
</rewriteMap>
</rewriteMaps>
<rules>
<rule name=”Redirect rule1 for Redirects”>
<match url=”.*” />
<conditions>
<add input=”{Redirects:{REQUEST_URI}}” pattern=”(.+)” />
</conditions>
<action type=”Redirect” url=”{C:1}” appendQueryString=”false” />
</rule>
</rules>
</rewrite>
</system.webServer>
In the example above I’m performing a 301 redirect on the test.aspx file to test2.aspx file. There’s also a 301 redirect for the aboutus.aspx file to folder called /about, however, in this case it’s important to note that the /about folder will also need a default page or else a 404 error will result.
As you add more URLs to your Rewrite Map you’ll notice that your web.config can become a bit cluttered. The solution to this will be to store the redirect rules in an external file. Let’s call this file myrewritemaps.config. This file will now contain this code block:
<rewriteMaps>
<rewriteMap name=”Redirects”>
<add key=”/test.aspx” value=”/test2.aspx” />
<add key=”/aboutus.aspx” value=”/about” />
</rewriteMap>
</rewriteMaps>
In your web.config you add the following line of code under the <rewrite> section referencing the external config file:
<rewriteMaps configSource=”myrewritemaps.config” />
Your web.config will now look nice and clean like this:
<system.webServer>
<rewrite>
<rewriteMaps configSource=”myrewritemaps.config” />
<rules>
<rule name=”Redirect rule1 for Redirects”>
<match url=”.*” />
<conditions>
<add input=”{Redirects:{REQUEST_URI}}” pattern=”(.+)” />
</conditions>
<action type=”Redirect” url=”{C:1}” appendQueryString=”false” />
</rule>
</rules>
</rewrite>
</system.webServer>
There is no real limit on how many URLs can be configured for redirecting with the URL Rewrite Map. You should perform regular search engine analysis to see when the new URLs have been picked up. Once the old URL is no longer indexed and traffic has dropped off you could remove it from your map.
